 Today in Tech
Digital Photography 101: How to photograph meteor showers
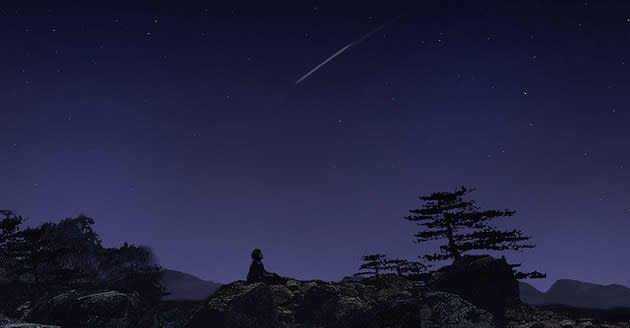
In an earlier edition of our low-light photography series, we talked about how to photograph the moon and stars. Today, with the Perseid meteor shower gearing up for a lovely showing, we'll talk specifically about how to get great photos of the so-called shooting stars and other celestial events.
What's in a name?
Wondering what's up with shooting stars? Just in case you're not an astronomy junkie like some of us here at Tecca, here's a brief explanation. What we call shooting stars are actually meteors, which are really nothing but tiny bits of space dust burning up in our atmosphere. The Perseids are associated with the comet Swift-Tuttle; the Earth passes through ice and debris from the comet's tail every summer, and that debris lights up our night sky near the constellation of Perseus, thus giving the event its name.
Where to look and what to expect
What you see during a meteor shower depends on where you are on the planet, the weather, and light pollution. The best places to observe and photograph the event are far away from cities and other sources of artificial light. While you can see meteors even in cities, the techniques to photograph them are extremely difficult beneath anything but very dark skies.
Check the weather forecast before you go; a few clouds shouldn't deter you from going out with your camera, but rain or a solidly overcast sky unfortunately mean you should probably just go back to bed.
Shooting shooting stars
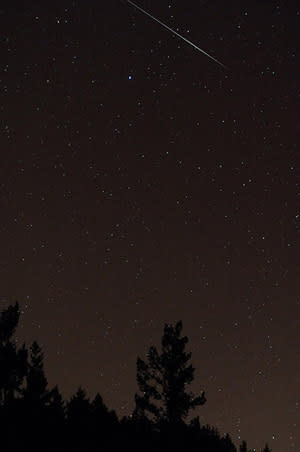
As with most low-light photography, shooting a meteor shower definitely requires a tripod and shutter release cable or remote control (though you could also use the self-timer to eliminate camera shake). Make sure you charge your camera's battery fully before you go, and bring extras if you can. A fast, wide-angle lens is your best bet — 21mm f/2.8 or faster will give you the best results. Since there's no way to predict exactly where the meteors will fall, the wider your lens, the more sky you'll get in your photo and the higher the chance you'll catch a shooting star.
There are two schools of thought about ISO. Some say to use the highest ISO you can, so that you can use a shorter exposure time and thus eliminate star trails. But I've found that setting your ISO between 100 and 400 is the best combination of exposure times and less graininess. The faster your lens, the lower the ISO you can reasonably use. Use an aperture a stop or two up from the widest your lens will go; this will let you use a longer shutter speed without letting in too much ambient light.
Shutter speed math
The question of how long a shutter speed to use is somewhat complicated and requires a little bit of math. Don't worry, though — it's a simple equation!
The issue is that you want to use a slow enough shutter speed to capture a good number of meteor streaks, but not so slow that the stars themselves appear as streaks. We all know the earth rotates, but it can be a bit surprising how little time it takes for that rotation to show up in our night sky photographs. For a very long exposure, this can be an intentional artistic choice; but usually for photos of meteors, we prefer that the stars appear as pinpoints of light, and the only streaks are those of the meteors themselves.
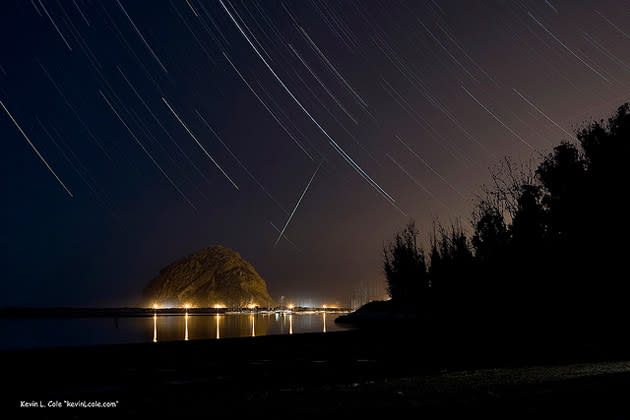
The simplified formula for a 35mm camera is 600 / focal length = maximum exposure time. So if you're using a 21mm lens, that would be 600/21 = 28.5, which means that any exposures of more than 28.5 seconds will start showing the stars as streaks. But unless you're watching a really impressive meteor storm (or you're very lucky), you probably won't capture many meteors during those 28 seconds.
There are two solutions to this problem. On the one hand, you could just keep taking 28-second exposures one after the other and hope that eventually you'll capture a meteor or two. On the other hand, you could use a much longer exposure, during which the Earth's rotation will give you some lovely intentional star trails and any meteors will appear as streaks atop the star trails.

Stay up late and aim high
Meteors can appear anywhere in the night sky, but during specific meteor shower events, they will tend to cluster around a single point in the sky called the radiant. For the Perseids, the radiant is in the constellation Perseus, which rises in the northeastern sky after midnight. Aim your camera toward this point, but not directly at it — about 45 degrees to one side will give you the highest chance of catching the most meteors.
Aside from light pollution, the other problem that might make photographing this year's Perseids difficult is the moon, which will be nearly full on August 13 as the Perseids are at their peak. To get the best results, aim your camera at the area of the sky directly opposite the moon. Make sure you turn off your camera's auto-focus, and manually set the focus to infinity, so your stars are sharp!
Keep an eye on the sky
The Perseid isn't the only meteor shower of the year, so if you miss tomorrow's show, there will be other opportunities. Some of the most well-known showers occur in late fall and early winter. The Leonids occur around November 17 each year and sometimes produce what's known as a meteor storm, with thousands of meteors per hour. The Geminids occur a month later in mid-December. The Earthsky website is a great resource to help you figure out where and when to see these and other celestial events.
Above all, be patient! Meteors are impossible to predict, and it takes a great deal of luck to capture them on digital film. Don't be discouraged if you take a hundred photos of the empty sky — if you keep trying, eventually you'll catch that one beautiful falling star!
[Image credits: Dimka, Ed Sweeney, Kevin Cole, NASA]
Story by Katherine Gray
More from Tecca:
