G'MIC: An incredibly powerful filtering system for GIMP
I use GIMP every day. I use it to create my book covers, article graphics, and much more. Because of this, I strive to get as much power from the tool as possible. So, the day I stumbled upon G'MIC was a happy accident that I'll never forget.
What is G'MIC, you ask? It stands for Grey's Magic for Image Computing, and it's an easy-to-use GIMP plugin that offers a ton of pre-defined image filters and effects. The plugin is also highly customizable, with the ability to set favorites and even add your own filters.
With G'MIC, you'll find hundreds of possible filters to choose from, each of which can be tweaked to meet your needs. But before you can use G'MIC, you have to install it, because it's not there by default.
Installation
If you're using Linux, you can install G'MIC by simply searching for gmic in your software center (such as the Ubuntu Software Center or Synaptic). For the Windows platform, download the G'MIC installer, double-click it, and walk through the standard installation process.
After the plugin is installed, you'll find it located in Filters | G'MIC. Simply click on it to begin using the plugin.
Usage
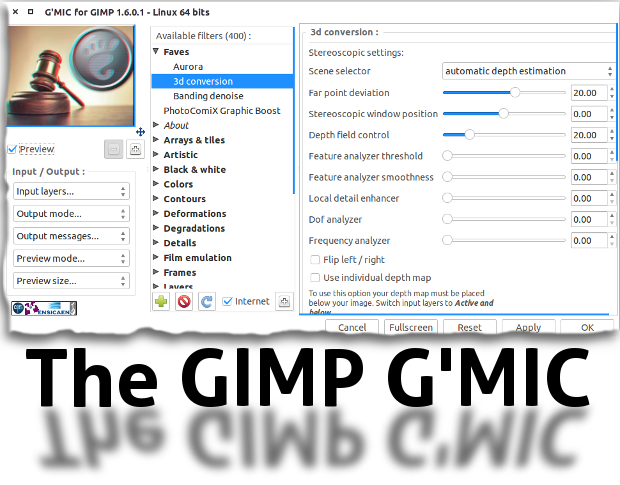
You use G'MIC like you do any filter -- the main difference is that instead of opening a specific filter window, it opens up a window where you can pick through any of the pre-defined filters (Figure A).
Figure A
The G'MIC plugin in action.
Now, the fun begins -- combing through the massive list of filters to find what you need to make that image sing. Apply filters like:
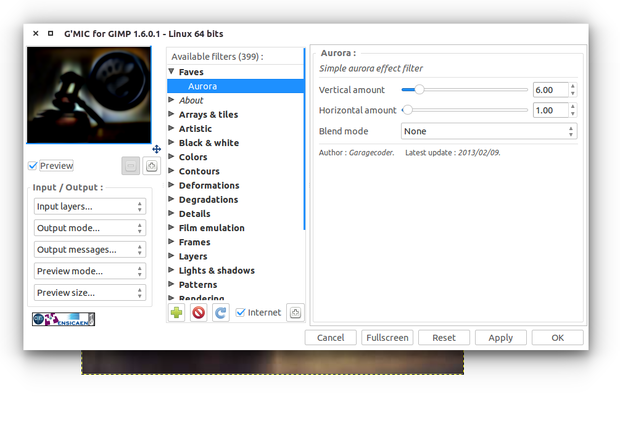
Aurora
Bokeh
Fractalize
Graphic Novel
Morphology Painting
Photo Illustration
Warhol
Charcol
Pencil portrait
Abstraction
Curves
Gradient RGB
3D conversion
Stereo image
And much, much, much more (399 default filters are included).
If you find the list a bit daunting, fear not -- you can aid yourself by adding those filters you use most to the favorites. To do this, follow these steps:
Open up G'MIC
Search through the filter listing to find the filter to add
Select the filter
Click the left plus sign [+] (under the available filters listing)
Once you've added a filter to your favorites, you'll find it in the Faves entry at the top of the Available filters. That will save you from having to remember, for example, which category the Soft glow animation is in.
Unfortunately, creating your own G'MIC filters isn't easy. In fact, it requires you to manually create a ~/.gmic file in (Linux) or %APPDATA%/gmic (Windows). A valid G'MIC file would look like:
#########FOR#GMIC#1.4.7.x############################# #@gimp PhotoComiX Graphic Boost : photocomix_boost, photocomix_boost # #here unsharp controls #@gimp : sep = separator () #@gimp : note = note("Unsharp Mask controls" ) #@gimp : Radius = float(1.25,0,20 ) #@gimp : Darken = float(1.50,0,10 ) #@gimp : sep = separator () #@gimp : note = note("BW_Pencil Controls") #here bw_pencil controls #@gimp : Pencil Size = float(0.15,0,4) #$3 #@gimp : Pencil Amplitude = float(14,0,200) #$4 # Do you wish to Smooth the pencil component ? #@gimp : sep = separator () #@gimp : Activate "Pencil Smoother" = bool(false) #$5 #@gimp : note = note(" If unchecked the 3 sliders below are disabled ") #if true this the options #@gimp : Pencil Smoother Sharpness = float(0.5,0,2) #$6 #@gimp : Pencil Smoother Edge Protection = float(0.45,0,1) #$7 #@gimp : Pencil Smoother Smoothness = float (0.78,0,10) #$8 #@gimp : sep = separator () # here options to merge #@gimp : note = ("Merging Options") #@gimp : Merging Option = choice(Hard Light, Multiply, Soft light , Color Burn ,Darken ,Stamp, 0verlay, Value) #$9 #@gimp : Opacity = float(1,0,1) #$10 #@gimp : sep = separator () #@gimp : Add Painter's Touch = bool(true) #$11 #@gimp : note = note("If unchecked the 3 sliders below are disabled") #@gimp : sep = separator () #@gimp : Painter's Touch Sharpness = float(0.5,0,2) #$12 #@gimp : Painter's Edge Protection Flow = float(0.45,0,1) #$13 #@gimp : Painter's Smoothness =float(0.78,0,10) #$14 photocomix_boost : -gimp_unsharp 1,$1,30,3,0,$2,0.40,1,0,0,0 --gimp_pencilbw $3,$4,0,0,0 -if {$5==0} -gimp_do_nothing[1] -elif {$5==1} -gimp_anisotropic_smoothing[1] 60,$6,$7,$8,1.1,0.8,30,2,0,1,1,0,1,0 -endif -if {$9==0} -gimp_compose_hardlight[1,0] $10 -elif {$9==1} -gimp_compose_multiply[1,0] $10 -elif {$9==2} -gimp_compose_softlight[1,0] $10 -elif {$9==3}-gimp_compose_colorburn[1,0] $10 -elif {$9==4} -gimp_compose_darken[1,0] $10 -elif {$9==5} -gimp_compose_stamp[1,0] $10 -elif {$9==6} -gimp_compose_overlay[1,0] $10 -elif {$9==7} -gimp_compose_value[1,0] $10 -endif -if {$11==0} -gimp_do_nothing -elif {$11==1} -gimp_anisotropic_smoothing 60,$12,$13,$14,1.1,0.8,30,2,0,1,1,0,1,0 -endif ########################################The effect of the above filter is illustrated in Figure B.
Figure B

The PhotoComix Boost filter.
Clearly, you need some skills to create a G'MIC filter. To learn more about this process, take a look at the official G'MIC Scripting Tutorial.
If you're looking for the fastest, most powerful means of extending GIMP, look no further than the G'MIC filter plugin. This plugin will bring more features and flexibility to the flagship open-source image editor than you thought possible.
Do you grok and rock the GIMP? If so, share your stories.
