
How to install Roundcube webmail on OS X Server
In a previous article, I covered the steps on how to setup and configure the Mail service in OS X Server. While this included the steps to get up and running with email services, it did not address one missing feature of OS X Server's Mail service -- webmail.
Apple dropped native support for webmail several versions prior, and while it's arguable that most end users access email from mobile devices these days, there are still times when webmail is important, perhaps even a necessity.
Luckily, since OS X Server confirms to industry standards -- due to it UNIX roots -- using the Websites service to configure a webmail client and host it from an Apple server is similar to hosting any other website, give or take a few configuration steps.
Several webmail clients exist that address this need, but Roundcube is open source and one of the simplest to configure. Additionally, it's very well documented, and there's a strong community of supporters to address most of the issues you might encounter while using Roundcube.
Before jumping to the setup and configuration, let's first review the requirements necessary to support Roundcube.
Broadband internet access (Ethernet preferred)
Registered Domain Name
Static IP address (optional, but highly recommended)
3rd-party SSL certificate (optional for internal messaging but highly recommended for external messaging)
Authoritative DNS with forward and reverse lookup records
Directory Services (or golden triangle)
FQDN set as host name (optional for internal messaging but highly recommended for external messaging)
The following Apple OS X Server services configured and running:
User accounts created for email access
Roundcube complete installer (stable download)
After verifying that all the requirements have been met, you can begin installing and configuring Roundcube webmail on your server.
I. Configuring Websites to host Roundcube webmail
Follow these steps to configure Websites to host Roundcube webmail:
Launch Server.app from the Applications folder.
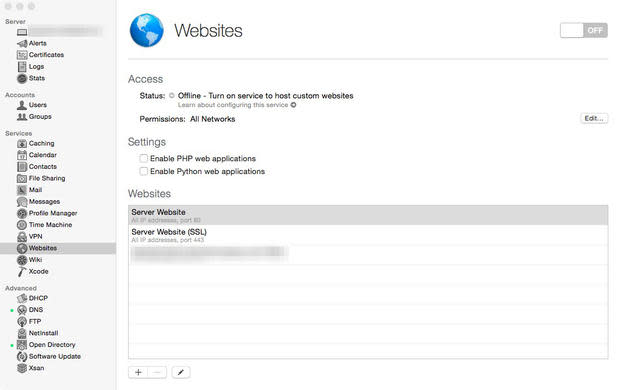
Select Websites from the Services pane (Figure A).
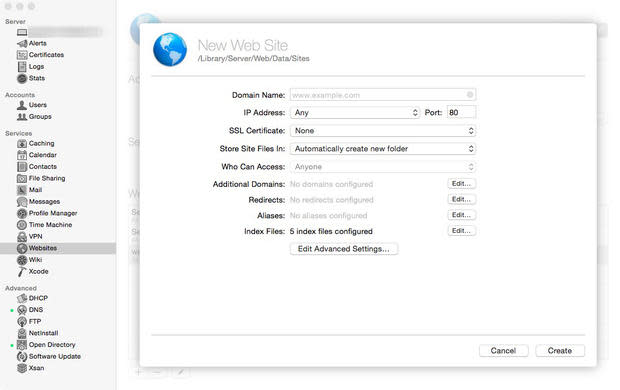
Figure AFigure A Click the plus sign [+] to add a new* domain entry to host. In the test field next to Domain Name, enter the FQDN of the website you wish to host. Next to IP Address and Port, enter the static IP address and port number that will be used to connect to this domain. If encrypting traffic with a self-signed or 3rd-party SSL certificate, select it from the drop-down menu as well. Keep in mind the port number might change automatically when using SSL. Websites will, by default, store the site files in the predefined location of /Library/Server/Web/Data/Site. If you wish to change the location, you may do so by selecting Other.... from the drop-down menu next to Store Site Files In, and manually navigate to the chosen path. By default, the folder will automatically be titled with the name of the domain. Lastly, the Who Can Access section will allow restrictions to be placed as to by specific users/groups, folder or anyone. The default here is that anyone is granted access, since the site will be hosted online (Figure B).
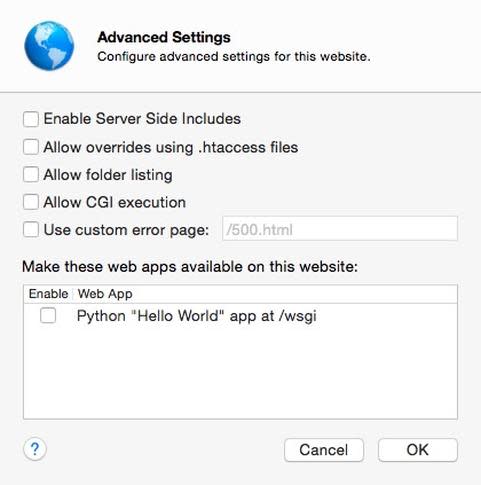
Figure BFigure B Next, click the Edit Advanced Settings... button to allow for some dynamic changes to apply to this site, only since not all hosted websites will require the same exceptions. In the case of Roundcube, a checkmark must be placed next to Allow overrides using .htaccess files, then click OK to close the window. Finally, click Create to add the new entry (Figure C).
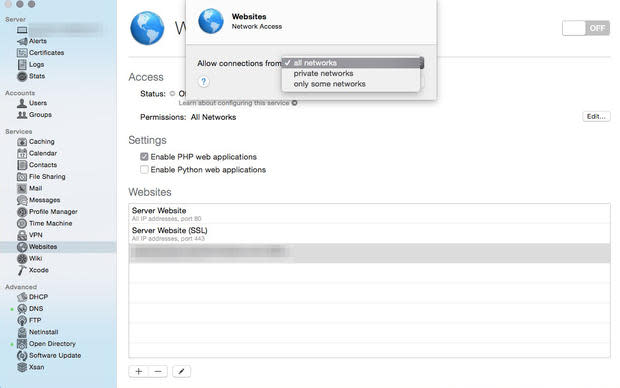
Figure CFigure C Back on the Websites pane, under Settings, checkmark Enable PHP web applications to allow PHP code to work as intended (Figure D).
Figure DFigure D The last step in configuring Websites to host your Roundcube webmail site is to determine the Permissions under Access. The default setting is All Networks, however, depending on your organizations specific needs, you might consider limiting access to Private Network (internal) or Only Some Networks, which will allow manual entry of specified IP ranges that will be granted access to the websites hosted by OS X Server. Please note these changes affect all websites (Figure E).
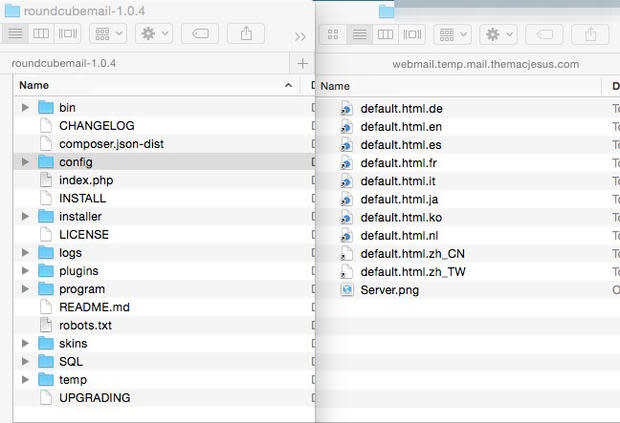
Figure EFigure E Once the entry has been added and the folder is created, extract the contents of the Roundcube.tar.gz (current stable version as of this writing is 1.0.4), and copy the entire root folder to the location of your sites hosted files (Figure F).
Figure FFigure F
*Note: OS X Server Websites includes two entries created for Server Websites -- one on port 80, the other on port 443 using SSL. These two entries are required by Websites to properly host sites and should not be deleted or modified in any way. As additional entries are created, the changes in those entries will override the defaults, as configured. Removing or otherwise modifying these default entries has been known to cause unstable behavior for hosted websites.
II. Configuring the database and user account used by MySQL
Follow these steps to configure the database and user account used by MySQL:
If MySQL has not already been installed, download the latest stable DMG that matches your version of OS X and proceed with the installation process. For OS X Yosemite 10.10, use the 10.9 installer of MySQL.
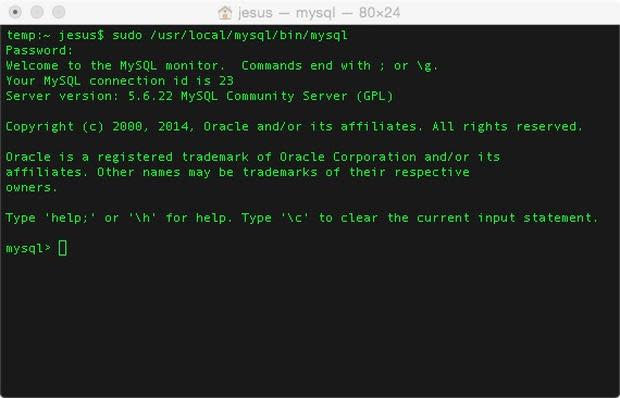
Next, open Terminal.app and enter the command -- sudo /usr/local/mysql/bin/mysql -- and then enter your password when prompted to access the MySQL CLI (Figure G).
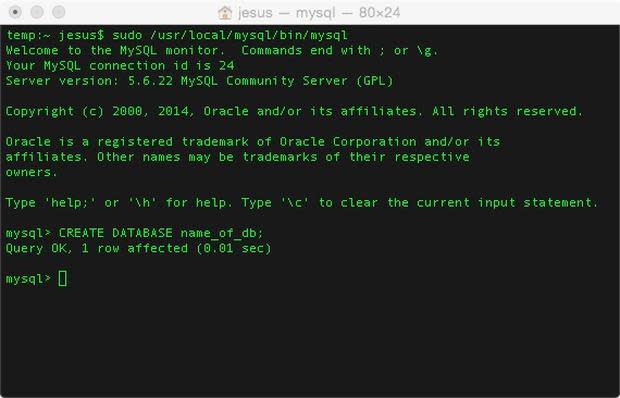
Figure GFigure G To create a database for use with Roundcube, enter the command as follows. Please note, all MySQL commands end in a semi-colon ";" which indicates the end of the command.
CREATE DATABASE name_of_database;
Press enter after entering the command to execute the command in MySQL and cause the corrective action to take place (Figure H).
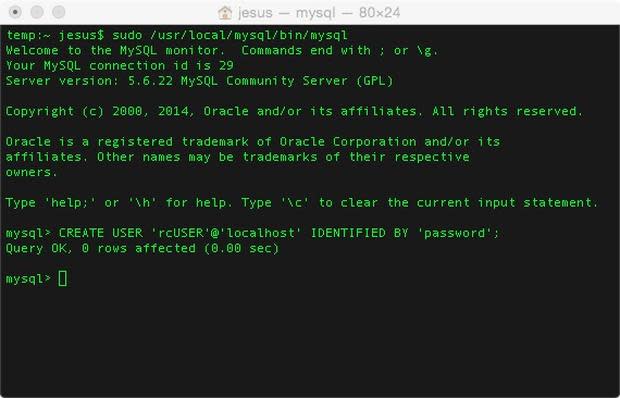
Figure HFigure H Next, a new user will be created to access the database (Figure I) created in step #3.
CREATE USER name_of_user@IP.address.of.server.hosting.database IDENTIFIED BY 'account_password';
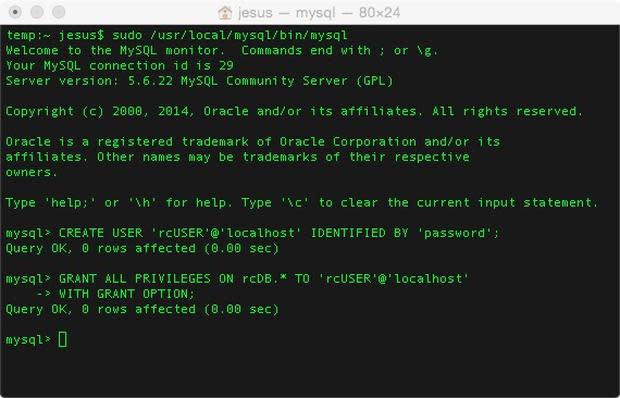
Figure IFigure I To provide privileges or admin-level access to the user (Figure J) created in step #4, enter the command as follows:
GRANT ALL PRIVILEGES ON name_of_database.* TO name_of_user@IP.address.of.server.hosting.database WITH GRANT OPTION;
Figure JFigure J Both the database and user account/password have successfully been created and will be used to access the database during the Roundcube configuration process and throughout the use of Roundcube webmail.
III. Configuring Roundcube webmail
Here are the finals steps of configuring Roundcube webmail:
With sections I and II configured properly, launch Safari.app and navigate to the domain of the website being hosted in section I with the suffix "/Roundcube-1.0.4/Installer" to access the install pages for Roundcube (Figure K).
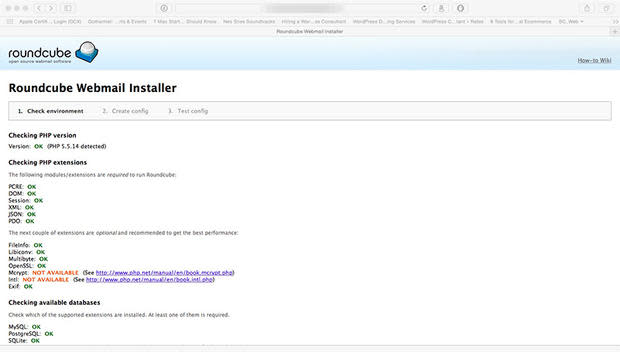
Figure KFigure K The Roundcube installer page is more of a configuration page that will be used to setup the site's config_inc.php page that holds all of the configuration information specific to your Roundcube webmail instance. The first portion, Check Environment, will check to verify that the necessary components used by Roundcube are installed and in place. A green "OK" means the items check out properly. However, a red "NOT OK" indicates a particular file, app, or configuration is not setup correctly. "NOT AVAILABLE" typically indicates that a specific app or config is not present.
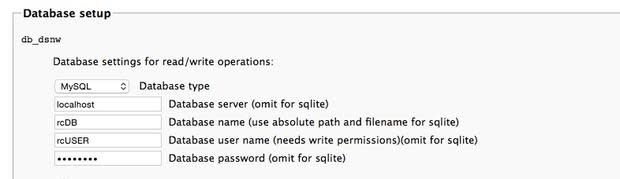
Under the Database setup section, the db_dsnw settings manage connectivity to the database server and database itself, along with the user and password of an account with read + write privileges to the resource. Select MySQL as the database type, and then enter the values representing each resource to access the database. A note about the Database server -- while the localhost value may be used when the DB server and web server are one and the same, ideally, entering the static IP address to the location of the stored DB is the best practice (Figure L).
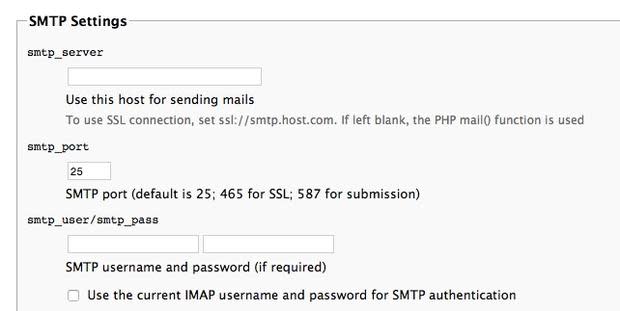
Figure LFigure L Configurations of the SMTP/IMAP hosts are optional since that functionality is managed by the Mail service running on OS X Server. However, in the event that subdomains have been configured to support each IMAP/SMTP protocol as a means of segmenting traffic, you should enter the FQDM of the SMTP/IMAP hosts in their respective sections, along with the relevant port numbers and username/password security during the configuration process (Figure M).
Figure MFigure M Review each section in order to customize the look, feel, and function of Roundcube to your environment. Once the necessary information has been entered, click Continue to proceed to the "Create Config" section where you'll be able to review the settings once more before clicking the Download button to create the config_inc.php file (Figure N).
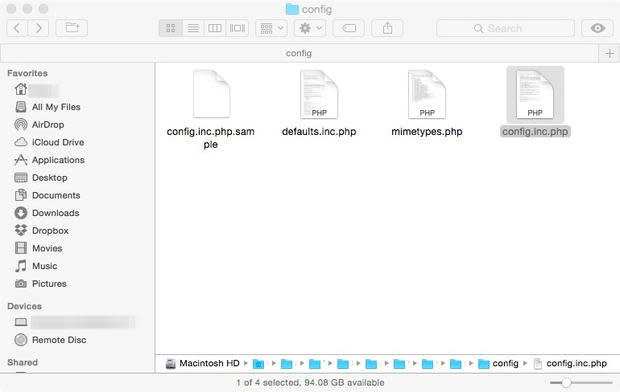
Figure NFigure N Copy the newly created config_inc.php file (Figure O) to the following location:
/Library/Server/Web/Data/Sites/path_to_domain_folder/path_to_roundcube_root_folder/config
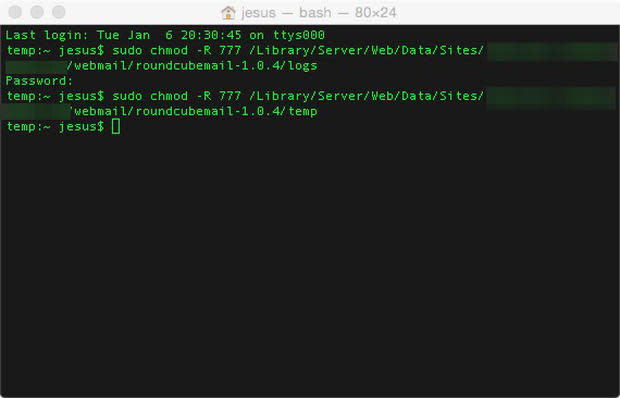
Figure OFigure O Before proceeding further, launch Terminal.app and enter the following commands on both the Logs and Temp folders (Figure P), since security must be modified to allow the web server read/write access to these in order for Roundcube to function correctly.
sudo chmod -R 777 /path_to_roundcube_root_folder/logs
sudo chmod -R 777 /path_to_roundcube_root_folder/temp
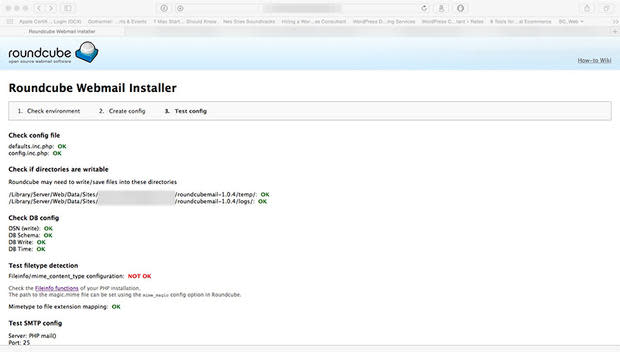
Figure PFigure P Now click continue to proceed to the "Test Config" section where by the Roundcube installation will test the configuration to determine if any issues are present prior to using Roundcube for the first time. Similar to step #2 above, "OK" indicates settings are verified; "NOT OK" indicates something is not configured properly or a file may be missing. Additionally, there are two tests found at the bottom of the page for testing IMAP and SMTP configuration to ensure IMAP/SMTP protocols are communicating properly (Figure Q).
Figure QFigure Q If the final test config checks out, the last step to the Roundcube configuration is to delete the Installer folder from the Roundcube root folder to prevent reconfiguration and/or unauthorized access.
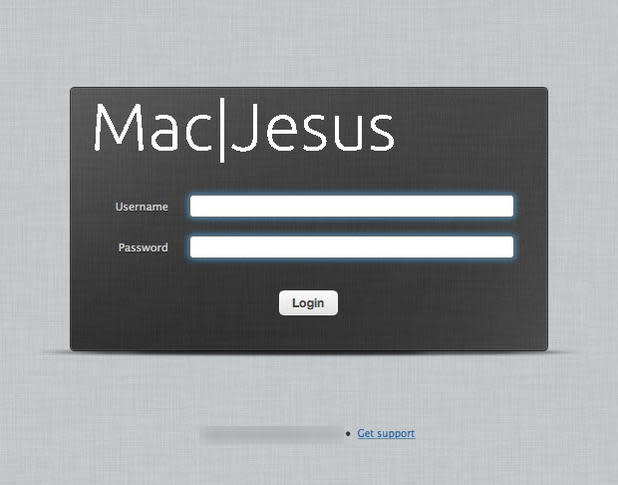
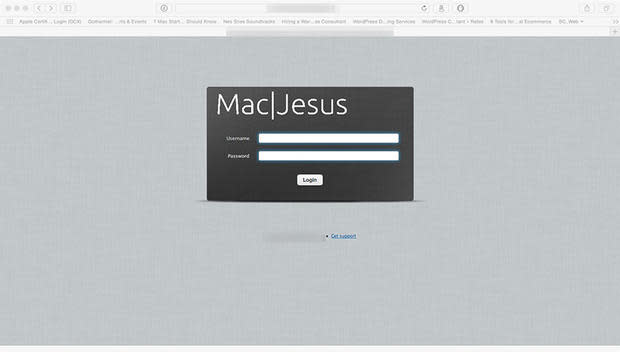
To test the Roundcube installation, visit the domain of the website configured, adding the /Roundcube-1.0.4 suffix (or if the folder was renamed to something like webmail, add that). The Roundcube logon page should be displayed (Figure R).
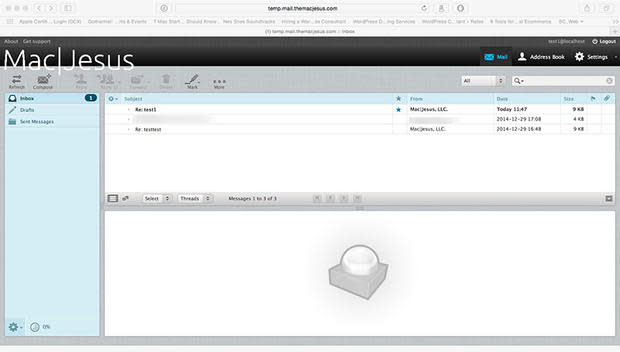
Figure RFigure R Entering the username and password of an account already configured for email access with the Mail service will cause the webmail app to authenticate the user account against directory services and display the reading pane (Figure S).
Figure SFigure S

An optional, yet crucial suggestion is to always test accounts by sending and receiving emails through the webmail interface to determine if any issues exist and to root out any possible usability issues that end users may encounter.
Roundcube is a pretty resilient, yet lightweight web application that works quite well as a webmail application. Once it's configured properly, there are few functionality changes that would cause for it to become unstable, just don't forget to backup the database regularly in the event that a rebuild is necessary in the future.
Do you use Roundcube for webmail? If not, what client do you prefer and why? Share your experience in the discussion thread below.
