Let Truecaller prevent spammers and hidden numbers from wasting your time
Sometimes, the most annoying aspect of a smartphone is the phone itself. It seems once one spammer has your number, they all do... and your phone (and your sanity) suffers that consequence. That's where applications like Truecaller come in -- to help silence the noise you don't want to hear.
But Truecaller is much more than a spam blocker for your phone. With this handy app, you can:
Search for any number
Know who's calling you (even if the number isn't in your address book)
Automatically block spam and telemarketers
Use predictive suggestions to know who to call based on time and place
Automatically update contacts with information and photos (when connected to services like Twitter, Facebook, LinkedIn, Google+)
Tweet and Follow a person directly from Truecaller
Get faster business lookup results with Yelp! integration
Truecaller isn't perfect, of course, and it does require you to create a profile or log in with either Facebook, LinkedIn, Twitter, or Google+ (granted, connecting to one of those accounts does make the app a bit more up to date). Outside of that, the app is extremely helpful for users who need to gain more control over their incoming calls.
Let's install Truecaller and see how to make use of what might become your go-to phone app.
Installation
Installing Truecaller is quite simple. Just follow these steps:
Open the Google Play Store on your Android device
Search for Truecaller
Locate and tap the entry for Truecaller by True Software Scandinavia AB
Tap Install
Read through the permissions listing
If the permissions listing is acceptable, tap Accept
Allow the installation to complete
At this point, you should see a launcher on your home screen or in your app drawer (or both). Tap that launcher to begin.
Usage
The first thing you must do is either create a profile or connect Truecaller to one of four social sites (Figure A). If you just opt to set up a profile, your name will be associated with your number on the Truecaller database. Note: If you want to get your number unlisted from the Truecaller database, visit their Unlist page.
Figure A
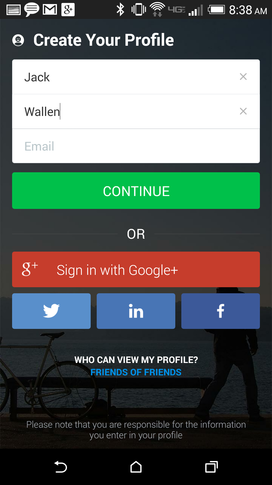
Truecaller running on a Verizon-branded HTC M8.
If you opt to go with a profile, you can connect Truecaller to a social platform, which I'll explain in a bit.
The first thing you should noticed on the main window (Figure B) is three taps across the top:
SUGGESTED: This tab will suggest calls based on certain criteria (missed calls, location, social connection, etc)
HISTORY: Your actual history of incoming and outgoing calls
CONTACTS: Your actual contacts
Figure B
The Truecaller main window.
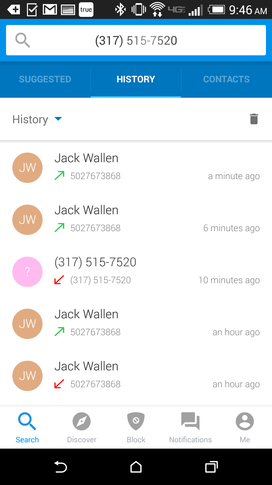
The HISTORY tab will be where you do most of your work. Tap on that, and you'll find there are three ways to interact with an entry:
Slide the entry to the right: Call the number
Slide the entry to the left: Message the number
Tap the entry: Edit the number
When you tap the entry, you'll be taken to the information page of the number (Figure C).
Figure C
Information page of a number in the Truecaller history.
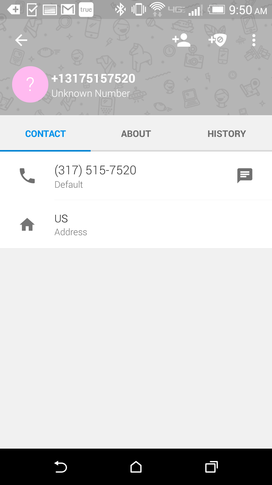
From this page, you can tap the ABOUT tab and see if there's any information known about the number (Figure D).
Figure D
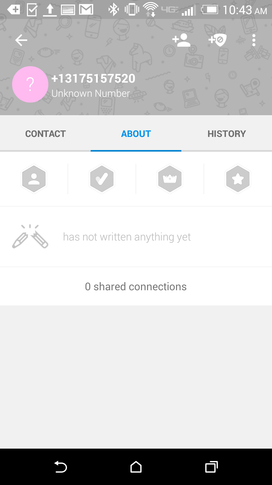
The ABOUT page for a particular number in the Truecaller history.
You'll notice badges under the tabs. These badges indicate (from left to right):
If the caller is a Truecaller user
If the contact has been verified (verification comes by associating your profile with Facebook)
If the contact is a Truecaller Premium member (the Premium service has been temporarily removed from the app)
If the contact is a Truecaller Ambassador (learn more about becoming an Ambassador here)
A word of warning about the verification badge. If you sign into Facebook, Truecaller will post to your timeline. You can, however, disable the newsfeed posting from within the app by going to Me | Settings | General and making sure the Facebook ticker is set to Off.
Blocking calls
This is probably the most important feature for Truecaller. Make sure both Top Spammers and Hidden Numbers are turned on. This will ensure that the known spammers and incoming calls refusing to display numbers are blocked. Here's how you do this:
Tap the Block button at the bottom of the main window
Slide the ON/OFF sliders to the right to enable each (Figure E)
That's it. Spammers and hidden numbers will be blocked.
Figure E
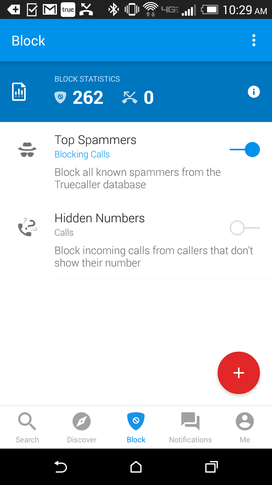
Blocking known spammers and hidden numbers.
You can also add numbers to the blacklist by tapping the plus sign [+]. A pop-up menu will appear (Figure F) that will allow you to add numbers manually from your call history, a recent SMS, your phonebook, or advanced (which allows you to enter wildcard numbers, such as numbers that start with/contain/or end with a specific string).
Figure F
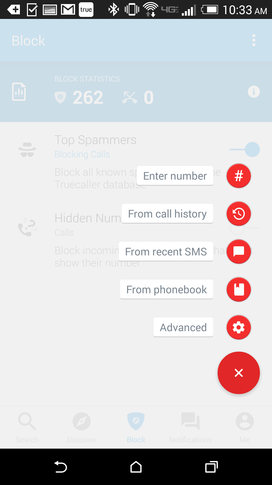
Adding numbers to the blacklist.
Connecting with Facebook
If you decide that connecting with Facebook (or Google+) will improve your Truecaller experience, here's how to make that connection:
From the main window, tap the Me button in the bottom right corner
Tap Edit profile
Tap the Facebook button (Figure G)
Enter your Facebook credentials
Tap Log In
Figure G
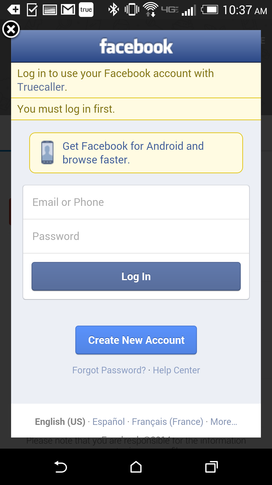
Connecting Truecaller with Facebook.
If you're looking for a thorough method of blocking known spammers and hidden numbers (and a means to more easily interact with incoming calls), give Truecaller a try. There are more features than outlined here, so you'll enjoy experimenting around to see what works and what doesn't work for you.
Have you been struggling to keep spam away from your Android device? If so, what is your best-kept secret? Share your tips and tricks in the discussion thread below.
