
Pro tip: Use standard and custom views to personalize an Outlook folder
All Outlook folders have views in place out of the box. You can use those or create custom views to determine how a folder displays information. Customizing a folder's view can help you work more efficiently by accommodating the way you work. Sometimes the change is simple--you might change the Contacts default view to Phone if you frequently need phone numbers. Other views require more settings, but they're worth the time to build and apply. In this article, we'll discuss some of the differences between and the benefits of using Outlook's standard (default) views and custom views.
We'll work exclusively with mail folders in this article using Outlook 2010, but 2013 is essentially the same. Most of what you'll read in this article also applies to Outlook 2003 and 2007; however, you'll access most of your view settings from the View menu via the Arrange By or Current View.
Apply a view
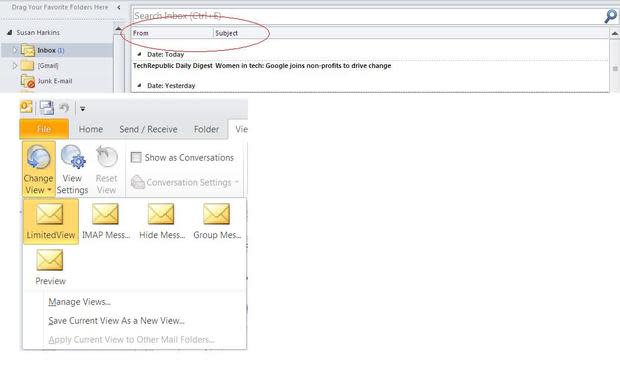
To change a folder's current view, click the View tab. In the Current View group, click Change View and select one of the options from the gallery shown in Figure A.
Figure A
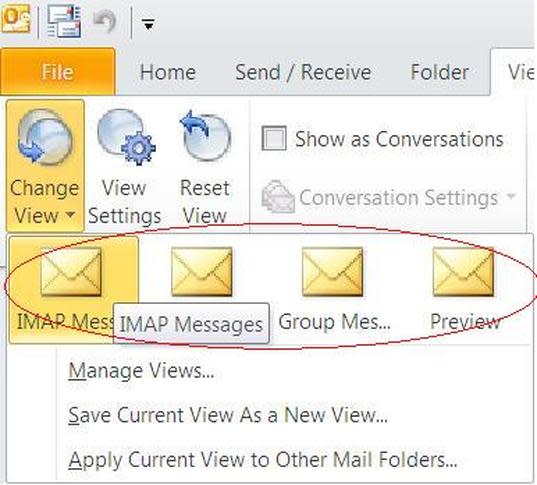
Choose a view from the gallery.
If a view isn't available in the gallery, choose Manage Views and select the custom (named) view from the Manage All Views dialog shown in Figure B. This dialog lists Outlook's standard (built-in) views and any custom views you've created. All views are specific to the type of window. For instance, Mail folders default to the Messages view. (The account in Figure B is an IMAP mail account.)
Figure B
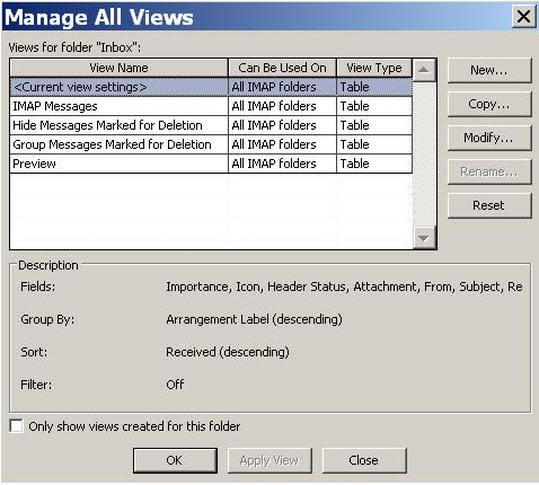
Use the Manage All Views dialog to modify, create new, and reset views.
The Manage All Views dialog is the go-to option for easy modifications. You'll use this dialog to copy, modify, rename, and delete existing views and to create new views. To change the current view, you can bypass this dialog and click View Settings in the Current View group. Reset View will remove the custom settings, returning the view to the default settings. It's not always available--you can't use it to reset a custom view.
If none of the standard views fits your needs, you can create one that does. You can start from scratch, or copy a standard and start from there. You can modify a standard, but any change you make to a standard view will apply to all folders using that standard view. The <Current view settings> view is the current view for only the current folder. Every folder has one, but its settings differ from folder to folder. It's the current default for the current folder. Changes made to this view won't impact other folders. I recommend that you not alter standard of <Current view settings> views unless you really know what you're doing.
Copy a view
After customizing a folder's view, you might decide it will work nicely in other folders. In Outlook 2010 and 2013, you can copy a view from one folder to another quickly:
In the folder with the view you want to copy, click the View tab.
Click Change View in the Current View group.
In the resulting submenu, choose Apply Current View to Other Mail Folders (Figure C). Expand folders and check the target folders -- or to quickly apply the view from the default folder to all subfolders in the same folder, check the Apply view to subfolders option at the bottom.
Figure CFigure C Click OK.
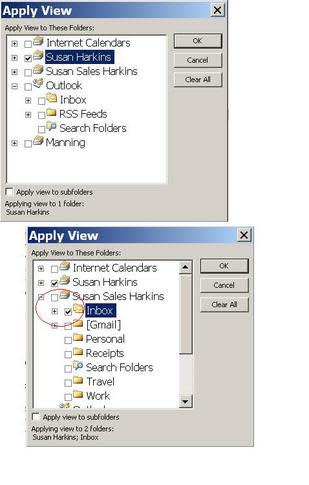
Using this feature, you can quickly copy a view from one folder to another or many others.
To copy a standard so you can start from an existing base, do the following:
In the appropriate folder, click View.
From the Change View drop-down (in the Current View group), choose Manage Views.
Choose the standard from the list.
Click Copy.
Give the view a name.
Identify when and where you want to apply it, and click OK.
Click the appropriate setting button and start modifying the underlying standard.
Create a view
As often as not, you'll start from scratch when customizing a view. Let's illustrate this process by creating a view that's a bit outlandish so you can easily see the changes. Specifically, let's remove all the fields but From and Subject from a mail folder:
In the appropriate folder, click View.
From the Change View drop-down (in the Current View group), choose Manage Views.
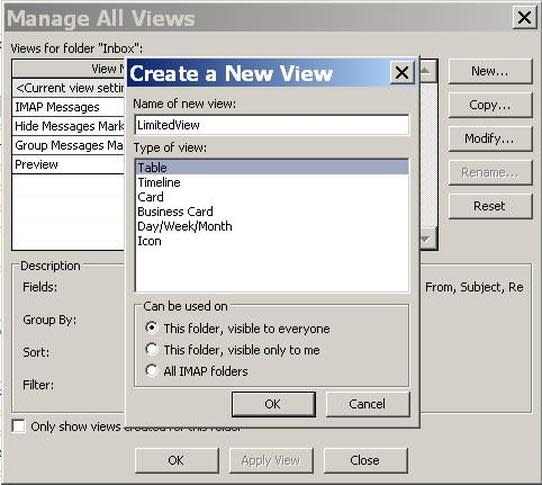
Click New in the resulting dialog.
Enter a meaningful name (LimitedView) for the view.
Choose a view type from the Type. For this example, I chose Table.
Select an option from the Can be used on options (Figure D). You won't see this option when copying a standard (above), because it's already set in the standard.
Figure DFigure D Click OK.
Now you must define the view by adding columns, grouping, sorting, and filtering settings, and other customizable settings. In this case, I removed all the fields but From and Subject (Figure E).
Figure EFigure E Click OK.
At this point, you'd continue to add settings, but for our purposes, click OK without changing any other settings.
Click Apply View. Figure F shows the result. When you click Change View, you can see that the new view -- LimitedView -- is the current view.
Figure FFigure F

Skip troubleshooting
Because of the hierarchical (dependency) design of views, you may find that settings overlap when you don't want them to. If you can't quickly discern the problem, I recommend that you just start over. If a standard view is causing the problem, select it by name in the Manage All Views dialog (Figure B) and reset it. (You can't reset the <Current view settings> view.) Doing so will reset it for all folders and the problem should disappear. I recommend that you skip altering the standard views and apply custom views when possible to avoid problems. (I know I'm repeating myself, but it's advice worth repeating.)
Reset all views
If your views have grown unwieldy or troublesome, you can remove them all quickly using a command switch. Use great care when doing so, because this switch will reset all views to their out-of-the-box settings. To spell it out for you:
All customization of standard views will be gone.
All custom views will be gone.
If you have custom views and settings that you want to keep, do not do this. To reset all views (in all windows, including all subfolders), use the following command switch to launch Outlook:
outlook.exe /cleanviews
Note that there's a space between .exe and the /cleanviews switch. Please don't make me sorry I shared this switch!
Outlook 2003 and 2007
If you're still using Outlook 2003 or 2007, you can change views quickly using the Advanced toolbar. From the View menu, choose Toolbars, and then select Advanced. With this toolbar visible, you can quickly select a view from the View control.
The differences between Outlook 2003/2007 and Outlook 2010/2013 are significant enough that covering all four versions in one article would be difficult. Please feel free to post questions about older versions. If I can't answer them, perhaps other readers still using those versions can.
Basics
This review is a cursory look at the potential views can offer. You've learned the basics. Now, it's up to you to explore the option (heeding my advice about creating custom views rather than modifying the standards) and see what views can do for you!
Send me your question about Office
I answer readers' questions when I can, but there's no guarantee. When contacting me, be as specific as possible. For example, "Please troubleshoot my workbook and fix what's wrong" probably won't get a response, but "Can you tell me why this formula isn't returning the expected results?" might. I'm not reimbursed by TechRepublic for my time or expertise, nor do I ask for a fee from readers. You can contact me at susansalesharkins@gmail.com.

