
Recycle that old Android device into a web-based security camera

There are so many reasons why you might need a security camera. There are also a lot of reasons why purchasing an actual security system might not be cost effective. So, if you're looking for a simple way to get a single camera security system up and running, and you happen to have a spare Android device lying around, there's an app that you need to look into called IP Webcam.
The IP Webcam app uses your device's built-in camera, adds a lightweight web server, and allows you to connect to the camera through that server. It's simple and effective. Here are just a few of the things that you do through the web interface:
Focus
Choose renderer (Flash, JavaScript, or built-in)
Record
Adjust video quality
Enable/disable audio
Snap a photo
The full feature list includes:
Record in webm or MPEG4 (on Android 4.1+)
Stream audio in wav, opus, and AAC (AAC requires Android 4.1+)
Motion detection with sound trigger
Date, time, and battery level video overlay
Sensor data acquisition with online web graphing
Videochat support (video stream only for Windows and Linux via an universal MJPEG video streaming driver)
Password protection for web interface
There are two versions of IP Webcam:
Free -- includes ads
Pro -- includes Tasker support
You'll probably want some type of mount for your device. If you're using a tablet, you can opt for something like this universal tablet mount. If you're using a phone, check out this Dockem: Damage free wall mount.
Installation
Installation of the IP Webcam app is quite simple. We'll install the free version on a Verizon-branded Droid Turbo. Here are the steps:
Open the Google Play Store on your device
Search for IP Webcam
Locate and tap the entry by Pavel Khlebovich
Tap Install
Read through the permissions listing
If the permissions listing is acceptable, tap Accept
Once the installation is complete, you'll find a launcher on the home screen or in the app drawer (or both). Tap the launcher and get ready to set up your webcam.
Usage
Setting up this webcam is incredibly simple. When you launch the app, the settings window will appear (Figure A).
Figure A
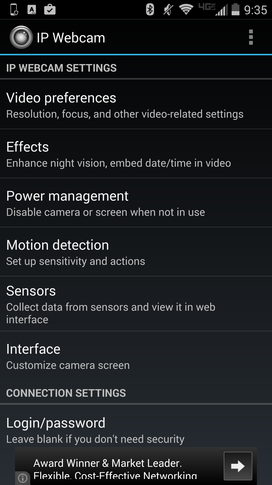
The IP Webcam settings window.
You'll be surprised to find out that, out of the box, you can simply scroll down to the bottom of the settings window, tap Start server, and then point a browser to the private IP address handed out by the app. That alone should key you in on the first important fact -- if you're going to use this on a local area network (LAN), make sure the phone (or tablet) is connected to the local Wi-Fi.
According to the app, you should be able to use the carrier network (if applicable), but many of the carrier IP addresses handed out aren't reachable. This would mean, should you want to access that webcam outside of your LAN, you'll need to set up your router to pass traffic to the IP Webcam server. With that in mind, let's assume that you're only going to view the webcam via your local network.
Before you start the server, you might want to set up a password to prevent anyone from gaining access to the camera. To do this, tap Login/password (from the IP Webcam settings window) and then add a Login name and password to be used. You can also select features that will require a password to use. Tap Select features that require password (from the Login/password setup window, as shown in Figure B) and enable/disable the features you want to password protect.
Figure B
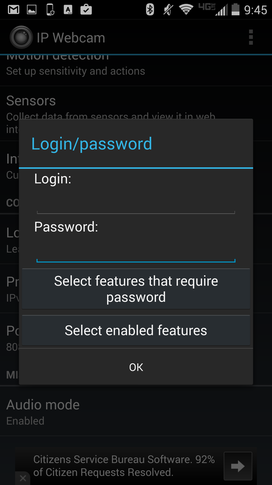
Setting up security for IP Webcam web interface.
Once you've set that up, tap Start server and you'll be given the local IP address to use. It will be in the form http://192.168.1.100:8080. If the port 8080 is not usable on your network, you can change the port to a more amenable number from the settings window.
Once you've started the server, the camera will start, and you can point your web browser to the IP address. From the web interface (Figure C), you'll need to select your Video renderer and (if applicable) your Audio player. Once you've selected the Video renderer, the streaming should begin.
Figure C
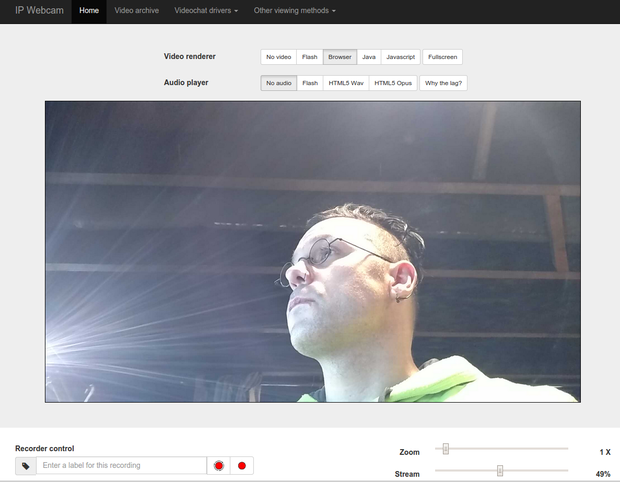
Viewing the video stream from IP Webcam.
If you need to record video, simply enter a label for the recording and tap the record button. You'll notice there are two record buttons:
Circular
Manual
If you record a circular video, it will record a loop of a determined length (select the length from the Chunk length drop-down). You can select loops of 5, 10, 30, 60, or 120 minutes. The recording will be found on the device in a sub-folder within sdcard/ipwebcam_videos, labeled with the tag you gave the recording in the web interface. You can't view those videos with the standard player. In the web interface, there is a Video archive button (at the top of the web interface). Tap that button to find and view an archived video. The archived videos themselves are not time stamped, but the files are.
To stop the server, you have to go back to the device and tap Actions (Figure D). From the pop-up menu, tap Stop, and you'll be returned to the Settings window.
Figure D
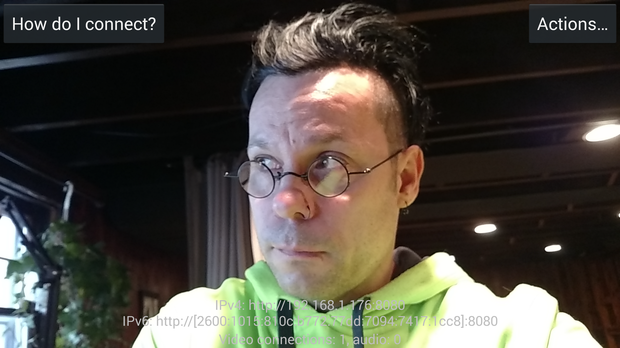
The IP Webcam interface when the camera is on.
If you're looking for a cheap way to get a simple security system using nothing but an Android device, IP Webcam is just the app you want.
Do you have a unique way to make use of your old Android devices? Let us know in the discussion thread below.
