A 31-day plank challenge to strengthen your core and boost metabolism
Welcome to Start TODAY. Sign up for our Start TODAY newsletter to receive daily inspiration sent to your inbox — and join us on Instagram!
Ah, the plank. It may just be one of the most intimidating exercises. Anyone who has shook their way through one knows that the isometric exercise appears simple, but is anything but. To the contrary, it is a full-body exercise that recruits muscles from your shoulders to your glutes.
But there is very good reason to incorporate planks into your fitness routine. In fact, it’s an exercise I recommend every single person works on, regardless of fitness level. And this month, we’re going to help you get there.
Plank benefits
Ditch the crunches — planks are a super effective exercise for strengthening and toning your core muscles. They help improve your posture, stability and overall balance, while also improving flexibility. Plus, it’s a great way to engage multiple muscle groups at once, including your abs, back, glutes and shoulders. As an added bonus, planks have also been shown to improve metabolism, as they allow you to squeeze in a full-body workout in a short amount of time.
31-day plank challenge
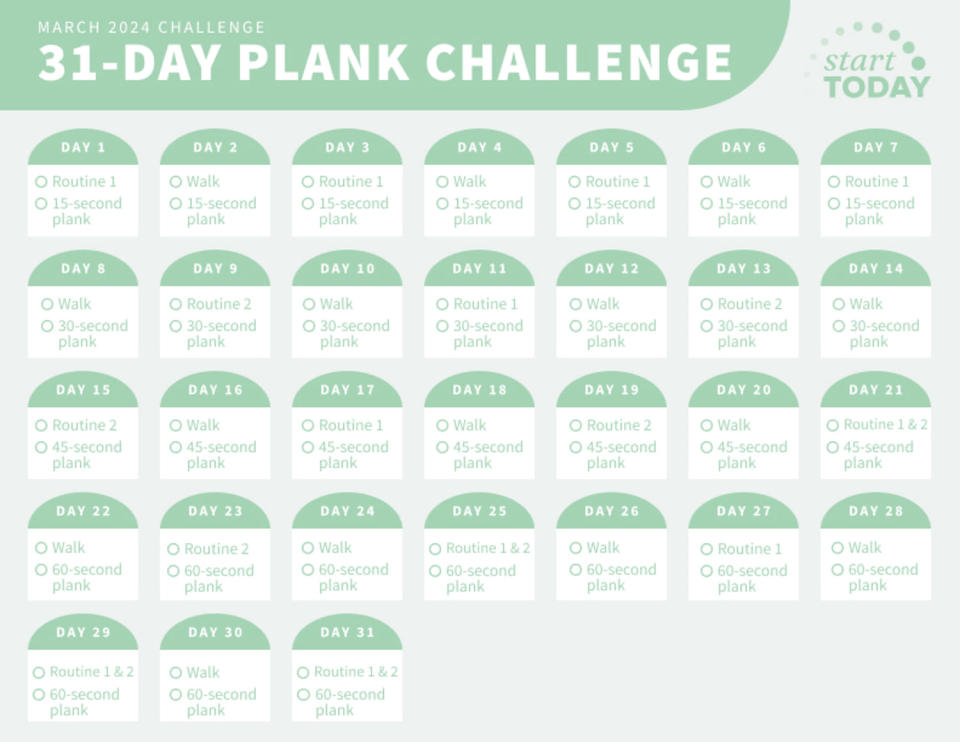
>>Download a printable calendar
>>Want to track your walking mileage this month? Get a printable calendar for March here.
This isn’t your typical plank challenge. Yes, we will be doing a plank every day and hitting a planking “streak.” But I have also put together two strategic routines that will strengthen the muscles recruited during a plank. This includes not only the core, but the glutes, shoulders and upper back. By strengthening these muscles, you will feel your stability in a plank improve, plus you’ll notice you can hold it for an extended period of time as the month progresses.
Building up strength to do a plank is all about consistency and progression. So that’s why we will be performing a plank every single day, starting at 15 seconds and increasing by 15-second increments each week. By the end of the month you will have worked up to a 60-second plank!
Take the plank test
Before we get started, it’s time to put yourself to the test to determine your plank level. Start by getting into a basic plank position. Remember to engage your core, keep your body in a straight line and breathe deeply throughout the exercise. If you’re unable to hold it for 15 seconds while maintaining proper form or feel pain in your wrists, shoulders or low back, that’s a signal to modify.
Beginner: Start with a modified plank to safely build up wrist and shoulder strength. Similarly, if you’re new to planks and are still learning how to properly activate your core and build the strength necessary to hold a full plank with correct form, start at the ultra or beginner level.
Intermediate: If your wrists and ankles feel stable, and you know how it feels to engage your core (pulling your naval in toward your spine and holding with no arch in the low back), then you are likely ready to work on a full plank in the intermediate level.
Advanced: If you already feel confident in a plank position and can hold it somewhat easily for 15 seconds, then it’s time to step it up to the advanced modifications. Lifting one leg or one arm off the ground, and eventually lifting both a leg and arm at the same time, will really challenge your side waist and obliques as well as put more pressure on your wrists and ankles.
Plank progressions
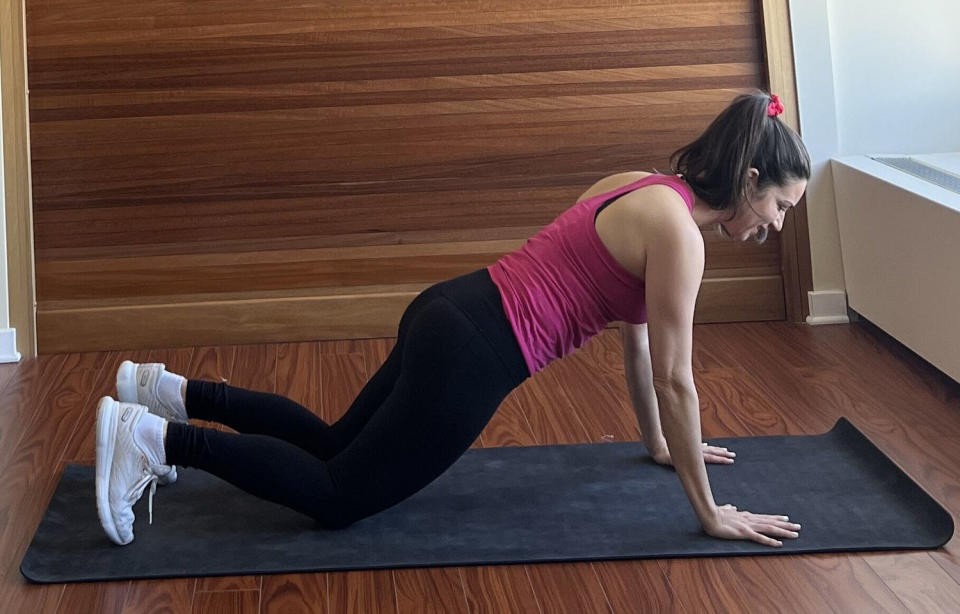
Ultra beginner: Plank on hands and knees
Start on your hands and knees with your shoulders over your wrists and your knees underneath your hips. Pull your abs in and move your knees back further so that your hips are in front of your knees, and hold.
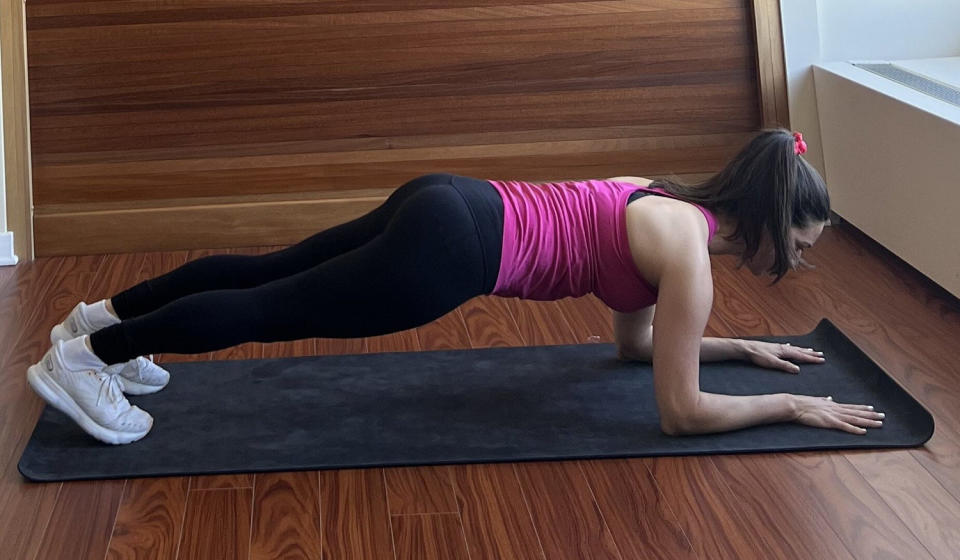
Beginner: Forearm plank
Start on your hands and knees, and then place your forearms on the ground with your fingers reaching toward the front of your mat and your shoulders over your elbows. Hold the plank position with your toes on the ground and body lifted while your weight is in your forearms.

Intermediate: Plank
From hands and knees, press down with your hands and tuck your toes under to come into plank. Pull the abs in and maintain a straight line form your head to your heels.
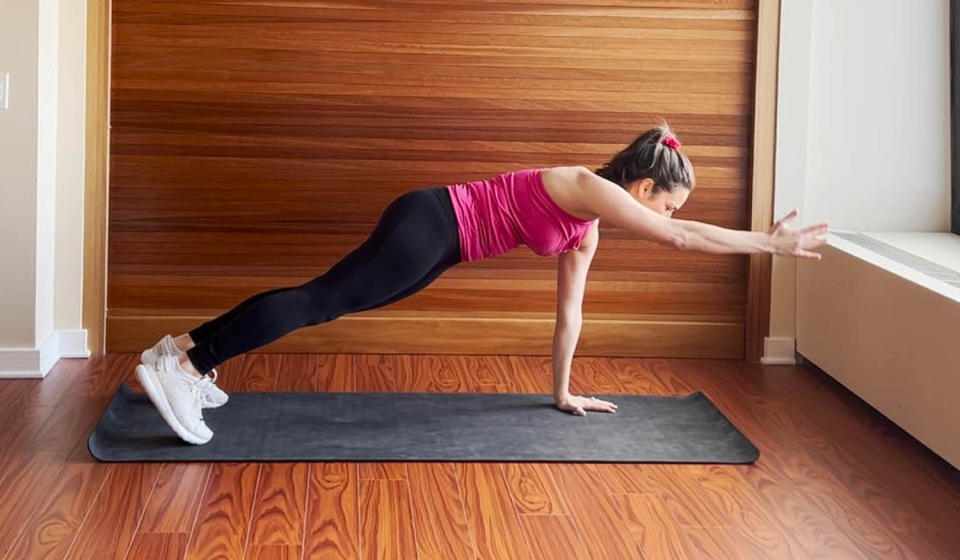
Advanced: Plank with one arm extended
From a full plank position, lift your right hand off of the ground and reach your arm forward. Half way through, switch sides, lifting the left arm off of the ground.
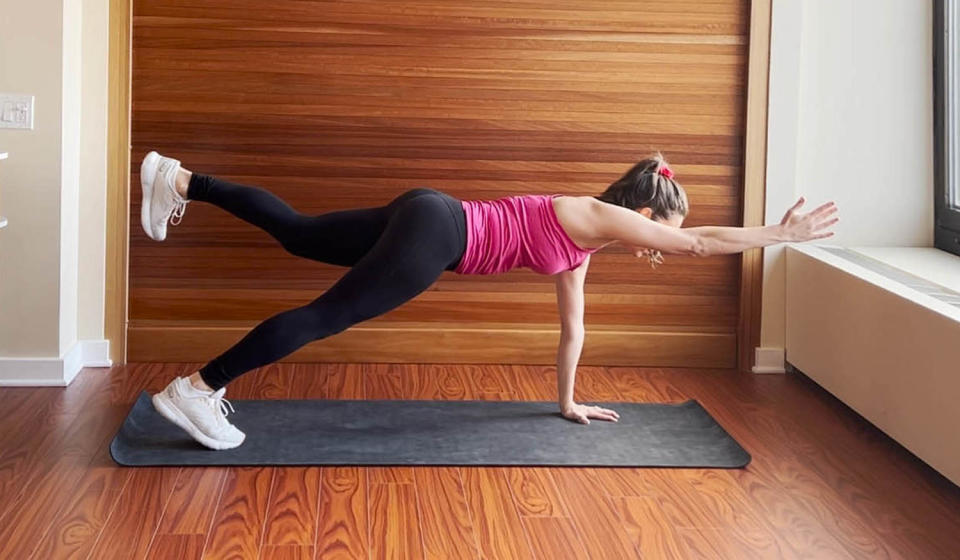
Ultra advanced: Plank with one arm and one leg extended
From a full plank position, reach your right your arm straight out in front of you as you lift your left toes off of the ground and reach your left leg straight behind you. Half way through, switch sides, lifting the left arm and right leg off of the ground.
Plank workout routine 1

Pilates ab crunch
Lie on your back with your arms at your sides and your knees bent. Keeping your heels on the ground and feet as wide as your hips, tilt your pelvis back and press your low back into the ground, as if you’re zipping into a tight pair of pants. Place your hands behind your head, elbows open wide. Exhale as you curl up with your head, neck and chest up into the crunch position. Hold for 5 seconds. Inhale as you lower back down.

Cat cow
From your hands and knees, gently move into the cow pose by arching your back and dropping your stomach toward the mat, looking toward the sky. As you exhale, move into the cat pose by pulling in your abs and rounding your back toward the sky.

Bird dog
Start on all fours with your palms and knees on the ground. Straighten your left arm out in front of you and your right leg out behind you, balancing on your opposite hand and knee. Hold for a few breaths. For an added challenge, bend your left elbow and your right knee in until they touch underneath your stomach. Switch sides and repeat using your right arm and left leg. Continue alternating, performing 10 reps on each side.

Modified pushups
Start in a pushup position with your wrists directly below your shoulders and your palms pressing into the mat. Instead of being on your toes, rest your knees on the mat and cross your ankles in the air. Pull your navel in toward your spine, and ensure you maintain a straight spine from your neck to your tailbone. Begin bending your elbows slowly out to the sides, lowering your chest until your chin touches or almost touches the mat. Return to the starting position and repeat.

Bridge
Lying on your back, bend your knees and place your feet flat on the ground as wide as your hips. Reach your fingertips toward your heels so that they’re able to graze the back of you heel. Press down through your feet and pull your naval in toward your spine to lift up into bridge pose. Squeeze your glutes and make sure your knees do not open out wider than your hips. Clasp your hands underneath you and tuck the shoulders underneath your upper back. Pretend that there’s an egg between your chin and chest and you don’t want to crack it! Hold here for 5 slow breaths, in and out through your nose. Then release the clasp and slowly lower down to the starting position. Repeat 2 more times.

Hollow hold
Lying flat on your back, start with your arms and legs reaching straight up toward the ceiling. Exhale as you pull your naval in toward your spine and slowly lower the arms behind you and the legs in front of you. Only go as low as you can without allowing your low back to arch.

Runner’s lunge
Start in a standing position. Bend your knees and place your hands on the floor. Step your right foot back with your leg straight behind you. Place your left foot between your hands with your left knee bent over your left ankle. Look in front of you and straighten your back, maintaining good posture. Breathe out, letting your hips move toward the floor. Hold this position for a few breaths and then switch sides.
Plank workout routine 2

Toe taps
Lie on your back with knees bent and feet flat on the ground. Take a deep breath in, then exhale as you draw your naval in toward your spine, and slowly bring both knees up to a table-top position. Draw your lower ribs down toward your hips and tighten your core as if you were wearing a corset. From here, lower the right leg down to tap the toe on the ground while maintaining the engagement of the core. There should be no movement above the hips, and the back should stay gently pressing into the ground while the abs are pulling in tightly. Exhale as you lower the leg down, and inhale to bring it back up. Repeat on the left leg. Continue alternating, performing 20 taps total.

Bridge marches
Lying on your back, bend your knees and open your feet as wide as your hips. Relax the arms by your sides. Pull the naval in toward the spine as if you’re zipping into a tight pair of pants. Slowly roll the hips so that you lift your low back up off the ground, and then your middle and finally upper back. Press down through the feet, then lift the right foot off the ground as if you’re beginning to march. Repeat 10 times, alternating between the left and right legs.

Pushups
Start by getting down on all fours with your palms on the mat a little wider than shoulder-width apart. Make sure your arms are straight. Reach your legs straight behind you, tucking the toes under to come into a plank position. Bend at the elbows, lowering your body until your chest almost touches the mat. Pause in this position for a few seconds, then press down into the ground to straighten your elbows and push your body back up. Return to the starting position and repeat.

Hug & extend
Start lying on your back. Hug the knees in toward your chest and curl up with your head, neck and chest. Gently hold onto the shins. Extend the legs out straight to 45 degrees in front of you and reach the arms straight back behind you. Then hug the arms and knees back in to the starting position. Repeat.

V-sit
Seated on a mat, engage your core muscles and gently lean back a couple of inches. Slowly lift your legs up in the air so that they are in a table-top position. Reach your arms straight out in front of you so that they are parallel with the mat. Keeping your core engaged, extend the legs straight up to a 45-degree angle, forming a “V” shape with your body. If you feel balanced here, attempt reaching your arms up toward the ceiling. You always have the option to leave them straight out in front of you. Hold this position for 10 seconds. Keep the shoulders relaxed, abs pulled in and the inner thighs squeezing together. Release your legs and arms down to the starting position.

Crescent lunge
From a standing position, step your left foot back behind you. Bend your right knee so that your quadricep is parallel with the mat. Reach your arms toward the sky and straighten your back, pulling your shoulders back and down. Hold for 5 breaths before switching sides.
This article was originally published on TODAY.com

