The Anatomy of a Sewing Machine: A Guide to All Parts and Their Uses

All sewing machines differ, but most have basic features that are similar from model to model. Here's a quick reference to identify the different components on most machines. You probably have a manual that provides similar information specific to your model. If you've lost it, or if you're using a vintage machine, you can find many manuals online.
Needles are sharp, so it's important to heed a few precautions when working with your machine. When guiding fabric over the throat plate, keep your fingers an inch or two away from the presser foot at all times. If you pause between stitches, take your foot off the foot controller so that you don't accidentally set the needle in motion. If you are taking a longer pause, turn off the machine completely. In addition to preventing accidental stitches, this will prolong the life of any small light bulbs that illuminate your work.
Related: Questions to Ask Yourself When Buying a Sewing Machine
Laurie Frankel
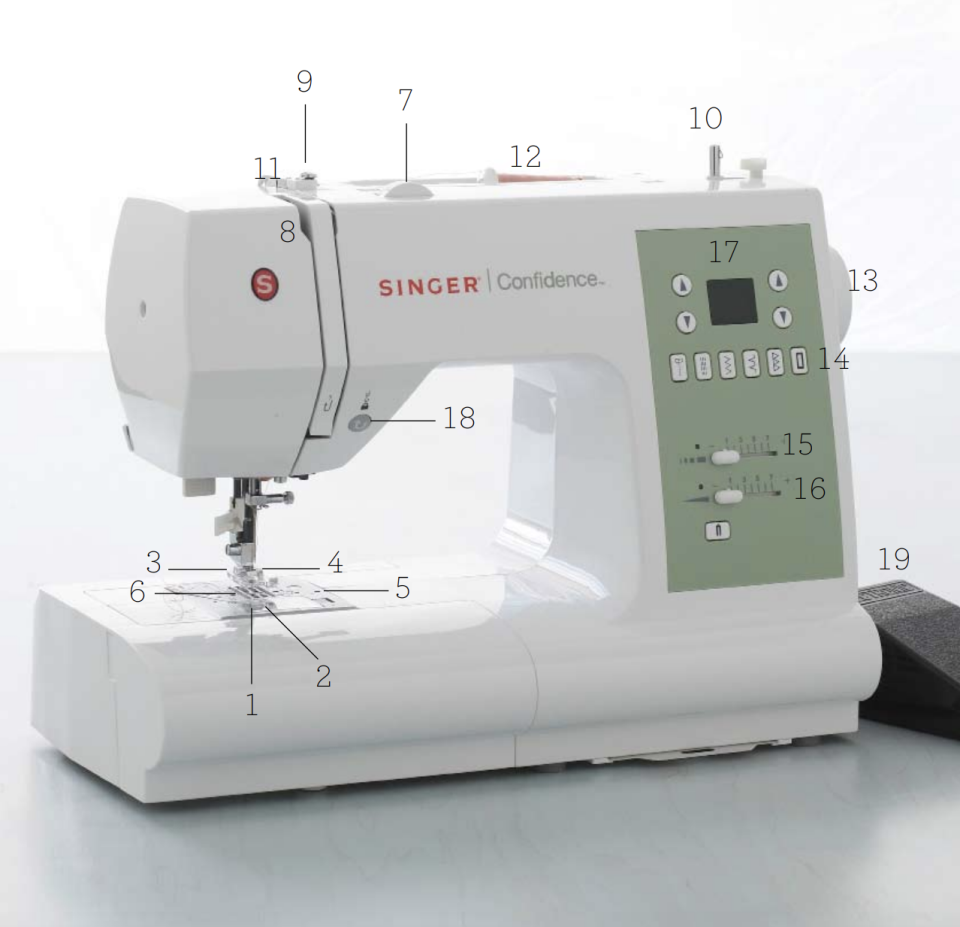
Bobbin and Bobbin Case (1)
The bobbin is wound with the thread that will make up the underside of a machine stitch. Machines have either a top drop-in style of bobbin (like the one shown), or a front-loading bobbin. The bobbin case holds the bobbin. It is usually not interchangeable between machines. Use only bobbins recommended by the manufacturer for your particular model, or the machine may not work properly.
Slide Plate or Bobbin Cover (2)
Depending on the machine, a slide plate or hinged bobbin cover allows access to the bobbin.
Presser Foot (3)
This removable foot keeps fabric in place as you sew. Different feet are appropriate for different sewing techniques or fabrics. For example, a zipper foot is used to install a zipper, and a roller or nonstick foot for sewing leather and oilcloth smoothly.
Needle and Needle Clamp (4)
Sewing-machine needles are removable and come in a variety of sizes. (For more on machine needles, see our guide.) As its name implies, the needle clamp holds the needle in place.
Throat Plate (5)
This metal plate, sometimes called a needle plate, sits below the needle and presser foot. A small opening in the plate allows the bobbin thread to come out and the needle to pass through to make stitches. Most throat plates have small lines notched to the right of the presser foot; these serve as guides for seam allowances and for sewing straight lines. The plate can be removed to clean underneath.
Related: 31 of Our Favorite Sewing Projects
Feed Dogs (6)
These small metal or rubber teeth pull the fabric between the presser foot and throat plate. The feed dogs also regulate the stitch length by controlling how much fabric passes through at once. As you guide the fabric, always allow the feed dogs—not your hands—to move the fabric. Manually pulling or pushing may cause the needle to bend or break.
Tension Regulator (7)
This dial controls the tension on the top thread. With proper tension the top thread and bobbin thread will join together in uniform stitches. If the tension is set too tight, the stitch will pucker and break; if set too loose, the stitches will not hold. For machines with a manual dial, turn the dial counterclockwise to decrease tension, and clockwise to increase tension. For machines with computerized tension, which displays digitally, press the control to a higher setting to increase tension and a lower setting to decrease it.
Take-Up Lever (8)
The top thread passes through this metal lever, which moves up and down in tandem with the needle. Depending on the machine, the take-up lever may protrude from the front or be hidden inside the plastic casing (as it is on the machine shown). Before placing fabric under the presser foot, raise the lever completely (the needle will be at its highest point); this will keep the needle from snagging the fabric.
Bobbin Winder Tension Disk (9)
On machines that have an external bobbin winder, the tension disk helps guide the thread between the spool and the winder.
Bobbin Winder (10)
An empty bobbin is placed on this winder to be filled with thread from the spool. To ensure that the thread winds evenly, always start with an empty bobbin.
Thread Guides (11)
From the spool pin, thread passes through these metal loops to help regulate the tension of the thread.
Spool Pin (12)
This small dowel holds the thread. Some machines come with several spool pins for various types of thread spools and for decorative or twin-needle sewing. Spool pins can be horizontal or vertical, but horizontal ones provide smoother thread feed.
Flywheel (13)
This knob, also called a handwheel, raises and lowers the take-up lever. Always turn the flywheel toward you (it will also turn toward you as you press the foot controller).
Stitch Selector (14)
On older machines, a dial allows you to choose between different machine stitches. Newer machines have buttons to select stitches (as shown).
Stitch-Length Selector (15)
Use this dial or lever to set the length of the stitches on manual and some electronic machines. Stitches are measured differently, depending on the machine. The stitches may be measured per inch, usually ranging from zero to 20 (by metric scale, from zero to four stitches per millimeter), or simply numerically from zero to nine. For general sewing, use medium-length stitches; for fine fabrics, shorter stitches; for heavier fabrics, or when basting or gathering, use long stitches.
Related: The Ultimate Guide to Sewing Thread
Stitch Width-Selector (16)
On manual machines, as well as some electronic machines, this dial or lever controls the width of decorative stitches, such as the zigzag stitch.
Menu Screen (17)
On newer electronic and computerized machines, the menu screen allows you to adjust functions and stitches, sometimes replacing the separate stitch, stitch-width, and stitch-length selector dials.
Reverse-Stitch Button (18)
Pressing this button will reverse the direction of the stitches, allowing you to secure the thread at the beginning and end of a seam. (Some manuals call this a backstitch button.)
Foot Controller (19)
The speed of the stitches is partially controlled by pressing on this pedal.

