The best pumpkin carving tips this Halloween, according to TikTok’s Barbara Costello
A TikToker whose nickname is “Everyone’s Grandmother” has shared her top tips on how to carve a pumpkin and make it last through the Halloween season.
According to Barbara Costello, her tips will cut the amount of time it takes to carve a spooky face into a pumpkin.
The 73-year-old, who goes by the handle @brunchwithbabs and has more than 2.5 million followers on TikTok, titled her new video “The Do’s and Don’t’s of Pumpkin Carving”.
Her first tip is to cut a hole in the bottom of the pumpkin instead of the top where the stem is. This is so the pumpkin can be placed over a candle, instead of having to reach inside to position a candle.
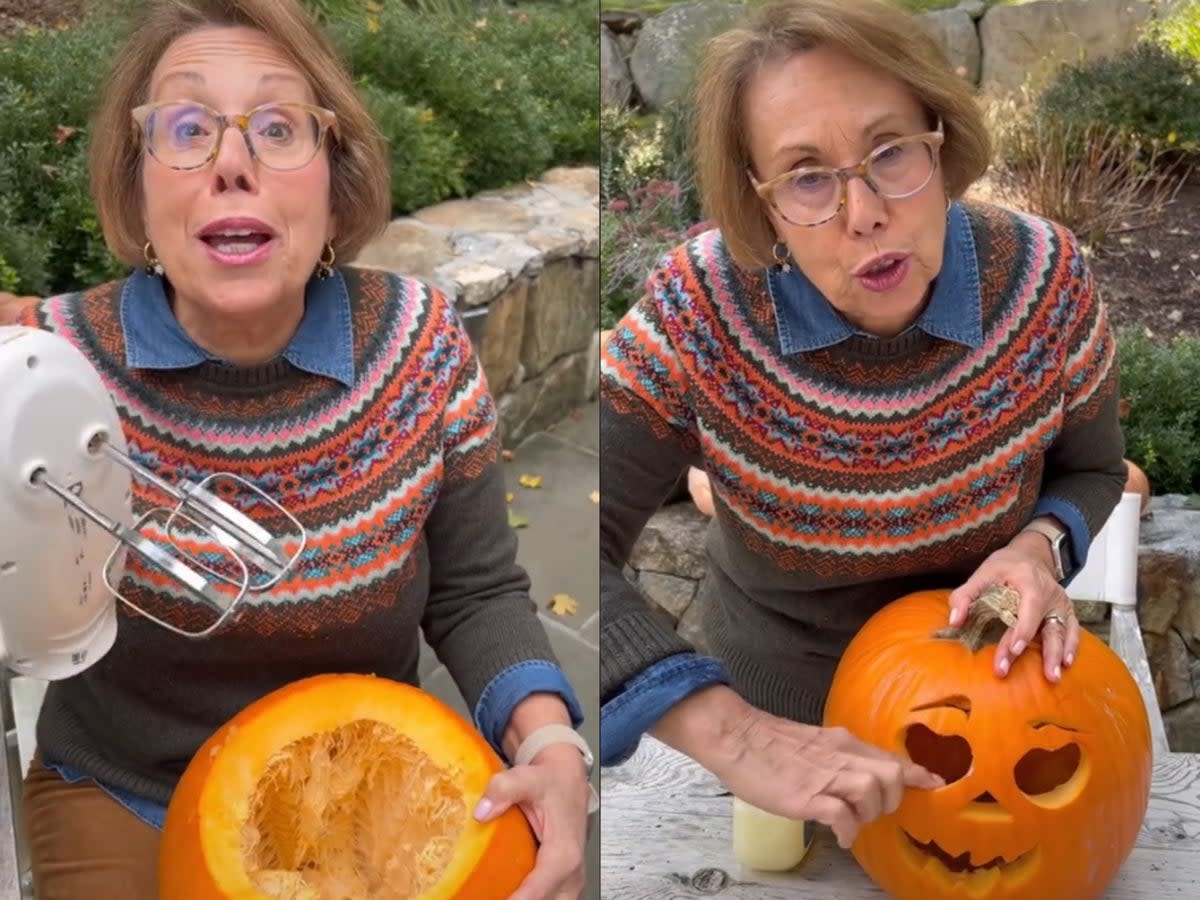
“Don’t stand to cut your pumpkin, sit! Just put it on your lap,” she says as she demonstrates how to cut into the large orange fruit.
After removing the bottom of the pumpkin, she advises followers not to use their hands to scoop out the fibrous strings and seeds when hollowing it.
“Use your hand mixer instead,” Costello says, and proceeds to turn hers on inside the pumpkin, using the beater attachments to loosen all the fibers.
“Get all those strings cleaned up. Your mixer did all the hard work of loosening all those strings,” she adds as she spoons out the seeds and remaining fibers.
Costello’s next tip involves using a dry-erase marker instead of a Sharpie or any other permanent marker to draw a face onto the pumpkin.
By using a dry-erase marker, you can rub away the outlines of the drawing after the pumpkin is carved.
For those who don’t like using a knife or don’t have a pumpkin-carving kit to create their jack-o’-lanterns, Costello recommends using cookie cutters and a wooden mallet to punch out the designs.
@brunchwithbabs 🎃Do’s and Don’ts of Pumpkin Carving 🎃It is a treasured tradition in our family to carve jack-o-lanterns for Halloween. But with all the yuck and mess, sometimes my kids would quit the project before we even started. Babs’ Do’s and Don’ts for Pumpkin Carving, saves the mess and speeds up carving so you can have the perfect jack-o-lantern with no mess and no fuss. Happy Halloween 🎃XO Babs 1. Carve from bottom. That way you have the stem to hold onto and you can easily slip the pumpkin right over a candle or flashlight. 2. Hold pumpkin in your lap to carve. You will have a much steadier pumpkin to cut. 3. Use a red dry erase marker to sketch your design. It erases easily and if you miss a spot, it blends in. 4. Use a hand mixer to clean out your pumpkin. 5. Use cookie cutters and a rubber mallet to carve your design. 6. Cover all cut surfaces with Vaseline to keep the pumpkin moist after carving. Pumpkins should last 1-2 weeks carved! 7. Sprinkle some cinnamon on the inside top of your pumpkin for festive pumpkin spice smell when a candle is lit inside the pumpkin. 🎃 #pumpkincarving
♬ original sound - everyone’s grandmother
The content creator also has advice on how to make the carved-out pumpkin last longer.
“Don’t let all your work go to waste, those kids want to enjoy these pumpkins,” she says. “Take Vaseline and rub it on all the open-cut surfaces. It’ll keep your pumpkin moist, won’t dry out as quickly, and it should last about one to two weeks.”
Costello’s final tip for a “beautifully scented” pumpkin is to sprinkle cinnamon into the head of the pumpkin, before lowering it over a candle.
Her video, which was been viewed nearly 23 million times on the platform, has been praised by fans for teaching them some new tips.
“My god, Babs, you never fail to impress and teach me something new and inspiring,” one person wrote.
Another said: “I have been doing everything wrong the last 40 plus years of my life!”
A third said Costello’s tips arrived just in time for carving pumpkins with their children, adding: “I literally just learned so many things, thank you!”

