How to Build an Anchor in Poor Rock
This article originally appeared on Climbing
This article was originally published in 2013 and is being republished now for free.
How many pieces do you need for a traditional anchor? Most climbers don't have time to blink before they answer this question. But if you answered "three," you're wrong. An anchor takes as many pieces as it needs based on rock quality, positioning, angle, and other factors. In an alpine environment where speed and efficiency are everything, an anchor can be a single piece of gear and your body (better learn to hip belay); however, loose or questionable rock (common in the mountains) might dictate four, five, or even six pieces of gear to create a solid anchor. Three pieces are relatively easy to equalize, but lots of gear in blocky and broken stone is challenging to equalize for a single master point. Learning how to build an "anchor in-series" will not only give you a solid option for bad rock, but also offers numerous solutions if you run into any other tricky anchor scenarios.
The beauty of in-series anchors is that you have infinite solutions with exactly the type of gear you should have on you (single- and double-length slings). Many guides recommend that beginning leaders work with anchors in-series because they will lay a solid intellectual framework of what an anchor is and what it's supposed to do. Once a leader begins to understand that, he should start experimenting with other systems (building an anchor with the rope, etc.).
Option 1: Untie your cordelette
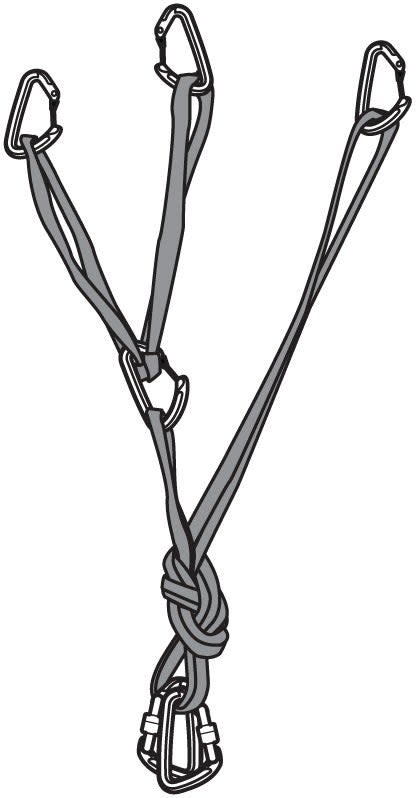
Cordelettes are excellent for equalizing anchors with three pieces, but when they're tied off into a closed loop--how most of us carry cord--they can be too short for this application. If you have four pieces or more to equalize, the first option to consider should be to "open up" your looped cord, meaning untie the Flemish bend, double overhand, or double fisherman's knot that keeps the cord in a closed-off loop. Once you untie the loop, tie a figure eight on a bight in each end and then use the resulting cord like a Webolette. In other words, clip the looped ends of the cord to the outside pieces, clip the remainder of the cord through the inside pieces, and then pull down all the strands and tie the whole thing off with an overhand on a bight (fig. 1). When you're finished, it will look like a standard pre-equalized cordelette.
Option 2: Anchors in-series
Sometimes opening up a cordelette still doesn't give you enough length to tie a pre-equalized master point. This is where "anchors in-series" come in. Anchors in-series provide a way to equalize three to eight pieces of gear together into a single master point. Basically, it is a series of pre-equalized anchors (built with slings and/or cord) that are stacked on top of one another. This is also a great way to build an anchor with a series of slings if you don't have a cordelette.
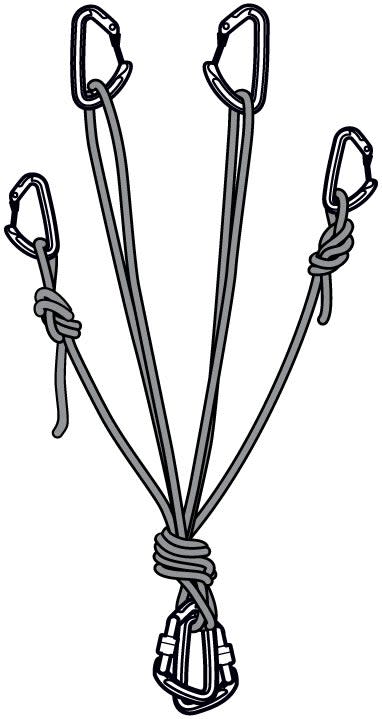
A. The simplest in-series anchor can be built with three pieces of gear and two double-length slings. Place two pieces, clip one double-length sling into both, pull all strands down (angled slightly toward where the master point will be), and tie a figure eight on a bight in the sling. Place a third piece and clip a second double-length sling to it, and then clip that same sling to the master point of the first two pieces. Pull both strands down and tie a figure eight on a bight (fig. 2).
B. A more complex version of this might have two two-piece anchors that each have a pre-equalized sling; each of those master points would then be joined with a third pre-equalized sling or cordelette. If the rock quality or the pieces are extremely poor, keep building smaller anchors connected by tied-off double-length slings. If you do have a closed-loop cordelette, you can use that to join three to four pieces to another mini-two piece anchor, treating it just like a sling that connects each mini-anchor.
Related: Check out our online course, Essential Self-Rescue for Climbers, with Karsten Delap:
Option 3: Overhand knots
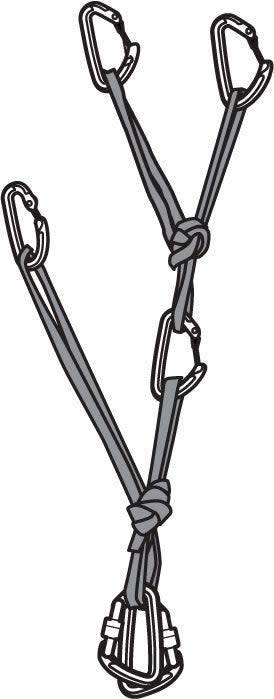
You might find that you don't have slings long enough to tie off into master points with a figure eight on a bight for an in-series anchor. Tie a single overhand knot in the middle of the sling instead. To do this, place the two pieces, clip the sling, and pull it down toward where the master point of that mini-anchor should be. While holding that point in your hand, unclip from the gear and tie an overhand knot where your hand is marking it. Re-clip the sling to each piece, and then clip a biner to both sides of the knot in the middle; this is the master point to include in the rest of the anchor (fig. 3).
You might be tempted to create a "magic X" or "sliding X" when the sling is too short, but that is not a good idea up high in an in-series anchor. If a single piece blows, it will have a serious impact on the overall strength of the anchor. The failure of one piece in a magic X doesn't just shock-load the other pieces like in a standard three-piece anchor; here, if one piece of the magic X fails, that leaves a limp sling and makes the second piece ineffectual. That means the whole magic X mini-anchor is now useless, and it loads the rest of the system with more weight, which is dangerous if the anchor is built in poor rock. If faced with a situation where you absolutely must use a magic X, all gear outside of the magic X must be extremely strong.
As an AMGA-certified rock guide and the Director of Operations for the American Alpine Institute, Jason Martin runs the popular American Alpine Institute climbing blog (alpineinstitute.blogspot.com) where you can find more tech tips like this one.
For exclusive access to all of our fitness, gear, adventure, and travel stories, plus discounts on trips, events, and gear, sign up for Outside+ today.
