How to Build a DIY Dog Wash Station That Makes Cleaning Your Pup So Much Easier
Marty Baldwin. Project producers: Lauren Aust and Mary-Beth Rouse
As every pet parent knows, dirty paws make it nearly impossible to keep your floors and furniture clean. And showering your dog in the family bath often creates big messes—yes, we're talking wet towels and floors and the tub needing to be cleaned before the humans can use it again. Plus, there are the extra storage needs for dog-designated shampoos, towels, brushes, and more.
A DIY dog wash station just might be the answer to all your problems. With a designated spot off the entry or perhaps in the basement, a dog wash station keeps all the mess plus your pet supplies in one zone. Call it the pet happy place.
You can build a dog washing station like the one we show above using intermediate DIY skills, basic tools, and supplies that are readily available at most home improvement stores. You'll also probably need the help of a plumber, depending on the logistics of your project and your skills.
Where Should You Locate Your DIY Dog Washing Station?
Determining where your DIY dog wash will be located is the biggest decision. And it will likely require consulting with a plumber. From an accessibility point of view, you'll want your dog washing station to be located so your dog can get to it without traipsing muddy footprints around the house when she arrives home dirty and ready for a bath. For an indoor dog wash, that may mean you'll want it near a side or rear entry. Many families like to incorporate a dog bath into their mudroom or laundry room.
From a construction point of view, it's easiest if your indoor washing station is on a main level, with an unfinished basement below to make plumbing easy to access. A more affordable option: Convert a shower or tub that's already on the main level or in the basement. That will simplify the amount of new plumbing your dog wash might need.
And don't forget to consider the flooring. Waterproof flooring such as luxury vinyl tile or ceramic tile (make sure it's designed specifically for floors, not walls) will need to be installed in the area around the station once the shower is finished.
RELATED: 6 Tips From the Pros to Get the Pet Shower of Your Dreams
How Big Should Your Dog Washing Station Be?
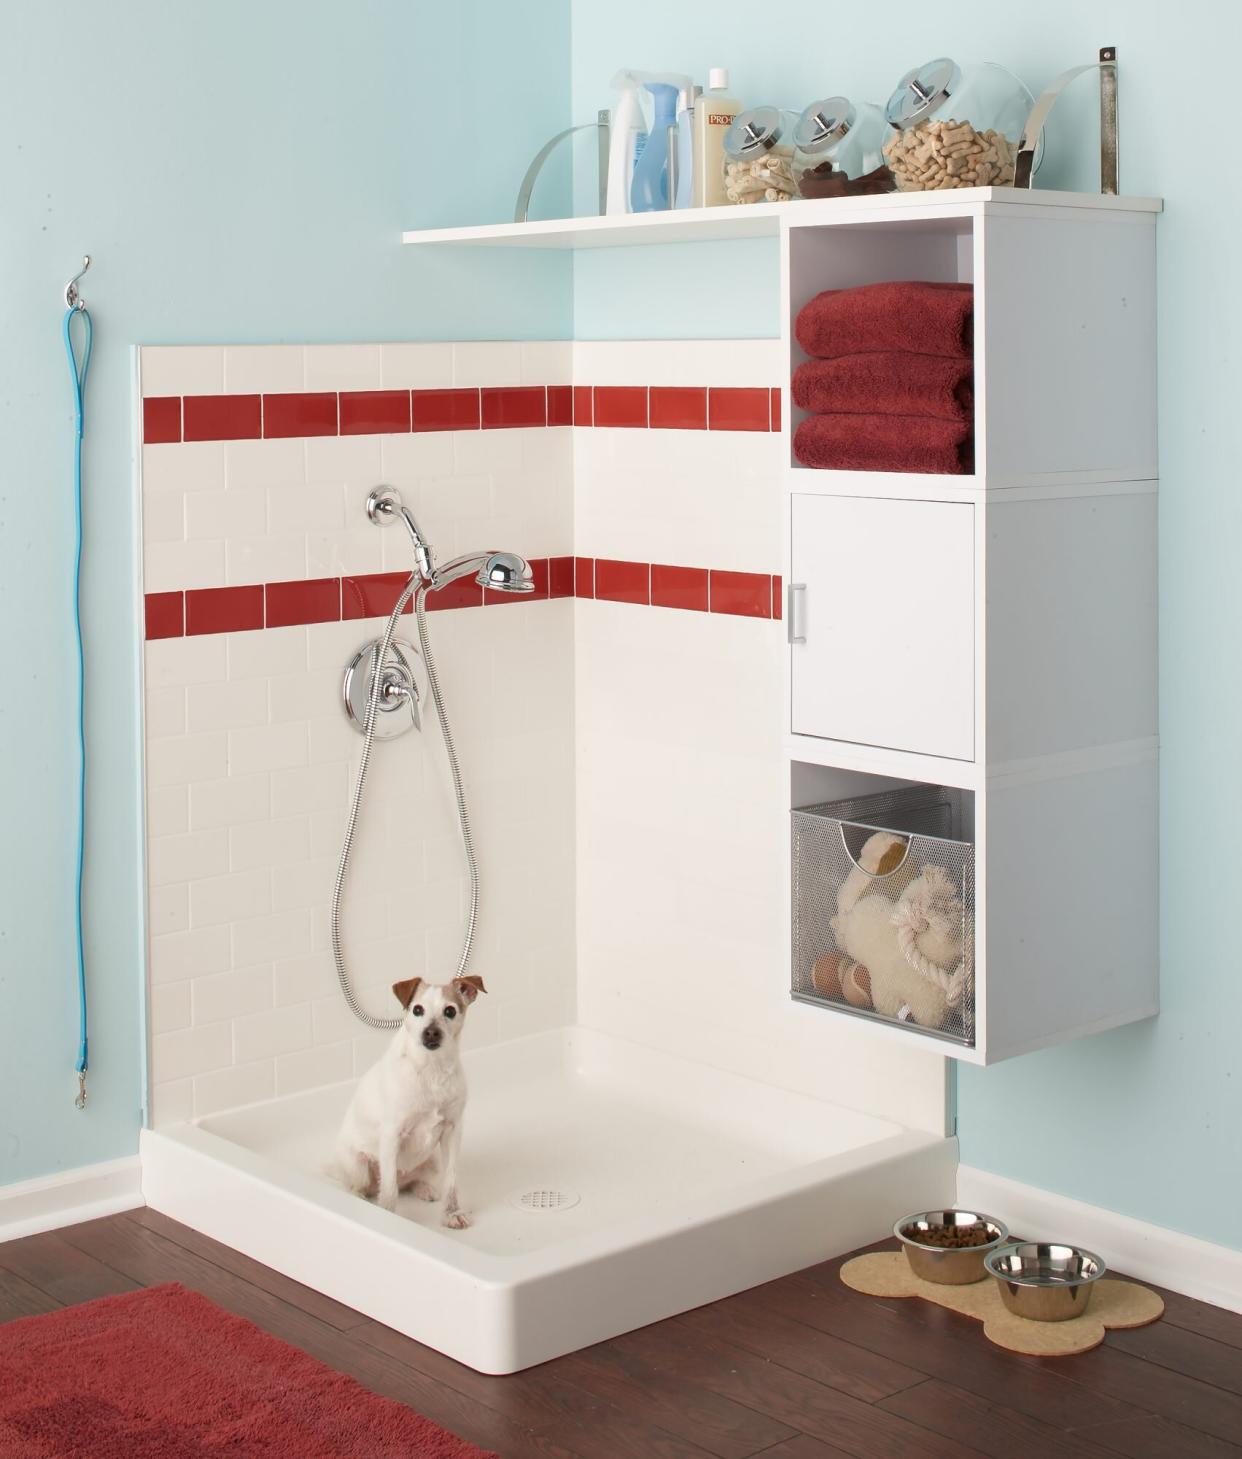
The size of your dog and your space will be the two main factors in deciding the size of your dog wash. Shower pans—the foundation for this project—start at 3x3 feet, perfect for small to medium dogs. Showers for a Newfoundland or Great Dane will certainly require a larger pan, such as 3x6 feet.
Once the shower size is determined, call in a plumber to plan out the placement and water lines. This is also a good time to talk about any water-related amenities you want your dog shower to have, like a specialty shower head, hand-held attachments, or an extra-long hose. Have your plumber take care of permits, placement, and any installation that's beyond your skill level.
During construction, make sure to keep project supplies and tools safe from pets. Construction materials are among the top pet-related toxins, according to the ASPCA Animal Poison Control Center. Close the door on your work area if possible, or set up a worktable to keep project items out of reach. Make sure to clean up the work site after each DIY session.
Tools You'll Need to Make Your DIY Pet Shower
Tape measure
Level
Tile cutter (can be manual if using individual subway tiles)
Tile snips
Notched trowel
Drill/driver
Hacksaw
Miter box
Notched trowel
Tile float
Tiling sponge
Bucket
Protective gloves and eyewear
Supplies You'll Need to Make Your DIY Pet Shower
Shower pan
Tar paper
Thin-set mortar
Shims
Plumbers' putty
Shower drain
¼-inch cement board
Aluminum bullnose edging (also known as Schluter strips)
Subway tile
Complementary-color subway tile
Tile adhesive
Tile spacers
Grout in desired hue
Grout sealant
Teflon tape
Showerhead
Faucet
Shelves, brackets, and/or wall-hung cabinets as desired
Drywall anchors
Step-by-Step Instructions to Make Your DIY Pet Shower
Step 1. Prep the Area
Remove flooring to the subfloor. Clean with a broom or shop vacuum.
Step 2. Call in the Plumber
Consult a plumber to determine placement of the shower. Have the plumber install the water lines for the drain and the shower water supply.
Step 3. Prep for and Set the Shower Pan
Tack tar paper on the subfloor. Dry-fit the shower pan to check that it's level. Remove the pan and add shims if needed to make it level.
To set the shower pan, apply plumbers' putty to the underside of the drain flange; insert through the drain hole in the pan. Install gaskets and tighten the flange. Mix a batch of mortar, and trowel onto the subfloor. Set the pan in the mortar bed; check for level and adjust as needed.
Step 4. Prep for Tiling the Walls
Using the level, draw a vertical line at the outer edges of the shower pan to the desired tile height; mark. The area between marks indicates where your tile will go. Use a jigsaw to cut the cement board to fit this area (work outside as it's messy). Apply cement board to the tile area with thin-set mortar. Secure to the wall with cement board screws.
Step 5. Lay Out the Tile Pattern
The pattern used here is a brick style, with 50 percent offset. Map out the design on paper to determine how many edge tiles to cut. Use a tile cutter to make the cuts.
Step 6. Trim and Install the Vertical Aluminum Bullnose
The bullnose trim will run along the side and top edges of your tiled area, creating a clean finish between the tile and the wall. You'll install the vertical trim at this point; the top edge comes later. Using a hacksaw, cut the aluminum bullnose to the finished tile height, creating a 45-degree miter at the top. Trim any excess metal with snips, and smooth with a file. Apply thin-set mortar along the outer tile lines and install the aluminum strips.
Step 7. Install Tile
Apply a layer of tile adhesive along the edge of the shower pan. You'll lay the tile from the aluminum edge and work toward the inner corner. Start at the aluminum edge with one of the half-tiles that you cut, then lay full tiles as you work toward the corner. Use tile spacers between each tile. Once at the corner, measure and cut the last tile to fit.
Continue tiling with the next row up, starting at the aluminum edge with a full tile. Repeat up the wall, applying tile adhesive as needed. When that wall is complete, move to the adjacent wall, working from the trim to the inner corner, from bottom to top.
When the tile reaches the water source and shower pipe, use tile snips to cut tiles so they'll create a tight fit around the pipes.
Work in contrasting-color tile at the desired height, according to your tile design plan. Before placing the last row of tile, measure and mark the wall and install the top aluminum strip. Then add the final (top) row of tile so the top edge is flush with the aluminum strip.
Step 8. Apply Grout and Sealant
After the tile adhesive has dried and set, remove the plastic spacers and fill the joints with grout using a rubber tile float held at a 45-degree angle. Allow the grout to set for a few minutes, then remove the excess with a clean sponge and a bucket of water. When the grout is dry, apply a grout sealant following the manufacturer's instructions.
Step 9. Connect Plumbing
Wrap several wraps of Teflon tape around the shower valve. Install the shower head and faucets following the manufacturer's directions. You can always call the plumber back for this step, if you prefer.
RELATED: This Pet-Friendly Mudroom Will Make You Swoon With Envy
How to Install the Finishing Touches for Your Dog Wash
While your dog washing station is ready to use, there are still a couple of finishing touches that will make the space a joy for you and your dog, like flooring. Depending on how and where you installed your dog wash, you may still need to finish the area with waterproof flooring. Many types of flooring are designed for do-it-yourselfers. But you can always hire an installer if you'd prefer.
Storage is the final addition that will transform your dog shower from a cleaning spot into a truly comprehensive washing station. Our pictured station includes a combination of open shelves, baskets, and closed storage. This strategy lets you display, corral, and hide items as needed. Be sure to use wall anchors when you hang shelves or cabinets. Nearby hooks will give you a place for leashes, harnesses, and your dog's cutest sweaters.

