How Daniel Stendel’s Hearts beat title-chasing Rangers: a forensic analysis of high press tactics
Daniel Stendel's influence is already clear at Hearts. A high press in a compact shape, determined tackling, attacking diamonds, forward passing options and, basically, the complete opposite of everything Craig Levein tried during his time in charge.
Was the 2-1 victory over Steven Gerrard's Rangers an example of things to come? Is this the new Hearts? Or was this a relegation threatened side punching up against a visiting giant?
Stendel's high press system
Stendel wants his side to press from the front with a high defensive line and maintain a compact shape both in terms of width and depth, in a high risk, high reward strategy which depends upon discipline, bravery and total trust in the manager's plan to execute effectively.
Pushing the defensive line up the pitch gets the team in possession closer to goal with wider control of the pitch but requires everyone working in sync and a lot of running. The obvious risk is any turnover in possession can lead to the chasm of space left behind the back line being exploited by direct passes or pacy forwards, something Rangers were entirely capable of doing.
The shaded parts of this graphic denotes where space is left as a result of press type.

A single mistake often decides a game, which is why so many managers favour a safer, more defensive setup against strong opponents to avoid being unravelled, but Stendel wants to defend by keeping the ball away from his own box and affect play with this aggressive approach.
If Rangers bypassed the press - which they struggled to do - Hearts dropped into a mid-block and waited to pounce on the counter. Gerrard's team seemed worried from kick off.
How the press was meant to work in practise
Liam Boyce led the line in a 4-2-3-1 flanked by Euan Henderson at left wing and Lewis Moore wide right, with Steven Naismith in the 10 position operating as second striker, auxiliary midfielder and link man all at once. If we want to define his role, 'ball winning forward' isn't too far off.
Naismith was key to the entire plan working. Hearts were setup to control the game without the ball, dictating where the next pass would be played, aware that Rangers were likely to have more of possession (which they did, with 54 per cent).
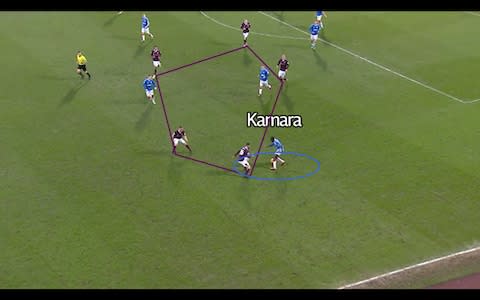
With Rangers in possession below, Naismith tracks Ryan Jack across to the left wing, closing off the Rangers midfielder's passing option inside the pitch and forcing the pass back towards the Rangers box.
Boyce is ready to press the pass.
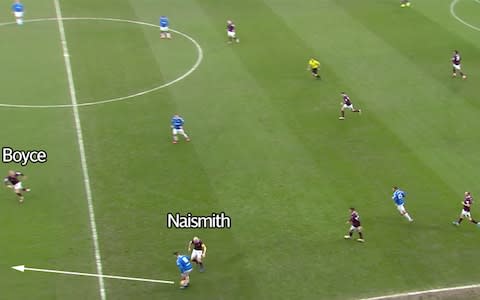
Boyce's run and position means Connor Goldson has to go backwards, so Boyce runs inside the pitch (yellow arrow) to block off the passing option to Nikola Katic (the lonely blue shirt below).
Naismith can now read the play and either run inside to to block a pass through the middle, or stay close to Goldson to prevent a pass coming back to him.
Allan McGregor elects to 'get rid' and boots the ball up the pitch... but Sean Clare, the right-back, is able to easily intercept and heads to a midfield teammate. Hearts win possession.
The press has worked. Or has it? Bad first touches leads to the ball pinging around the midfield, Hearts lose the ball and Joe Aribo controls. He takes a look ahead and spots Defoe making a run beyond the last man, chipping a pass into space beyond the centre-backs.

One player standing too deep means the offside trap has failed and Defoe runs beyond the last man as Hearts rush to get back..

Suddenly, Joel Pereira appears on screen having run 30 yards off his line to head clear like a sweeper keeper. This is a very un-Levein piece of goalkeeping.
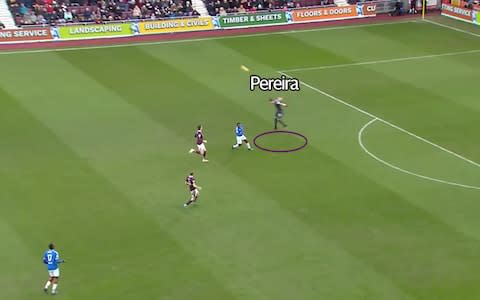
Pereira saves the day.
A deeper defensive line rarely has to deal with situations like these because sitting closer to the box leaves little space behind for through-balls.
Stendel needs his centre-backs to be brave in this high line and avoid dropping five yards against a fast, breaking striker as most defenders tend to want to.
The advantage of staying narrow
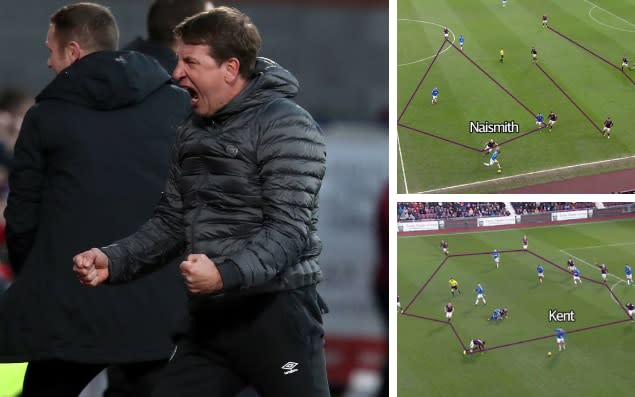
To ensure Hearts were able to win the ball high up the pitch and keep it, Stendel had them in a narrow formation with bodies packed together. If one player won a tackle or made an interception, another was close by to pick up the loose ball.
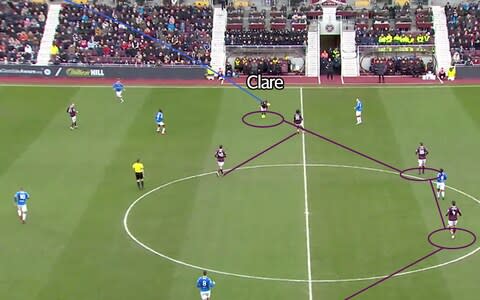
Below, Hearts win a throw-in wide right in the opposition half with every single member of the team within the same vertical space, occupying about a third of the width of the pitch.

As Clare comes across to take it, the shape expands with left-back Aidy White moving high and wide on the opposite wing. Rangers forwards Aribo and Kent have to drop deeper to cover the advanced full-backs, leaving Defoe isolated near the centre-backs at half way - hardly a threat on the counter.

Playing in a narrow shape prevents the opposition from passing through the centre of the pitch. When Rangers had the ball the only available players were in wide areas, and so when the ball moved to the wing, Hearts shifted across to that side and further limited forward options.
Below, Flanagan has the ball on the right wing. Rather than attempt to win the tackle, Naismith shows Flanagan down the line knowing his only option is to play the ball down a channel protected by numbers in maroon shirts. Hearts have four players vs Rangers' three on that wing.
Hearts win possession.
Disadvantages to the narrow shape
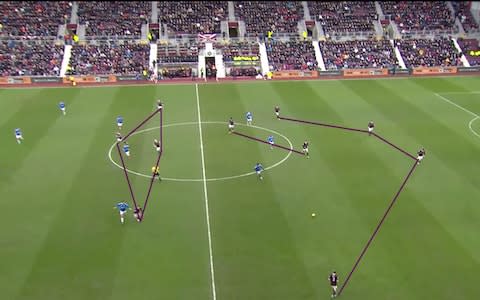
Staying so compact allowed Hearts to swarm the player on the ball in midfield but left them vulnerable to counters on the opposite wing, as shown below, with Jon Flanagan (right-back) and Jack (midfield) attacking the right side following a turnover.

Hearts haven't quite perfected the out-of-possession transition phase yet and shift across in a panic to cope, the back four rushing to deal with the immediate danger of Kent's underlapping run. This is something Stendel will need to correct quickly in training.

The Hearts back four (linked above) manage to get back into some sort of proper defensive shape but Jack threads Kent into the box. Luckily, the winger shoots over and Hearts survive.
The problem with pressing when tired
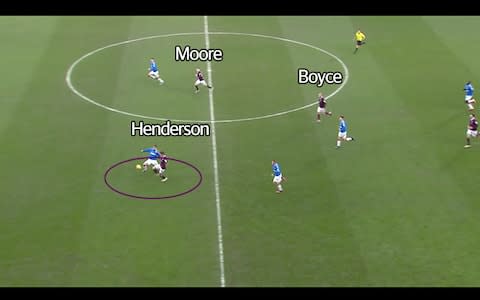
Rangers created a few chances on the counter by exploiting the high line but with little time to pick a pass in defence or midfield, resorted to long balls and switched passes which Hearts were ready to deal with. The high press from Stendel's team forced Rangers closer to their own box than Gerrard wanted and meant any attacks tended to be from individuals in wide areas who were quickly outnumbered by Hearts defenders.
Hearts were made to drop a little deeper as the half wore on but Henderson, Boyce and Moore were always ready to counter, which made Rangers reluctant to send too many players forward and prompted some unwanted recovery tackles after mistakes. Flanagan picked up a yellow card for chopping down Henderson as Hearts broke from a Rangers free-kick, below, for example.
The fear of making errors that would lead to these sorts of attacks meant Rangers were less inclined to get forward in numbers and keep the ball as long as they usually do, allowing Hearts to direct play and control the game without possession. Teams rarely press Rangers so high up the pitch.
Perhaps inevitably, Hearts began dropping deeper as time went by and made a few errors in concentration towards the end of the half, with positional errors nearly gifting Rangers opportunities to score.
Below, three of the back four are in a straight line to play the offside trap Stendel is looking for, but one centre-back switches off and drops two yards to give Defoe an easy run through on goal.
The long pass from the deepest defender (closest to Rangers' box) goes over the top and Hearts are in trouble - one small cog out of place has broken the machine. Defoe runs into the box.

The chasing defender shows him onto his right foot and makes the block. Hearts get away with another one.
Sticking to the plan
Hearts made a slight tweak at half time with Siddick moving to left-back and Oliver Bozanic replacing White after the break, but started with the same system. It led directly to Rangers scoring their opener.
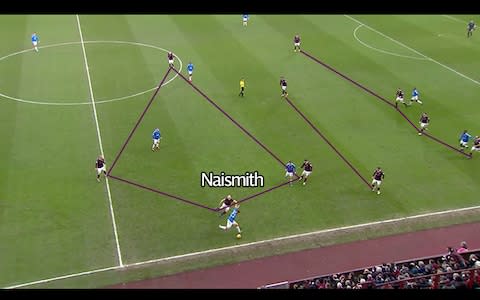
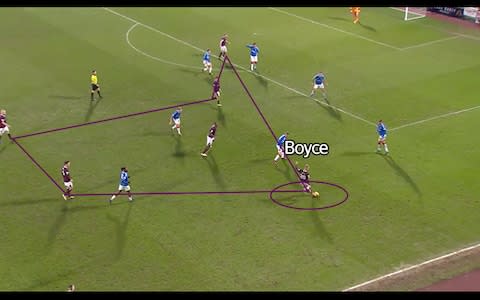
There are three potential receivers of the Hearts throw-in below, with two covering midfielders and three players stood in the same vertical space in the middle of the pitch waiting for a switched pass. Everything is quite congested, Rangers are trapped.
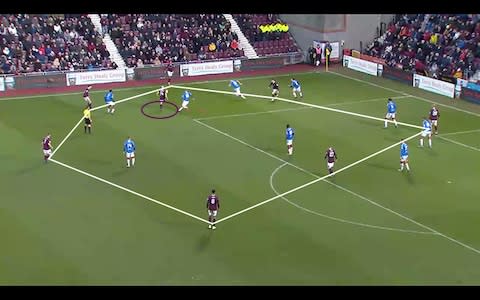
Boyce (by the six yard box) gets as far forward as he can to drag Rangers back and create depth, freeing up space for others behind him as the defensive line shift closer to their own goal.
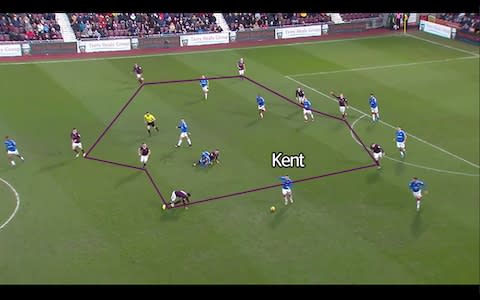
The throw goes short, Rangers press and possession is turned over. Suddenly, Hearts' attacking shape has left them with eight players behind the ball.

Hearts try to recover instantly, constricting the shape to block space but Rangers win the next 50/50 and in the panic, Hearts players slip. Nine maroon shirts are now behind the play as Kent sprints away with the ball.
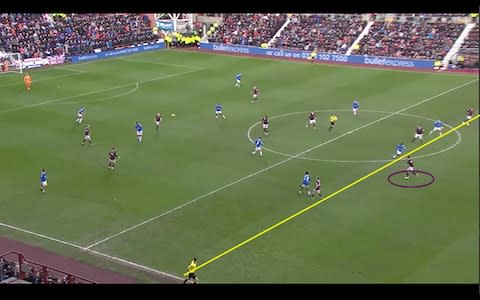
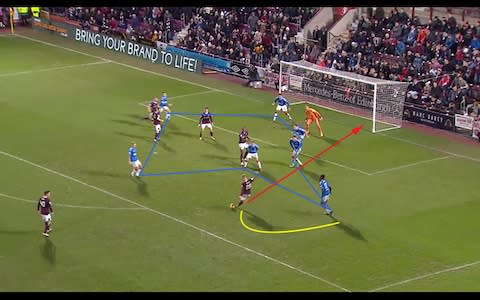
Kent reaches the final third with Rangers in a four v five scenario and waits for the overlapping run of Barisic.
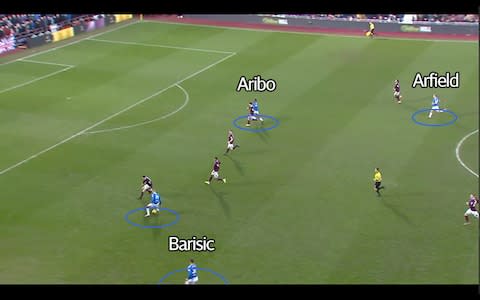
Barisic gets wide of the box and the Hearts defenders follow the immediate threat of Aribo close to goal, freeing up space for Kent on the edge of the box. Hearts defenders follow the ball, Kent reads the game.
Barisic crosses low, Aribo lays it back and Kent scores.

This is the risk that high pressing presents. Although Hearts had Rangers pinned back in their own half and were able to keep the ball against a stronger opponent, one quick move was enough to open up the defence - something which doesn't happen when playing safer in a more defensive low block.
Crucially, Hearts didn't deviate from the plan.
How Hearts won the game
Hearts pressed in exactly the same way after conceding and made sure every pass was vertical, following each forward ball with numbers to support.
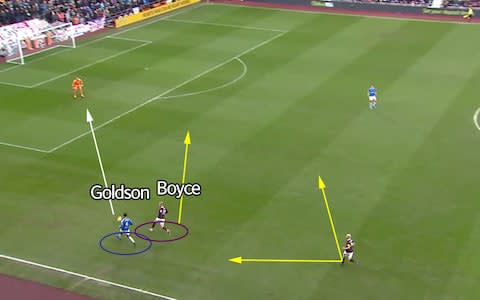
In the 57th minute Glen Kamara received the ball wide left without a safe option to shift it on, surrounded by Hearts players thanks to the compact, pressing shape.
The player pressing Kamara here is centre-back Craig Halkett, who blocks and then jockeys Aribo before taking his chance to tackle, jabbing the ball away as Kamara takes too long to make a decision. The high Hearts press results in a turnover near the Rangers box. High risk, high reward.

Boyce turns into the box, spots Naismith in position on the edge of the area and the finish is brilliant, looping over the goalkeeper's head as a panicked Goldson lays prone on the floor having slipped.

Creating chaos with structure
The second goal was another product of Stendel's tactical setup. With Uche Ikpeazu now on as a striker, Boyce has moved to a wide right position and receives the ball, below, on that wing with plenty of Hearts players in the same narrow shape they've kept all game long.
By loading one side of the pitch with six players, as above, Hearts make Rangers naturally shift to that side to avoid being overrun... but that leaves the opposite wing completely free for anyone able to take up that position.
Connor Washington, on as a substitute for Moore, does exactly that, arriving in space unmarked to control the switched pass from Boyce. Rangers have to adjust and everyone shifts over to the right.

Washington takes a step towards the box as Rangers take their new positions then switches it back to Boyce, who has found space at the edge of the area away from the transitioning Rangers shape.

Boyce controls and fakes to shoot, Aribo buys the dummy and Boyce cuts onto his left foot. By shifting the ball from side to side, Rangers' defensive shape has turned into porridge and the finish, placed back across goal, catches everyone by surprise.
Hearts hang on to record a famous victory.
Is this the new Hearts?
Worse teams will take points off Hearts this season by sitting deep and hurting them on the counter, but this tactical model is designed to help open up locked defences by creating in transition. As Jurgen Klopp attests, "No playmaker in the world can be as good as a good counter pressing situation".
Stendel's high press helped Hearts win the ball close to the Rangers half, disrupted Gerrard's passing game and meant Rangers were restricted to counter-attacks from a deep starting position. The narrow shape kept players close together to aid counter-pressing and facilitate quick one-two passing moves, and the late goal was created by using this shape to make Rangers defenders chase the ball like dogs on a tennis court. It also led directly to dangerous counter-attacking moves that Gerrard's players should have done better with.
"I said 'Believe what I say is right, this is the way we will play," Stendel said after the match.
"I can understand it's not so easy when you don't win but you can believe we will find success, and you can see today in every situation we had the courage to defend in front, to attack in the front, to press high and we believed even at 1-0 down that we can win this game. The last 10 minutes, the fight on the pitch from everybody was great."
Stendel has asked his players to trust the tactics, knowing that anything less than full commitment will result in it failing. Wins from performances like the one on Sunday will certainly help his cause and should end with Hearts climbing swiftly out of the relegation zone.

