Dessert lasagna, Kisses and Santa Hats: The best cookie recipes for a holiday party
Tired of baking the same old boring cookies for your holiday party and want a different or unusual recipe?
Tired of Aunt Martha’s fruit cake and looking for an eclectic, engaging array of cookies and confections? We have those. How about homemade marshmallow fluff layered in what we’ll just call “dessert lasagna?”
Ganache — just saying the decadent filling it will take your holiday gathering up a notch. And to just make sure the party stays festive, red velvet makes an appearance, and it’s willing to shape any cookie desires for any age.
Try one of these holiday cookie recipes or try them all. Each has the list of ingredients and the how to instructions. But, be sure to share with your friends and family this season.
Meet ‘dessert lasagna’
The humble soda cracker has long been the stage for us to privately explore our most bacchanalian culinary instincts. Admit it — you’ve done weird stuff with them.
Salty, crispy and available at retailers as varied as Whole Foods and gas stations, they’re a perfect vehicle for just about any flavor. My favorite late-night soda cracker delicacy is saltines with slices of cheddar cheese and kimchi, a creation I would never serve on a plate to another human soul but will happily chomp down standing in front of an open refrigerator late at night.
This recipe did not begin with a late-night rummage through the cabinets, but rather at a holiday gathering where I glumly stared down an ignored platter of the Midwesterner specialty of saltines topped with melted chocolate chips and sometimes toffee. (It is often made with matzoh around Passover, too.) This stuff just isn’t as mind-blowingly good as its premise hints at. It’s primarily too sweet, and visually it doesn’t beg for real estate on whatever tiny appetizer plate you’re holding. Don’t threaten me with a good time and then not deliver.
Saltine S’mores takes the core elements and turns them up to 11, transforming chalky melted chocolate into glossy chocolate ganache and introducing homemade marshmallow fluff to the equation. Can you sub store-bought fluff? Actually, no. The Washington Post Food team tried and found it was too soft and sticky to hold its shape, as well as being overly sweet. But homemade fluff is transcendent, and this is coming from a reformed marshmallow hater.
While the description of “dessert lasagna” certainly has a Buddy the Elf quality about it, I find that it’s a useful way to think about the assembly of this treat. You start with a layer of crackers, then marshmallow fluff, then crackers, then ganache and peanuts, and keep building until your lasagna is four layers of saltines high (any taller and it becomes a bit unwieldy). Top it off with sprinkles and you’ve got a treat that can’t be ignored.

Recipe: Saltine S’mores
Active time: 1 hour | Total time: 3 hours, including chilling time
Servings: Sixteen 2-inch squares
This recipe is inspired by saltines or matzoh topped with melted chocolate chips and (sometimes) toffee. Saltine s’mores takes the core elements a step above, transforming chalky melted chocolate into glossy chocolate ganache and introducing homemade marshmallow fluff to the equation.
Emily Nejad likes to refer to this recipe as “dessert lasagna,” which is a useful way to think about the assembly of this treat as you build the layers. We found assembly easiest in an 8-inch square pan with straight sides that was at least 2 inches deep.
The marshmallow fluff does not use gelatin, making this recipe vegetarian and kosher. We don’t recommend using store-bought fluff. In a test, we found it was too soft and sticky to hold its shape, as well as overly sweet.
Storage Notes: The s’mores can be stored in an airtight container at room temperature for up to 1 week, as can any leftover fluff (you may need to whip it again to reach full volume). Store in the freezer for up to 1 month.
Note: If you are concerned about the risk of salmonella from not fully cooked egg whites, buy pasteurized egg whites, such as Organic Valley, Bob Evans or Davidson’s brand. To get the necessary volume, you will need to increase the amount of whites by about 1/4 cup (the equivalent of 2 whites). Bring the whites to room temperature and note they can take as long as 15 minutes to reach soft peaks — that is, almost hold their shape but still flop over at the top.
INGREDIENTS
3/4 cup granulated sugar
3/4 cup corn syrup
1/3 cup water
3 large egg whites (see NOTE)
1/2 teaspoon cream of tartar
1 teaspoon vanilla extract
11 1/2 ounces (1 bag) milk chocolate chips
3/4 cup heavy cream
64 saltines (from 2 sleeves)
1/2 cup finely chopped unsalted peanuts, raw or toasted
Flaky sea salt, for sprinkling
Sprinkles, for decorating
DIRECTIONS
In a medium saucepan, stir together the sugar, corn syrup and water until combined. Attach a digital or candy thermometer with a clip to the side of the pot, ensuring the tip is submerged. Turn the heat to medium-high and leave the mixture undisturbed from this point on — stirring it will create pesky sugar crystals.
While your sugar syrup heats, in the bowl of a stand mixer fitted with the whisk attachment, combine the egg whites and cream of tartar.
The sugar mixture will probably reach around 200 degrees relatively quickly and then slowly creep toward 225 degrees. When the syrup is just about at 225 degrees, start whipping the egg whites at medium-high speed to soft peaks, 4 to 5 minutes. (Pull the attachment out of the bowl, invert it and look at the whites attached to it. You should see the whites almost hold their shape, but still flop over at the top.) Keep an eye on the egg whites, and be sure not to over mix. You should be at soft peaks as the sugar mixture reaches 240 degrees.
When the mixture hits 240 degrees, remove the saucepan from the heat, turn the mixer to medium and get ready to pour: You’re aiming to pour the mixture in the sweet spot between the whisk and the side of the bowl. Slowly and carefully pour the sugar syrup into the whites in a steady stream (it’s OK if the attachment flings some of the mixture to the sides of the bowl, but don’t pour the mixture onto the metal), then increase the mixer speed to medium-high and whip for 8 minutes, adding the vanilla in the last minute or so. The fluff should be soft, thick and glossy and stretch a bit like saltwater taffy when it’s ready. Transfer to a large piping bag or gallon zip-top bag with the corner snipped (you may need to work in two batches of the fluff so it all fits in the bag).
While your marshmallow fluff is whipping, make the ganache. Place the chocolate chips in a medium bowl. Pour the heavy cream into a microwave-safe glass measuring cup and heat for 1-1/2 to 3 minutes, until hot. Keep an eye on it, as you don’t want it to bubble over.
Pour the heated cream over the chocolate and let sit for 1 minute before slowly stirring smooth. It may look like it’s not going to come together, but it will as you keep stirring.
Line an 8-inch square pan with crisscrossed sheets of parchment or wax paper that have plenty of overhang on all sides.
Line the bottom of the pan with 16 saltines (four rows of four). Then, pipe tidy lines of marshmallow fluff over the saltines. If you want to be precise, use about 250 grams of fluff. Add a second layer of saltines, then pour half of the ganache (also about 250 grams) into the pan and spread it over the saltines using the back of a spoon. Add half the chopped peanuts, plus some flaky sea salt. Top with a third layer of saltines and follow with the last layer of marshmallow fluff, followed by your final layer of saltines. Pour the rest of the ganache into the pan and top with the remaining peanuts and more flaky sea salt. Top with your choice of festive sprinkles.
Freeze in the pan for at least 3 hours. Remove the s’mores slab from the pan by using the paper overhang as handles. Unwrap to reveal the layers, and cut into 16 saltine-sized servings (2-inch squares). Eat right away and/or leave them uncovered at room temperature for a few hours to let the marshmallow fluff dry out a bit and stiffen so they more resemble a candy bar. For longer-term storage, transfer to an airtight container to keep at room temperature or in the freezer.
Nutrition information per 2-inch square: Calories: 292; Total Fat: 12 g; Saturated Fat: 6 g; Cholesterol: 15 mg; Sodium: 172 mg; Carbohydrates: 45 g; Dietary Fiber: 1 g; Sugar: 28 g; Protein: 3 g
This analysis is an estimate based on available ingredients and this preparation. It should not substitute for a dietitian’s or nutritionist’s advice.
From Emily Nejad of Bon Vivant Cakes in Chicago.
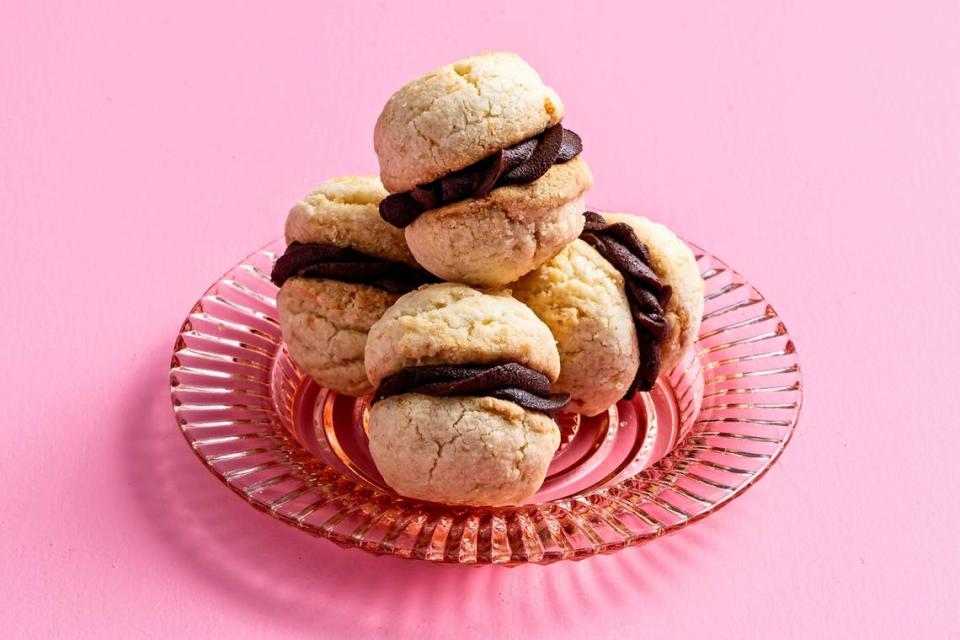
Recipe: Chocolate Macadamia Nut Kisses
Active time: 1 hour 30 minutes | Total time: 5 hours, plus optional overnight rest
Servings: 24 sandwich cookies
I’ve always loved sandwich cookies. They are special, as it feels like you’re getting two cookies in one, with a flavorful filling that could be jam or a soft fudgy ganache. Inspired by the Italian classic baci, which means “kisses,” my version — also served at Hotel Wailea in Maui — is made with Hawaiian macadamia nuts.
The recipe has more dry ingredients than usual due to the higher moisture and fat content of the nut, which also results in a lower amount of sugar used. You can substitute all-purpose flour with gluten-free flour without changing the flavor or texture of the cookie. Refrigerate the cookies for a chewier two-bite treat. Otherwise, when eaten at room temperature, these cookies will quickly crumble in your mouth, and you may have to eat them in one bite.
I’ve offered two variations: One that highlights the buttery nuttiness of macadamia, and another with optional cocoa powder, for a more bittersweet result. If you want some of each, divide the dough into two portions and add half the amount of the cocoa called for to one of them.
Recipe notes: This recipe makes double the amount of ganache you’ll probably need for filling the sandwiches. You can use the extra to make another batch of cookies or to make truffles — simply roll into balls and coat with your choice of toppings, such as cocoa powder, crushed freeze-dried berries and finely chopped nuts, before refrigerating. You can also halve the ganache recipe.
If you’d rather not make the ganache (which we highly recommend you do), you can fill the sandwich cookies with jam, melted chocolate or a chocolate spread such as Nutella.
The ganache needs to rest at room temperature for at least 3 hours, but ideally overnight, to achieve the best texture for piping.
The shaped dough can be refrigerated for up to 3 days. The baked cookies can be stored at room temperature in an airtight container for up to 3 days.
INGREDIENTS
For the ganache filling
1 cup heavy cream, at room temperature
1 tablespoon vanilla paste (may substitute 1 tablespoon vanilla extract)
2 cups chopped bittersweet chocolate
1/2 cup granulated sugar
Juice of 1 lemon (3 to 4 tablespoons; finely zest first to save for the cookies, below)
3 tablespoons unsalted butter, softened
1/2 teaspoon fine sea or table salt
For the cookies
1 1/4 cups whole macadamia nuts or halves
1 2/3 cups) all-purpose flour
1 2/3 cups cornstarch
2 tablespoons natural or Dutch-process cocoa powder (optional)
1/4 cup turbinado sugar or sugar in the raw
1 cup granulated sugar
2 tablespoons packed light brown sugar
1/2 teaspoon fine sea or table salt
Finely grated zest of 1 lemon (from above, about 1 teaspoon)
16 tablespoons (2 sticks) unsalted butter, softened and cut into large chunks
3 tablespoons almond paste
1 teaspoon vanilla paste (may substitute 1 teaspoon vanilla extract)
DIRECTIONS
Make the ganache filling: In a liquid measuring cup, whisk together the cream and vanilla paste until thoroughly combined. Place the chocolate in a medium heatproof bowl.
In a 2-quart heavy-bottomed saucepan over medium heat, combine the granulated sugar and lemon juice and cook to a light shade of caramel, about 328 degrees. Turn off the burner and let the residual heat continue to cook the sugar until it’s a darker shade of caramel (you may see a few wisps of smoke, too), about 30 seconds. Remove from the burner and gradually add the cream mixture in 3 to 4 additions, whisking after each addition. Take care, as the caramel will splatter.
Return the pot to medium heat and bring the mixture to a gentle simmer, scraping constantly to release any hardened caramel at the bottom of the pot. Pour the hot caramel over the chocolate in the bowl. Let sit for 1 minute to soften the chocolate. Add the butter and salt and, using a stick (immersion) blender, blend the mixture into a smooth ganache.
Let the ganache sit until the mixture is firm with a slight yield, like a ripe peach, at least 3 hours, though the ganache is easiest to work with after an overnight rest at room temperature. If you’re letting it rest overnight, cover it after the first few hours.
Make the cookies: Position a rack in the middle of the oven and preheat to 325 degrees. Toast the macadamias on a rimmed baking sheet for about 15 minutes, or until rich golden and fragrant, shaking halfway through. Transfer the nuts to a bowl or cutting board to cool completely, then coarsely chop.
Line 2 large, rimmed baking sheets with parchment paper.
In a medium bowl, whisk together the flour, cornstarch and cocoa powder, if using. Add the turbinado sugar to a small bowl.
In a food processor, pulse the toasted and cooled nuts with the granulated and brown sugars, salt and lemon zest until almost finely ground but still a little coarse, 7 to 10 times. Add the butter and almond and vanilla pastes and pulse 5 to 8 times, just to combine. Transfer to the bowl of a stand mixer fitted with the paddle attachment.
Add half of the flour mixture to the stand mixer bowl and mix on medium speed until combined. Stop the mixer, add the remaining flour mixture and continue mixing on medium just until combined, about 1 minute. Scrape the sides and the bottom of the bowl and mix for 30 seconds more. This can also be done by hand in a large (6-quart) bowl with a flexible spatula, keeping in mind you basically want to knead the mixture to ensure it’s combined (use your hands if necessary).
Using a No. 60 disher, portion cookies out into half dome shapes about 3/4-inch apart onto the prepared baking sheets, scraping as you fill to flatten the bottom. (A 1-tablespoon measuring spoon is another option, but it will be a little more work.) Each piece should be about 1 1/2 inches in diameter at the base. Smooth the exterior of the dough portions, as needed, and then dip the domed end into the turbinado sugar. Refrigerate the dough on the pans (or consolidate onto one if you’re tight on space) for at least 30 minutes to firm up.
Meanwhile, increase the oven temperature to 375 degrees. Bake the cookies, one sheet at a time, for 9 to 10 minutes, rotating from front to back halfway through, until slightly puffed and cracked. The plain dough will have some pale golden tones on top. (If using the optional cocoa, look for the cookies to be slightly darkened on the bottom.)
Match up the cookies in pairs, with halves as similar in diameter as possible. Pipe or spread about 2 teaspoons of the ganache on the flat sides of half the cookies so that the ganache almost reaches the edge. Place the remaining cookies flat side down on their mate, gently pressing them together.
Let the cookie sandwiches sit for 1 hour for the ganache to firm up slightly before serving or storing.
Nutrition information per sandwich cookie, using half the ganache: Calories: 298; Total Fat: 19 g; Saturated Fat: 9 g; Cholesterol: 29 mg; Sodium: 77 mg; Carbohydrates: 33 g; Dietary Fiber: 2 g; Sugar: 16 g; Protein: 2 g
This analysis is an estimate based on available ingredients and this preparation. It should not substitute for a dietitian’s or nutritionist’s advice.
From pastry chef Pichet Ong.
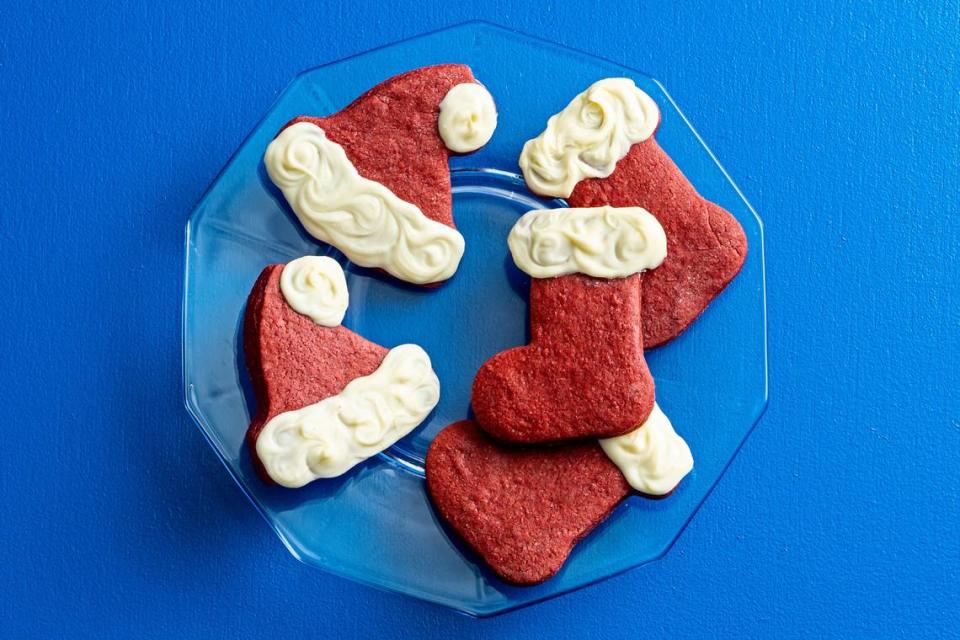
Recipe: Red Velvet Santa Hat Cookies
Active time: 1 hour 10 minutes | Total time: 2 hours 15 minutes
Servings: 36 to 54 cookies, depending on the cutter
Cookbook author Vallery Lomas channels the spirit of red velvet cake in these festive cookies. They can also be made in the shape of candy canes, Christmas stockings or whatever your favorite cookie-cutter shapes are. The yield will vary depending on the size and shape of your cookie cutter.
Red gel food coloring is more concentrated than liquid food coloring; but liquid food coloring can be used (the color will not be as bright).
Active time: 1 hour 10 mins; Total time: 2 hours 15 mins
Make ahead: The wrapped disk of dough can be refrigerated for up to 3 days.
The finished cookies can be stored in an airtight container at room temperature for up to 4 days, or frozen for up to 1 month.
INGREDIENTS
3 cups all-purpose flour, plus more for dusting
1/4 teaspoon fine sea or table salt
1/3 cup natural unsweetened cocoa powder
1/2 teaspoon baking soda
1 1/3 cups granulated sugar
16 tablespoons (2 sticks) unsalted butter, at room temperature
2 large eggs, at room temperature
1 tablespoon red gel food coloring (see headnote)
1 teaspoon vanilla extract
4 ounceswhite chocolate, finely chopped
DIRECTIONS
Line 2 large, rimmed baking sheets with parchment paper. (You may need a third or may need to re-use one, depending on how many cookies you end up with.)
In a large bowl, combine the flour and salt. Sift in the cocoa powder and baking soda, then whisk the dry ingredients together to aerate and combine.
In the bowl of a stand mixer fitted with the paddle attachment, or using a handheld mixer and a large bowl, combine the sugar and butter and mix on low speed for 1 minute, then increase to medium and beat until light and fluffy, an additional 2 to 3 minutes.
Stop the mixer and use a flexible spatula to scrape down the bottom and sides of the bowl and the paddle attachment. Still on medium speed, add the eggs, one at a time, ensuring each is thoroughly incorporated before adding the next, scraping the bottom and sides of the bowl as needed. Add the food coloring and vanilla extract, and mix until the red dye is evenly dispersed.
Reduce the speed to low. Spoon in the flour mixture and mix until a dough forms and the batter is just combined. (If there are bits of flour at the bottom of the bowl, use a large, sturdy spatula to incorporate any remaining flour by hand.)
Lightly flour your work surface. Scrape the dough onto the work surface and gather the dough into a disk. Wrap tightly in plastic wrap and refrigerate for at least 30 minutes and up to 3 days.
When ready to bake, lightly re-flour your work surface. Roll out the cookie dough to 1/4- to 1/2-inch thickness. Using floured cookie cutters, cut out cookies, then transfer them to the prepared baking sheets, spaced 1 inch apart (they will not spread much). Reroll any scraps and repeat. Freeze the cookies for 15 minutes. (If your freezer is tight on space, you can freeze and then bake one sheet at a time, on the middle rack, or you can more tightly pack them on one sheet to freeze and then divide among multiple pans for baking.)
While the cookies are chilling, position racks in the upper and lower thirds of the oven and preheat to 350 degrees.
Bake the chilled cookies for 10 to 11 minutes, or until they are mostly dry to the touch but appear slightly puffed with crisp-looking edges, rotating from top to bottom and front to back halfway through. Remove from the oven, let cool for a few minutes, then transfer the cookies to a wire rack to cool completely.
Set a heatproof bowl over a pan with a few inches of simmering water, ensuring the bottom of the bowl doesn’t touch the water. Add the white chocolate and stir occasionally until melted and smooth. Spoon the melted chocolate along the bottom and tops of the cookies to mimic the white fur of Santa’s hat (or decorate to suit whatever shape you’ve chosen). You can swirl with the spoon or a toothpick for extra texture. Return the bowl to the double-boiler if the chocolate starts to seize up, or sit the bowl in a larger bowl of tepid water to keep it fluid. Let the chocolate set on the cookies, about 5 minutes, before serving or storing.
Nutrition information per cookie, based on 54: Calories: 91; Total Fat: 4 g; Saturated Fat: 3 g; Cholesterol: 17 mg; Sodium: 27 mg; Carbohydrates: 12 g; Dietary Fiber: 1 g; Sugar: 6 g; Protein: 1 g
This analysis is an estimate based on available ingredients and this preparation. It should not substitute for a dietitian’s or nutritionist’s advice.
From Vallery Lomas, author of “Life Is What You Bake It” (Clarkson Potter, 2021).

