New to Mountain Biking? This Is the Gear You Actually Need
If you’ve been thinking about getting into mountain biking, you might be wondering where to start. Or, maybe you’ve dusted off that old bicycle from your garage, conquered some local trails, and you’ve been bitten by the trail-riding bug. Now you want to know, what gear do I need to keep going?
Below, we’ve put together a guide on all the mountain bike essentials you need to conquer the trails with confidence—and more importantly, what you'll need to stay safe.
The Bike
Arguably, the most crucial of all mountain bike essentials is the bike itself. Modern mountain bikes are either hardtails, with only front suspension, or full-suspension bikes, with both front and rear suspension. Here's what to consider when making the big purchase:
Suspension
Hardtails are great for beginners in part because they are the most affordable—you can find a quality hardtail under $1,000. They perform the best on smooth trails, so if your local trails are pretty rocky and rooty, you should consider a full-suspension bike instead. But some riders, including pro mountain bikers, prefer hardtails regardless because of their responsiveness, lighter weight, and better power transfer when pedaling. (On a full-suspension bike, some power that you produce through pedaling is lost because the frame flexes.)
Full-suspension mountain bikes are for riders who want more comfort or a better bike for rowdier trails, but expect to pay at least $1,500 for a new one and likely more. These bikes come in a wide range of suspension options for both the front and rear. Generally, the more travel (which is measured in millimeters) there is in the suspension, the smoother the ride and the more technical the terrain you can take on without feeling the effects of the rough riding.
Look for a bike with at least 100mm of travel front and rear—there tends to be more up front versus the rear—and more if you want a more comfortable ride on technical trails. Travel of 170mm and up is heading into downhill territory and is too much for riding everyday trails. Somewhere in between is the sweet spot for most riders.
Frame Material
The most common bike frame material options you’ll find in your local bike shop are aluminum and carbon, and they both have their pros and cons. Aluminum is more affordable but heavier, while carbon is more expensive but much lighter. Carbon also has a smoother ride feel. You can also find mountain bikes from frame builders that are made from steel or titanium. Steel has a good ride feel but is on the heavy side, while titanium has a great ride feel and is lighter—but it’s the most expensive.
When making a decision on frame material, consider your personal preferences and your budget. But most people start with aluminum because those bikes are the more affordable, entry-level option.
Wheel Size
Modern adult-sized mountain bikes from reputable bike manufacturers offer wheels in one of two sizes: 27.5-inch or 29-inch. The old wheel size standard was 26-inch, and it’s mostly fallen out of use except in kids bikes. Bike frame sizes at both ends of the spectrum may only offer one wheel size: for example, 27.5-inch for an extra small bike or 29-inch for an extra-large bike. But you might find that you’re able to choose a wheel size for the bike you’re interested in. The larger the wheel, like on 29ers (that's what you call a bike with 29-inch wheels), the easier it is to roll over obstacles and the better traction you have. But smaller wheels are lighter and can accelerate faster. Ultimately, it comes down to personal preference.
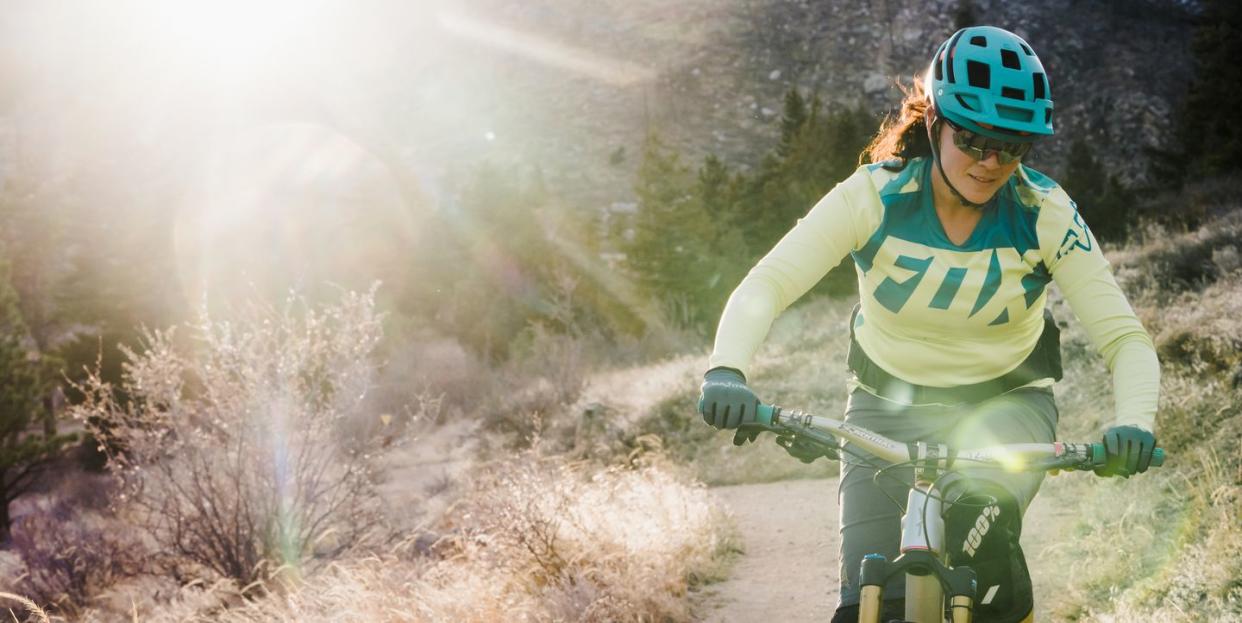
Helmet
While you probably won’t do much road riding on your mountain bike, there are still trailside obstacles and dangers—moving or not—you’ll encounter, including animals, trees and bushes, rocks, other trail users, and more. That being said, a helmet is an absolute must.
Any helmet is better than no helmet, but mountain bike helmets are specifically designed to cover the lower back of your head. (Crashing is inevitable and practically a rite of passage, but don’t let that scare you!) A mountain bike helmet will also usually have an adjustable visor. For even more protection, like if you’re honing your skills at the bike park, opt for a full-face helmet.
Shoes
Your shoes, at the very least, should be closed-toe. Basic sneakers are a good option, and you likely already have a pair. Mountain bike shoes are even better and come in two styles: flat or clipless.
“Flat shoes” are the sneakers of the mountain bike world. They’re similar to skate shoes and feature super grippy rubber outsoles that are designed to stick to flat pedals. They also have durable, padded uppers for better foot protection. (Your mountain bike will come with basic flat pedals, but you might want to get better performing ones with a wider platform and pegs to grip your shoes.)
Clipless mountain bike shoes have a cleat recessed into the bottom, similar to road cycling shoes but with more traction for when you’re walking on the trail. Riding clipless improves power transfer while pedaling, especially uphill, and can make it easier to get over obstacles. If you’re already used to riding with a clipless system, feel free to use it in mountain biking, too. But if you’re not used to riding clipless in technical terrain or you’re just starting off, flat shoes are the way to go.
Other Protective Gear
Depending on your ability level and the difficulty of the terrain you’ll be riding, additional protective gear like elbow pads and knee pads are a good idea. If you’re new to the sport, or progressing into more technical riding, wearing these will help you get through the learning curve (relatively) unscathed. For riding fast, challenging downhill trails, consider also wearing bike-specific body armor with a chest protector, a neck brace, and hip pads.
Gloves

Gloves are also optional, but sweaty bare palms and jarring vibrations from trail riding are a recipe for losing your grip on the handlebar. (Your fingers may slip off the shifter lever without gloves, too.) Plus, gloves protect your hands if you crash. You may already be familiar with standard bike gloves that have short fingers and padding on the palms. Mountain bike gloves, by contrast, have full fingers and usually no padding on the palms to give you better grip and more direct contact with the handlebar for better control.
Eyewear
Some riders consider sunglasses or other protective eyewear, like riding goggles, to be essential. You certainly can ride without any, but wearing sunglasses on the trail will protect your eyes from more than just the sun’s harmful UV rays. It’ll keep dust, dirt, bugs, and other debris out of your eyes, especially when riding behind someone and in dry trail conditions. But don’t just grab any sunglasses: If your local trails are heavily shaded, opt for sunglasses with lenses that are good for low-light conditions or even clear.
Repair Kit
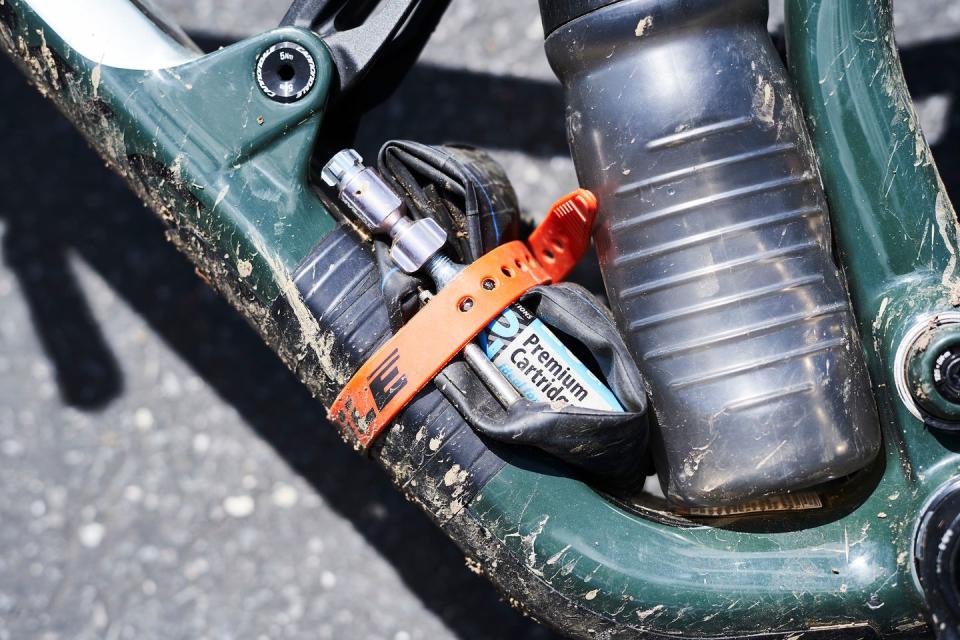
Sure, there’s always the option of walking back to your car or home if you get a flat tire. But it’s far better to carry a repair kit with you containing everything you’d need to fix it. These days, many mountain bike tires are set up tubeless or are tubeless compatible; check to see if that’s the case for yours, and if your tires have an inner tube.
Running tubeless tires—and routinely adding tubeless tire sealant—will keep most flats at bay, but in the event it does happen, you’ll need a tubeless tire plug kit to fix it. If that doesn’t work, or if you run tubes instead, keep a spare tube in your repair kit, along with a mini pump or CO2 cartridge and tool to inflate it. Other handy items to keep in your repair kit include a multitool and tire levers.
Water Bottle or Hydration Pack
Another consideration is your midride hydration. Install a bottle cage or two, if your bike doesn’t already have one, and pick up a few cycling water bottles—they’re affordable, reusable, designed to sit securely in a bottle cage, and some are insulated. Alternatively, using a hydration pack instead is useful two-fold: It’ll carry your water in an easily accessible way, plus the pack can hold your repair kit and snacks.
Trail Map or GPS App
Lastly, unless you’re already familiar with the trail system you’re riding, you’ll need a trail map, cycling GPS computer, or phone app to help you navigate and find your way back to the trailhead. Some trail systems offer paper maps at the trailhead, or at least a kiosk with a map you can take a picture of and carry with you. Also, check out the popular mountain biking phone apps, like Trailforks and MTB Project, and see which one works best for your area.
You Might Also Like

