How I Painted My Basement Utility Closet—and Turned It Into an Office
A little DIY paint job can go a long way. Here’s a step-by-step.

The author's fully functioning office, transformed from a closet. (You might call it a "cloffice.")
By Tanya A. Christian
After a year of searching for a home, we finally found The One: a three-bedroom townhouse with an open floor plan, a two-car garage, and a little green space. It even has a designated office for my fiancé, which was important—because, clearly, remote work was here to stay and we had to adjust.
As for me, I’m a perennial laptop user. I had spent a year and a half working from the couch. All I needed was a desk, a chair, and a place to stash my curated collection of glossy magazines.
On the initial walk-through of our home, I found the perfect spot to set up shop: a 5.5x7-square-foot utility closet in the back corner of our finished basement, probably used for suitcases, Christmas decorations, and other odds and ends by the previous owner. Though it was just an empty room with builder-grade paint, it looked big enough to fit my needs, and my mind was instantly filled with grand plans for a small but efficient creative studio. I knew it would all come together with a can of paint.
“One of the easiest things that folks can do to upgrade their space is give their walls a fresh coat,” says Nicole Gibbons, founder and CEO of direct-to-consumer paint brand Clare. The emerging startup was top-of-mind for my studio refresh. With a curated palette of colors, I knew I could find the perfect match for my intended vibe. Here are some steps that can bring a closet to life.
Order Paint Samples
When the time was right, I ordered a handful of peel-and-stick swatches from clare.com to test out. The 8x8-inch samples can be placed on the wall and moved around to get an idea of what the color will look like when applied. While I typically go for bright whites and deep hues, I knew I wanted my office to be an ode to Black femininity. Not only had I chosen a Black-owned paint company, but I wanted a color that would exude womanhood and pay homage to my sorority—Alpha Kappa Alpha Sorority—the oldest sorority for Black collegiate women. I chose to sample five colors, ranging from a deep rose to a warm beige.
Live With the Color
A number of paint manufacturers in our ratings (such as Benjamin Moore and Behr) have embraced the peel-and-stick way of sampling paint. You can also go with the tried-and-true method of buying a 1-quart can and painting a stripe on your wall. However you choose to sample your color, give it time. Throughout the day, observe the effects of changing light on the color, both natural and artificial.
Even in a basement with no natural light, the paint can look different based on the color of the flooring and undertones can be made more apparent depending on the light. I put my paint samples at eye level—the best way to observe paint colors—and kept them up for a solid two weeks. After making a decision, I left the swatch up for a few more days. I found the perfect hue in “Wing It,” which Gibbons describes as “a pale, sophisticated barely there pink, inspired by our favorite all-ladies social club (The Wing) that made pink our new favorite neutral.”
Calculate the Amount of Paint You Will Need
Most manufacturers offer paint by the gallon, with particular formulas also coming in a 5-gallon bucket or a smaller-sized quart. The easiest way to measure that is by multiplying the width of the room times the height. I knew my little utility closet wouldn’t need more than 1 gallon, but had it been a larger space, I could have easily used one of the many available calculators found online to figure out how much I needed.
Once I was ready to get painting, I went on the website and ordered the gallon in an eggshell finish—perfect for low-to-mid-traffic areas. In a couple of days, it was at my door along with a five-piece paint kit that included a 2-inch paintbrush, 9-inch roller frame, 9-inch roller cover, 9-inch metal tray, and 9-inch tray liner. I ordered it online to avoid a trip to the store.
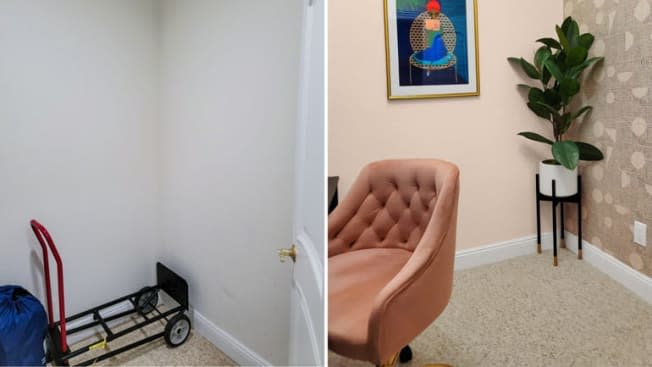
Before, left: a nice closet. After, right: an even nicer office, with a Zoom-ready backdrop.
Photos: Tanya Christian/Consumer Reports
Get Painting
Before I started my project, I cleared what little bit of stuff I had (literally just a fold-up table, a chair, and some luggage) from the room to give myself some space to paint. I then removed the wall plates and covered the baseboard trim with painter’s tape. There was no need to do too much prep to the walls because they were in good shape, but I did take a broom to the corners where I noticed a couple of cobwebs.
To get the color on the walls, I enacted what CR calls the four S’s—saturated my roller in paint, smeared the paint on the walls in a W pattern (a 2x2-foot section at a time), spread the paint to cover the entire 2x2-foot section, and then smoothed out the section with strokes from top to bottom.
Once the paint was dry to the touch, it was time to tackle the touch-ups. I used a paint edger and touch-up brush to go over the small spots that didn’t look quite up to snuff.
Create an Accent Wall
I wanted a studio that would look good on Zoom calls and at-home media interviews. The easiest way for me to create that space was to choose a wallpaper that added visual interest. I found that in a pattern created by Tavia Forbes and Monet Masters of Forbes + Masters. The Atlanta-based duo has a wallpaper collection available at Mitchell Black, and though I didn’t use the service, they also offer one-on-one Video Design Consultations through Decorist.
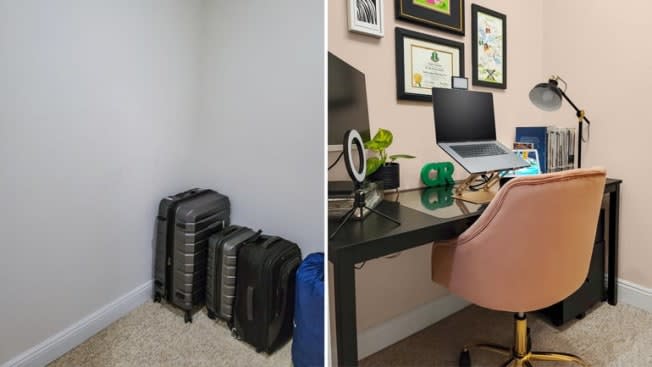
Before, left: White paint served its purpose for a storage space. After, right: A neutral pink sets the vibe for a creative space.
Photos: Tanya Christian/Consumer Reports
Decorate
Then came the fun part. Once the painting and wallpapering was complete, it was time to decorate. I had many of the items I put in my space lying around but purchased a table and file cabinet to keep me organized. A faux plant went in the back corner (real plants are tricky in basements), acrylic magazine holders fit nicely on my desk, and I adorned my walls with a framed Eenie Edit poster, black-and-white framed prints, and photos of Ruby Dee and Lena Horne, both taken at the 1963 March on Washington.
For the final touch, I called in an electrician to swap out the recessed light that was in the ceiling for a flush mount fixture I had left over from my old apartment. I believe that lighting is like jewelry for the home, so I added a five-light sputnik chandelier to add a bit more flair. I also had him add two outlets to power up my room.
Overall, I couldn’t be happier with the way it all turned out. For about $750, and less than two days’ worth of work, I turned a throwaway space into a fully functioning creative studio. And it all started with a can of paint.
Top Paints From CR’s Tests
The best paint jobs start with a great-quality paint. Our engineers have evaluated more than three dozen formulas for their hiding and staining abilities. The picks below are top-rated in Consumer Reports’ tests.
More from Consumer Reports:
Top pick tires for 2016
Best used cars for $25,000 and less
7 best mattresses for couples
Consumer Reports is an independent, nonprofit organization that works side by side with consumers to create a fairer, safer, and healthier world. CR does not endorse products or services, and does not accept advertising. Copyright © 2022, Consumer Reports, Inc.

