When you put 25 hours of work into a batch of cookies, it's a labor of love
Baking is love made edible, so the saying goes. That baking becomes a profound labor of love when it requires lots of time and effort.
For nearly two decades, I’ve been giving batches of love to my nieces and nephews in the form of decorated sugar cookies. What began in 2005 as a simple offer to make princess-themed cookies for my niece Vienna’s 5th birthday evolved into a decades-long tradition for more and more kids, most of whom are now adults.
The treats eventually expanded from birthdays to graduations — high school, college and even a white coat ceremony. I’ve made cookies for graduates of schools as near as Brookfield East and Central High to as far as South Eugene High in Oregon and Knox Grammar School in Wahroonga, Australia.
My cookies early on were rudimentary and imperfect. While they were tasty, the decorating was crude and clearly the work of an amateur home baker. In recent years, however, I learned that I could improve their appearance by meticulously repairing the decorating with a paring knife, toothpicks, pastry brush and lots of patience.
Thousands of cookies later, I’ve refined the process to where the results look almost professional. But that quality comes at a price — time. Lots of time. So much time. We’re talking 25-plus hours to produce just a few dozen cookies.
So why do it?
Only an obsessive perfectionist (me) would devote that much energy to making treats that will be admired fleetingly, then devoured in seconds. Why do I put myself through these dizzying, and stressful, marathon sessions year after year?
Simply, it’s out of love.
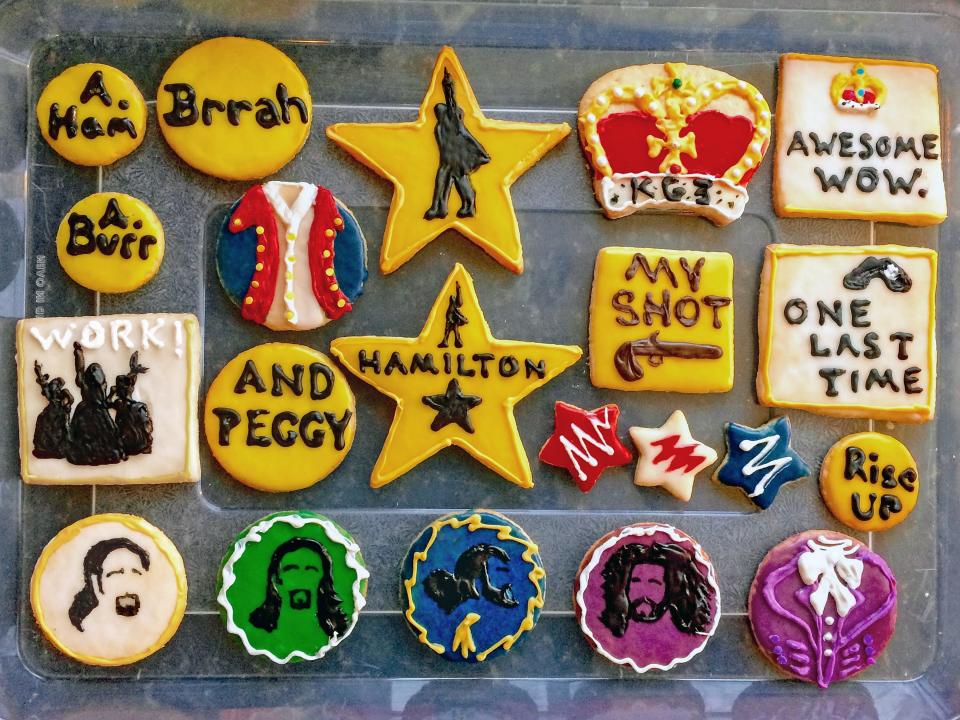
There’s great reward in making others happy, especially children. Seeing their smiles and getting their hearty thank-you hugs are priceless. Kids might forget who gifted them that eighth video game, but they’ll remember the “Hamilton” cookies.
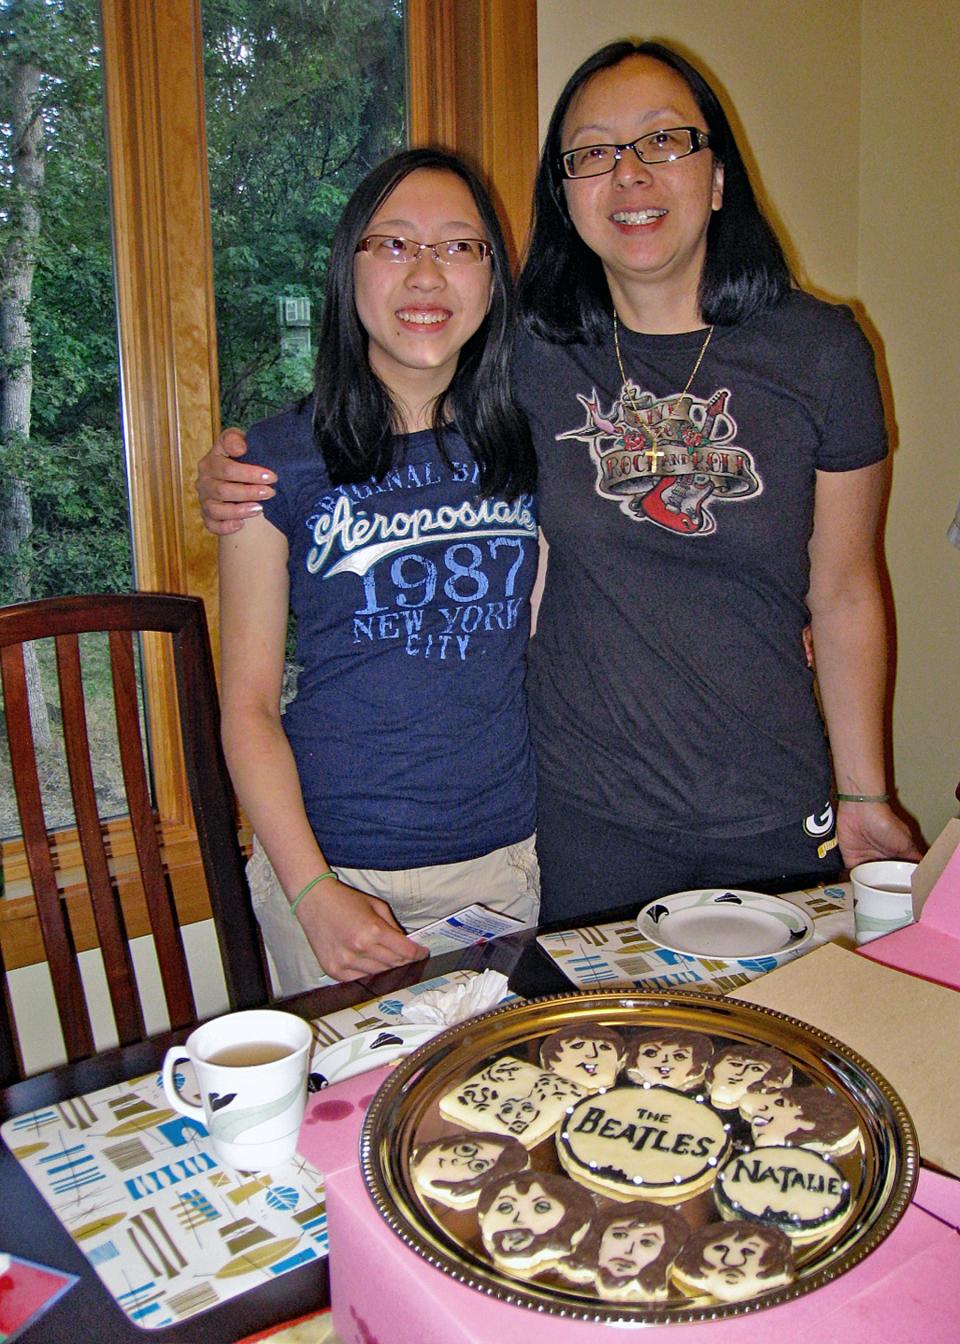
My niece Natalie couldn’t bear to eat the Beatles cookies I made for her 15th birthday, saying they were works of art too special to consume. She froze them for posterity, though they’re long gone by now.
While I did want her to eat and enjoy them since that’s the point of baked goods after all, knowing that she so treasured my efforts warmed my heart. It’s those reactions that make the labor of love by this “Cookie Aunt” worth every grueling hour.
More: Some simple, timeless tips for baking cookies
The weeklong process
Making the cookies is a multistep endeavor that I tackle over several days.
• Making the dough.
• Rolling the dough, cutting the shapes and baking the cookies.
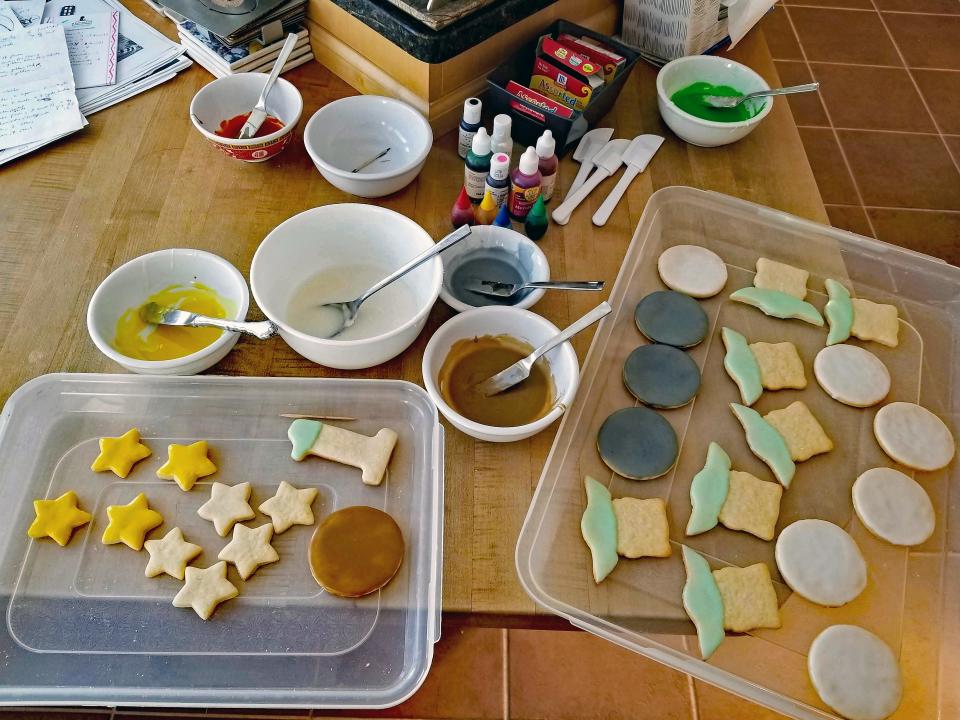
• Mixing and dyeing the glaze, then glazing the cookies.
• Decorating the cookies.
• Repairing the decorating.
Since life’s other demands often get in the way, I do each step on a separate day. (The first three steps could be done in several hours in one day.) Each step takes more time than the last.
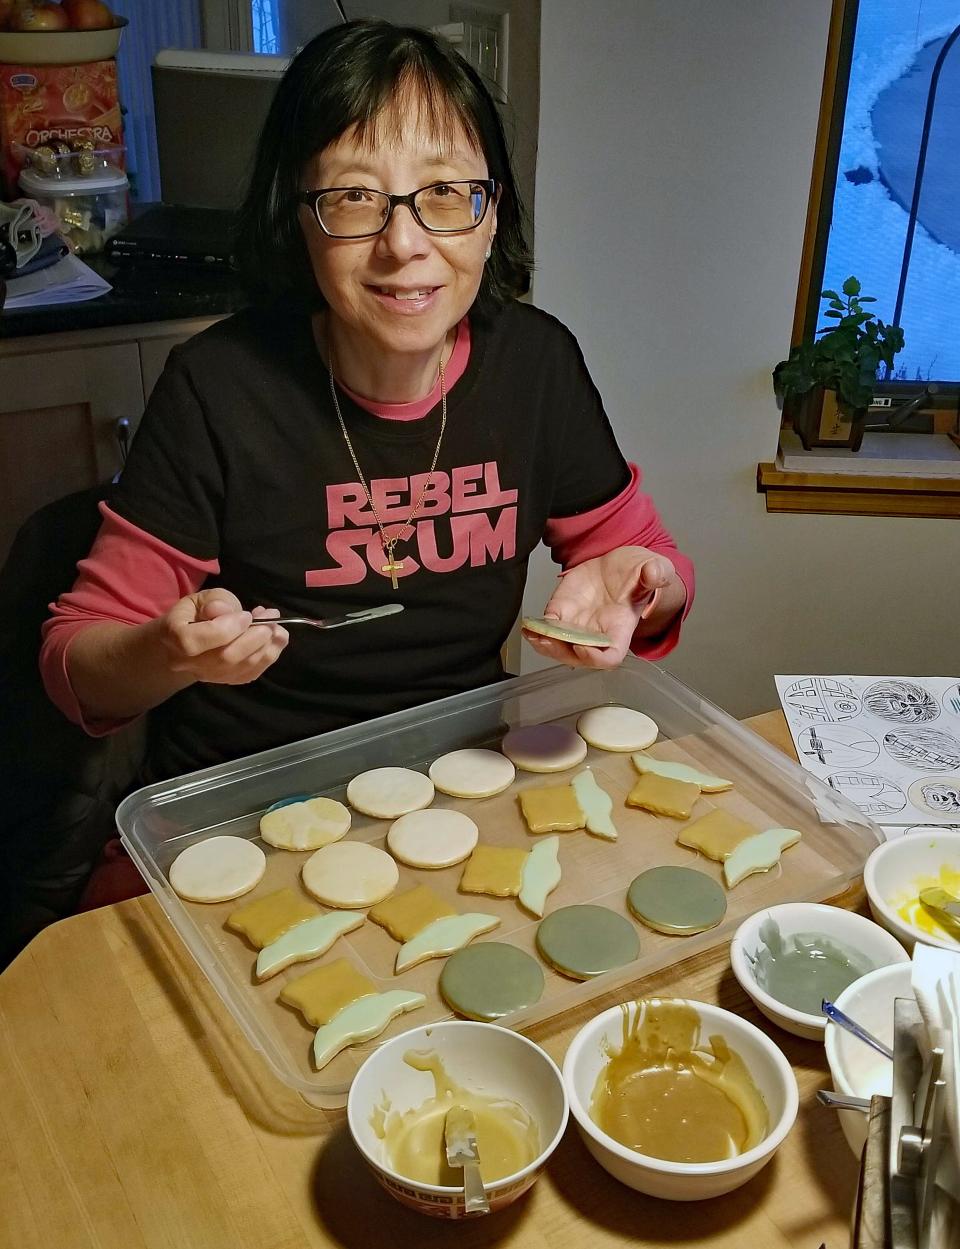
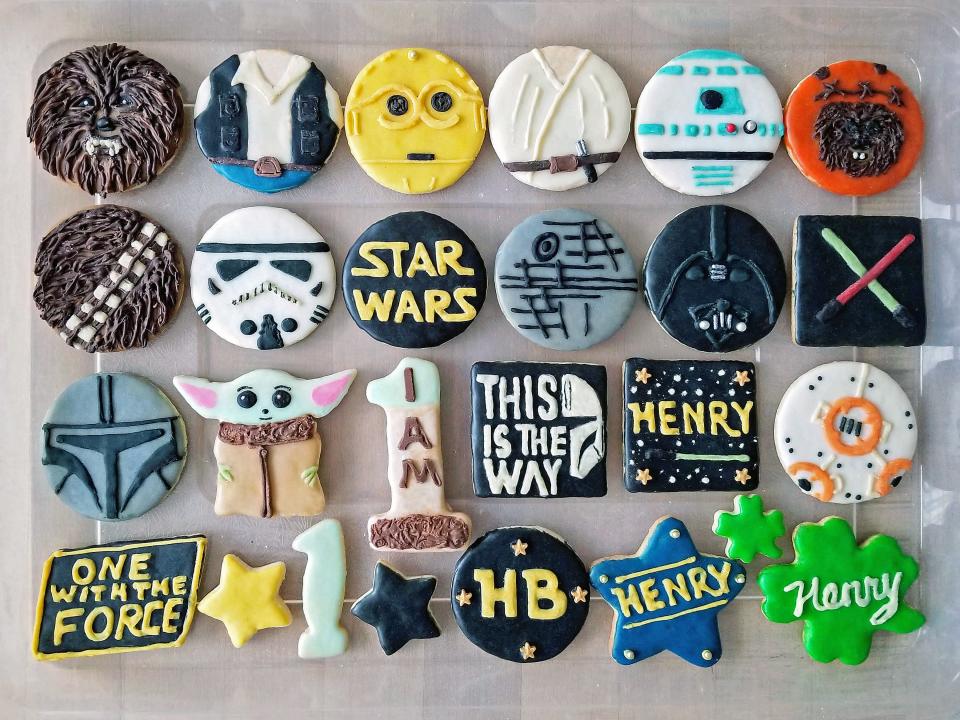
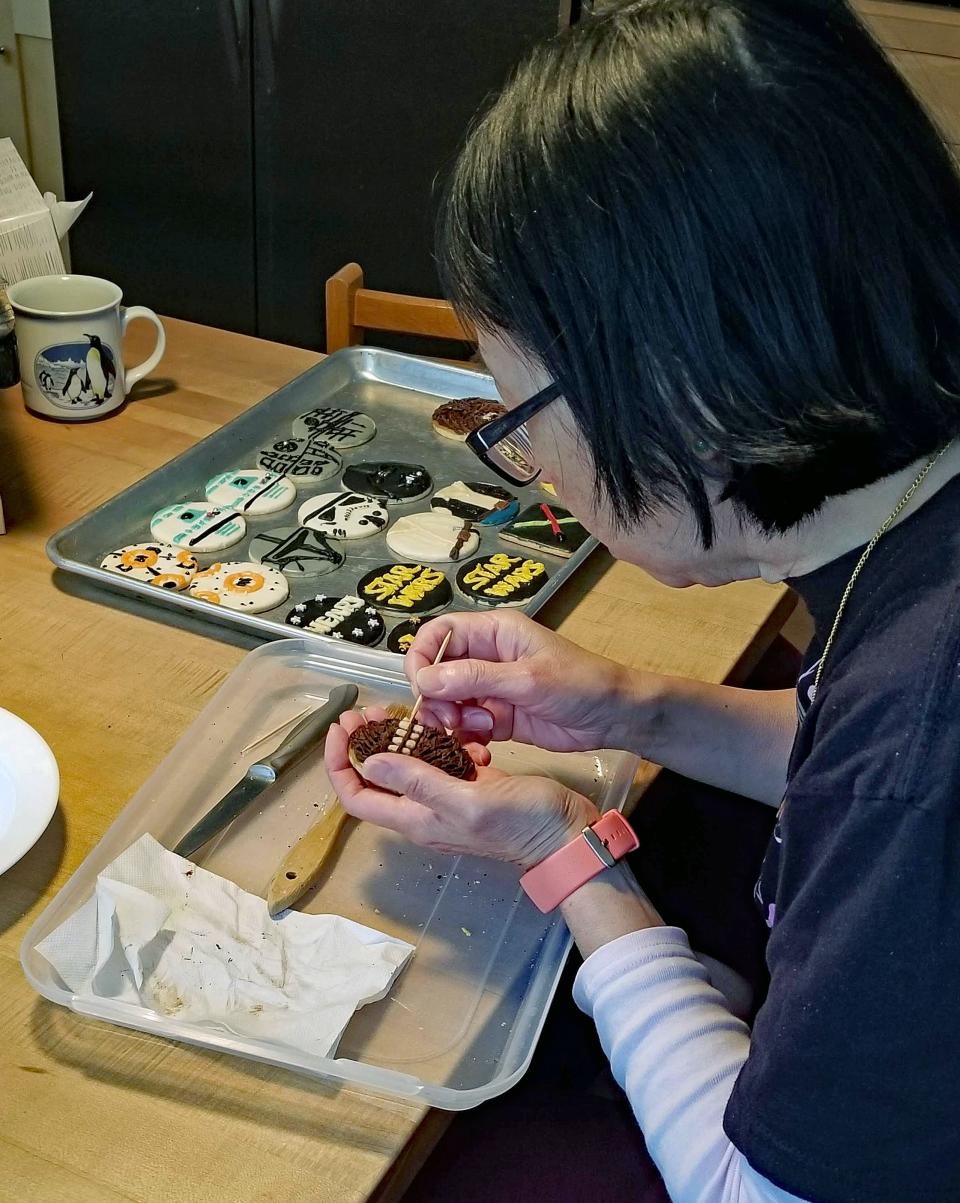
For example, the latest batch I made — “Star Wars” and “Mandalorian” cookies for my grandnephew Henry’s 1st birthday — took 30 hours over five days. That was a half-hour for making the dough; three hours for rolling, cutting and baking; four hours for glazing; nine hours for decorating; and 14 hours for the painstaking repair work.
The hard part
Since my inaugural batch, I’ve been using candy writers to decorate — slim tubes filled with candy coating (similar to melting wafers) that tastes like white chocolate. These differ from the larger tubes and pouches of pliable icing found at grocery stores.
The candy writers are warmed in hot water to melt the candy coating. They harden in minutes, so you have to work quickly and constantly reheat and knead the tubes. This makes drawing and writing with the candy writers cumbersome and inexact. A review online said, “Only buy if you have the patience of an absolute SAINT.”
When I’m in my ninth hour of decorating at 3 a.m., I regret not learning to make and use royal icing. That’s what people on TV baking competitions and in YouTube tutorials pipe onto cookies with ease, producing flawless designs. Royal icing, however, just isn’t very tasty. So what you lose in precision and time with candy writers you gain in chocolatey goodness.
Unfortunately, repairing the decorating is an ordeal. It involves using a paring knife and toothpicks to shave off excess candy coating, smooth out unsightly bumps and straighten lines.
A pastry brush is used to clean off the coating bits.
The sloppier the initial decorating, the longer it takes to fix. For instance, “The Mandalorian” This is the Way design — with its multiple words and helmet, all on a 3-by-3-inch cookie — was so problematic that it took me over an hour to repair. One hour. For one cookie.
In addition, hand-cutting dough takes time. Last year, I re-created the logo for my nephew Preston’s high school robotics team — a figure in a hazmat suit. Of course, I didn’t have such a cutter, so I sketched the logo on cardboard, made a template and hand-cut the dough with a small knife. It was so arduous that I managed to make only two of those cookies.
The fun part
While I dread the 25 to 30 hours that it takes to produce the cookies, I love the research and planning — even though that adds another 15 hours of work.
Brainstorming designs for each kid’s interests or requested themes is the most enjoyable part of the process. I search online for images that I want to reproduce and then draw designs on paper in the exact sizes of the planned cookies. I refer to those sketches when decorating.
For surprise cookies last year for my nephew Ashton, who graduated in Australia and was heading to UW-Madison, I sleuthed on social media to learn the name of his school and found online its logo, colors and Latin motto to include. He was amazed at, and truly appreciated, the cookies’ personalization.

When searching online, you’ll find that almost every cookie design — from kidneys to Grogu — has already been made by someone. Having those examples to follow is helpful.
A mélange of themes
In the beginning, the cookies were basic — sports, flowers, butterflies — but became progressively more complex. Themes have run the gamut from favorite TV shows to music to video games.
For birthdays, they included Hello Kitty, Care Bears, Strawberry Shortcake, “Power Rangers,” Mickey Mouse, Elmo, Barney, drums, the Rock Band video game, “High School Musical,” soccer, “Hannah Montana,” roller skates, “Phantom of the Opera,” dinosaurs, “Twilight,” Nintendo DS, Wii, PlayStation, Xbox, “Transformers,” military, “Avengers,” Tinker Bell, tea party and “Harry Potter.”
For graduations, I tailor the cookies to each school, the recipients’ interests, the university they’ll be attending or are graduating from and their chosen careers.
To accommodate such a range of themes, I started out with a set of general interest cookie cutters — hearts, holidays and such. Over the years, I’ve added scores of specialty cutters, such as T-Rex, the Liberty Bell and a lobster. 3D printing has greatly expanded the cutter inventory — for instance, the Baby Yoda one I bought recently. My collection now totals 240, and I’m probably not done.
The successes
The “Hamilton” and Beatles cookies were among my favorites because they were so challenging and the odds of them failing were high. I was pleased that the Hamilton and Jefferson cookies resembled the characters portrayed by Lin-Manuel Miranda and Daveed Diggs in the hit musical and that the caricatures of John, Paul, George and Ringo actually looked like the Fab Four.
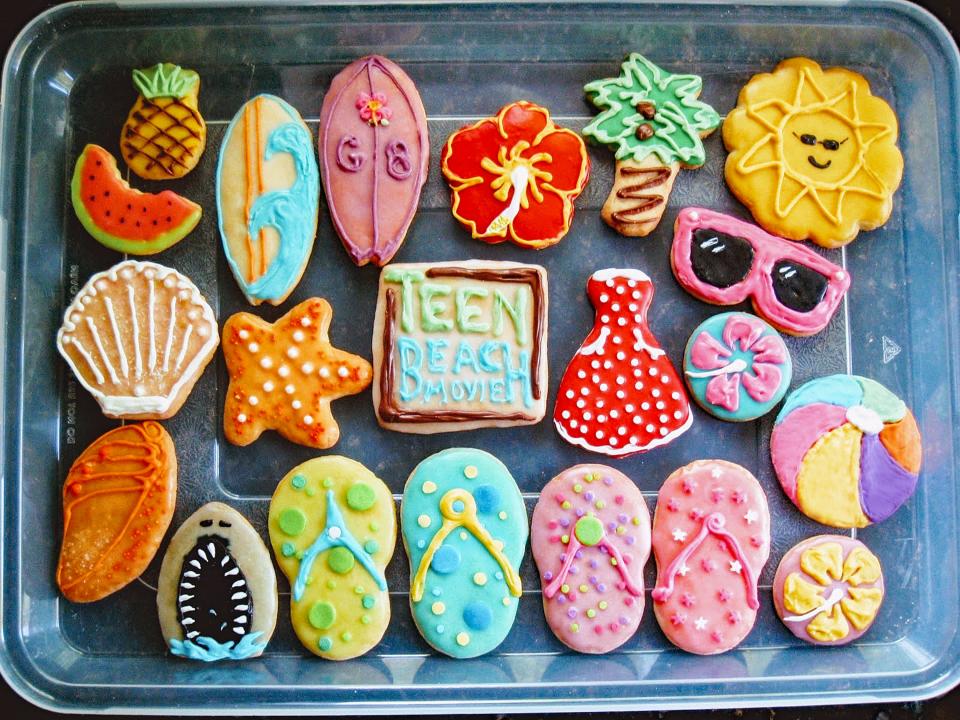
Over the years, themes for my niece Grace allowed for fun and lively designs. These included a fashion diva spread of designer accessories; an assortment of pandas; and surfboards, flip-flops and even a shark for “Teen Beach Movie.” I was also pleased with the Green Day album covers for my nephew Calvin’s 17th birthday and a color blindness test for Natalie’s optometry white coat ceremony.
And I got creative by adding texture to some unique cookies. For Vienna’s sushi ones, I used sprinkles to mimic rice and fish roe, and for Preston’s LEGO cookies, I made the studs on each brick by cutting out tiny cylinders of dough and baking them right in. And for the recent “Star Wars” batch, the messy candy writers actually worked in my favor to create Chewbacca’s fur.
The failures
There were plenty of cookies that I wish I could do over — among them “Transformers,” Tamagotchi pets and a laughable Yoda (awful he was). Invariably, some cookies just won’t turn out. Countless ambitious designs got chucked on decorating day when I found they were impossible to execute.
To my amazement, the first Bucky Badger cookie I made for Ashton’s graduation was successful. I was confident as I began decorating the second one, but then things went comically wrong — poor Bucky ended up looking like a rabid rodent.
I’ve binge eaten scores of rejects in the throes of late-night decorating and have trashed many others in frustration. And I’ve wept when, after hours of perfecting an especially intricate and prized cookie, it snapped in half as I placed it in the container.
Most of the cookies I made early on wouldn’t pass muster today. My first attempt at “Star Wars” cookies for Preston in 2007, and another batch for my nephew Matt in 2009, can’t compare to the ones for Henry last month. I’m grateful that my nieces and nephews weren’t judgmental, enjoyed the cookies as they were and just appreciated the effort. That made everything worthwhile and spurred me on to keep the tradition going.
Mabel Wong of Brookfield is a freelance editor who for three decades worked at the Milwaukee Sentinel and the Milwaukee Journal Sentinel.
*****
This recipe is from the 1969 Wisconsin Electric Power Company Cookie Book.
Easy Roll Sugar Cookies
Makes 5 dozen
For the cookie:
1 cup granulated sugar
3 cups all-purpose flour
1 teaspoon baking powder
1/2 teaspoon salt
1 cup unsalted butter
2 large egg yolks
1 teaspoon vanilla extract
1/3 cup milk
Preheat oven to 350 degrees.
In a medium bowl, combine flour, baking soda and salt. In a large bowl, cream the butter. Gradually blend in the sugar. Mix in the egg yolks and vanilla extract. Blend in the dry ingredients and milk. Cover and chill at least one hour.
Roll the dough 1/8 inch thick on a well-floured surface. Cut shapes and place about an inch apart on a baking sheet. Bake for 8 to 10 minutes. Cool on a wire rack. Store cookies in an airtight container.
For the glaze:
3 cups confectioners’ sugar
3 tablespoons of milk, possibly more (whole or 2%)
Dash of vanilla extract
Food coloring or gel dye
In a medium bowl, stir milk one tablespoon at a time into the sugar until the glaze is the consistency of ranch dip. It should not be too thin or else it will be translucent when it dries.
Stir the glaze occasionally during use to keep it pliable. Add more milk or sugar as needed to maintain the right consistency. Divide the glaze into smaller bowls to add colorings. Use a small spatula to glaze the cookies. Let the cookies dry overnight before decorating.
Sign up for our Dish newsletter to get food and dining news delivered to your inbox.
This article originally appeared on Milwaukee Journal Sentinel: Baking decorated sugar cookies is a time-consuming labor of love

