Recipe: Pull-Apart Sour Cream and Chive Rolls

By Claire Saffitz, courtesy of Bon Appétit magazine.
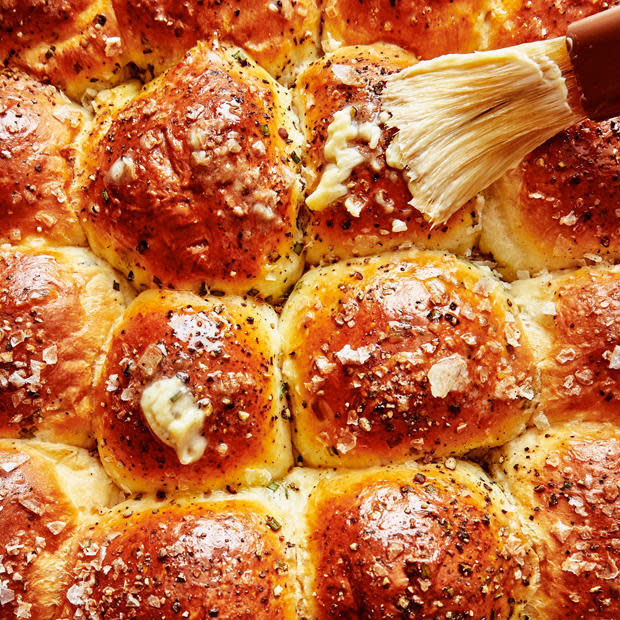
These melt-in-your-mouth dinner rolls, from Claire Saffitz's cookbook "Dessert Person," are even more tender and pillowy than the classic Parker House rolls that inspired this recipe. That's thanks to the addition of tangzhong, a white roux made from flour and milk cooked to a stiff paste, often used to make Japanese milk bread. The cooked starches in the tangzhong help the dough retain moisture and keeps the rolls super soft and light. The slight onion flavor of chives and tang of sour cream give them oomph. They're as equally excellent at mopping up gravy as they are at holding the contents of a leftover turkey sandwich. "If food could give you a hug, these rolls definitely would," says Claire.
Pull-Apart Sour Cream and Chive RollsMakes 24
Ingredients:½ cup plus 2 Tbsp. whole milk5⅓ cups (667 g) bread flour, divided, plus more1½ tsp. active dry yeast1 cup sour cream, room temperature¼ cup (50 g) sugar4 tsp. Diamond Crystal or 2¼ tsp. Morton kosher salt3 large eggs8 Tbsp. (1 stick) unsalted butter, cut into pieces, divided, room temperature½ cup finely chopped chivesFlaky sea saltFreshly ground black pepper
Preparation:
Step 1: Whisk ½ cup milk, ⅓ cup flour (42 g), and ½ cup water in a small saucepan until smooth. Cook over medium heat, whisking constantly, until a very stiff paste forms (it should resemble mashed potatoes), about 2 minutes. Remove from heat; scrape tangzhong into the bowl of a stand mixer fitted with the dough hook.
Step 2: Gently warm remaining 2 Tbsp. milk in same saucepan over low heat until lukewarm. Remove from heat, add yeast, and whisk until dissolved. Let sit until mixture is foamy, about 5 minutes.
Step 3: Add sour cream, sugar, kosher salt, 2 eggs, 4 Tbsp. butter, and remaining 5 cups bread flour (625 g) to tangzhong. Scrape in yeast mixture and mix on low speed until a shaggy dough forms. Increase speed to medium and mix, scraping down sides of bowl occasionally and adding more flour by the tablespoonful if sticky, until dough is smooth and supple, 8–10 minutes.
Step 4: Scrape dough onto a work surface and form into a smooth ball; dust lightly with flour. Place inside a clean large bowl and cover with plastic wrap or a silicone lid. Let sit in a warm, draft-free spot until doubled in size, 1–1½ hours.
Step 5: Meanwhile, coat a 13x9" pan, preferably metal, with 2 Tbsp. butter (it will be a generous layer, which is what you want). Uncover dough and punch down lightly to expel some of the gas.
Step 6: Turn dough out onto a lightly floured surface and stretch into a square.

Step 7: Roll out, dusting with more flour as needed to prevent sticking, to a 12" square and sprinkle chives evenly over dough.
Step 8: Starting at one end, loosely roll up dough. Flatten with the heel of your hands into a long rectangle. Roll out dough again, dusting with more flour as needed, into a 16x6" rectangle.
Step 9: Using a wheel cutter or bench scraper, cut dough into twenty-four 2"-squarish pieces (an 8x3 grid).

Step 10: Working with 1 piece of dough, gather all the corners and pinch together to form a teardrop shape. Place seam side down on work surface. Cup your hand over dough and drag across surface, moving your hand in a rapid circular motion, to form dough into a tight ball. Do not add flour, as you want friction between the dough and the surface. Place ball in prepared pan and repeat with remaining pieces of dough, spacing to make a 6x4 grid. Cover pan with plastic wrap and let sit in a warm, draft-free spot until rolls are nearly doubled in size, 45–60 minutes.
Step 11: Meanwhile, place a rack in middle of oven; preheat to 375°.
Step 12: Using a fork, whisk remaining egg in a small bowl until no streaks remain. Uncover pan and gently brush tops of rolls with egg, then sprinkle with sea salt and pepper. Bake rolls until tops are deep golden brown, 25–30 minutes.
Step 13: Remove pan from oven and immediately brush tops with remaining 2 Tbsp. butter. Let cool in pan 5 minutes. Slide a knife or an offset spatula around sides of pan to loosen rolls, then slide a metal spatula underneath to loosen the bottom. Slide entire grid of rolls out and onto a wire rack. Serve warm or let cool.
Step 14: Do ahead: Rolls can be formed and arranged in pan 1 day ahead; cover and chill. Let rise at room temperature before baking (this can take up to 3 hours). Rolls can be baked 3 days ahead. Let cool; store airtight at room temperature.
See also:
More holiday recipe ideas from Bon Appétit magazine"Sunday Morning" 2020 Food Issue recipe index
Biden says Trump's refusal to concede is "incredibly damaging" and "totally irresponsible"
Jobless claims increase as 742,000 Americans file for first-time unemployment
Lesley Stahl follows up with nonagenarians from landmark study on aging
