How To Search the Web and Use Plugins With ChatGPT Plus

There are new features to explore in ChatGPT.
ChatGPT is improving again—or at least it is if you’re paying $20 a month to access the Plus version of the AI chatbot. While free users can’t access them for now, two major new features promise to make a huge difference to the capabilities of ChatGPT. Here’s how to use web access and plugins with ChatGPT Plus.
First, some definitions. Web access means that ChatGPT can actually look stuff up on the internet and add the information it finds to its answers, rather than rely solely on its training data. Second, ChatGPT now supports dozens of plugins, which is a bit like when browsers first got extensions, or indeed when the iPhone first got third-party apps—it means ChatGPT integration for all kinds of different sites and services (including Kayak and OpenTable, for example).
Read more

These beta features need to be enabled first of all.
With web access and plugin support, you can do more with ChatGPT than ever before. It might even be enough to persuade you to part with the monthly subscription fee—but before you do, let us show you how these upgrades work. To begin with, you need to enable these beta features inside ChatGPT by clicking your account email address (bottom left), then Settings and Beta features.
It’s worth bearing in mind that this is all moving very fast. ChatGPT will soon incorporate Bing for both Plus and free users, though it sounds as though this will work through the use of a plugin. That’s still to come, but here’s how web access and plugins operate on ChatGPT Plus at time of writing.
How to search the web with ChatGPT
Open up a new conversation in ChatGPT Plus on your web browser, and make sure GPT-4 is selected from the options at the top. Once you switch to GPT-4, you’ll see three further options: Default (the standard GPT-4 experience), Plugins (if they’re enabled), and Browsing (which is still labeled as a beta test). Enable the latter to let ChatGPT loose on the web at large.
Note however that you don’t necessarily always want to use the web-enabled version of GPT-4. Having the chatbot refer back to the internet can take some time, and it’s wasted time if you’re just looking for some creative prompts or need to process some text. Save the Browsing option for when you actually do need up to date information.

You’ve now got more options inside ChatGPT.
Once you’ve specified the mode you want to use, type out your query as normal, then hit the send button on the right or press Enter. ChatGPT then heads off to search the web to find some answers for you—you’ll see there’s a “Browsing the web” label in the response field while the chatbot does just that.
This label will change to indicate whatever it is that ChatGPT is doing, such as clicking on a link or following a link—more complex queries can take some time to complete when internet references are required. If you want to see all the steps that ChatGPT has been through, click the small arrow next to the green label.
Hopefully, ChatGPT will eventually respond to you, displaying a “Finished browsing” label. You can expand this label to check which websites the chatbot visited in its travels—you’ll also notice that factual information comes with citations attached, Wikipedia style, and you can click on any of these for the original source. If you want ChatGPT to consult a particular site, specify this in the prompt.
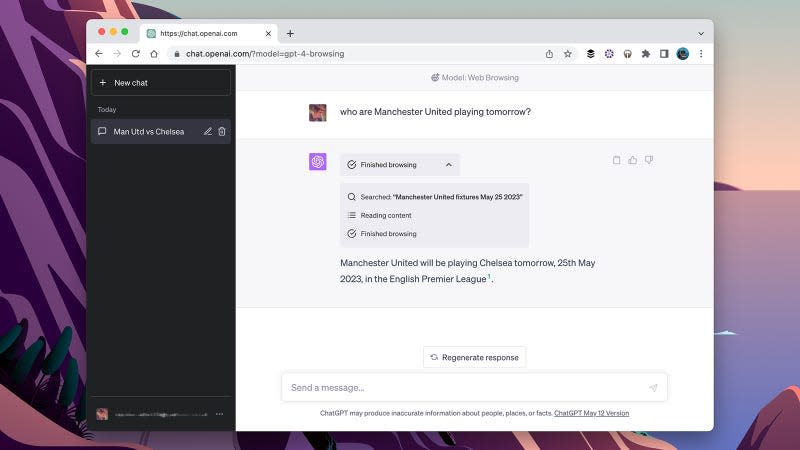
ChatGPT can check the web for sports matches, for example.
This feature is still in beta, and it can be slow—especially for lengthy, complex queries. It currently works best for short and snappy questions, the sort that would get a simple answer from Google. For example, ChatGPT told us about upcoming soccer fixtures, and where each team was in the current league standings when we searched. It knew where to find the information and how to parse it, although we hope the bot eventually gets better at searching for things you couldn’t easily find yourself.
You can also point ChatGPT towards specific URLs and get it to summarize or paraphrase the information that it finds there (though in some of our tests, the summary was longer than the actual article). It’s a major leap forward in functionality for the chatbot, but bear in mind that inaccuracies and bugs can still creep in—you do need to double-check the information that you’re given.
How to use plugins with ChatGPT
The other significant step forward for ChatGPT in recent days has been the introduction of plugins, so you can try out what other developers are building on top of the chatbot. Start a new conversation with ChatGPT, pick GPT-4 as the model you want to use, then select Plugins from the submenu underneath.
When you do this for the first time, you’ll see a message telling you that no plugins are enabled, up at the top of the conversation. Click this message, then pick Plugin store to see what’s currently available—choose All to see every plugin on offer, or Popular to see the best ones. At the time of writing, more than 120 plugins are available.
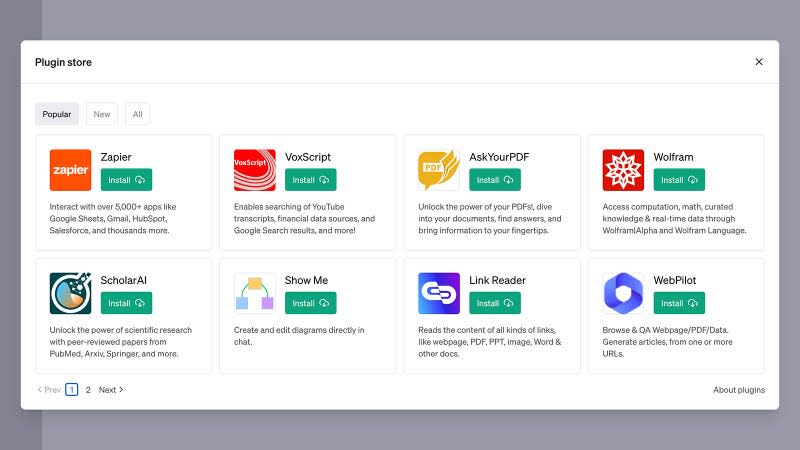
There are already dozens of plugins available.
Scrolling through the ChatGPT plugins is a bit like scrolling through browser extensions: There are some good ones and some... not so good ones. Travel is well represented, with Expedia and Kayak plugins that can help you with vacation planning and booking. There’s also a plugin for Wolfram Alpha, as well as plugins that can parse information from links and from videos.
You can install as many plugins as you want, but only three can be enabled at any one time: This is done via the drop-down submenu where you choose Plugins rather than Default or Browsing. Unfortunately, it’s not that easy to tell what specific plugins can actually do for you, beyond installing them and testing them out—they come with short descriptions, but these can lack detail.
ChatGPT should know automatically which plugin to use, if any, based on your query—and you’ll still have all the standard power of GPT-4 at your fingertips (the plugins work in addition to the core functionality). We tried the Link Reader plugin successfully, for example, and it was able to report back the contents of a particular article that we referenced accurately enough.
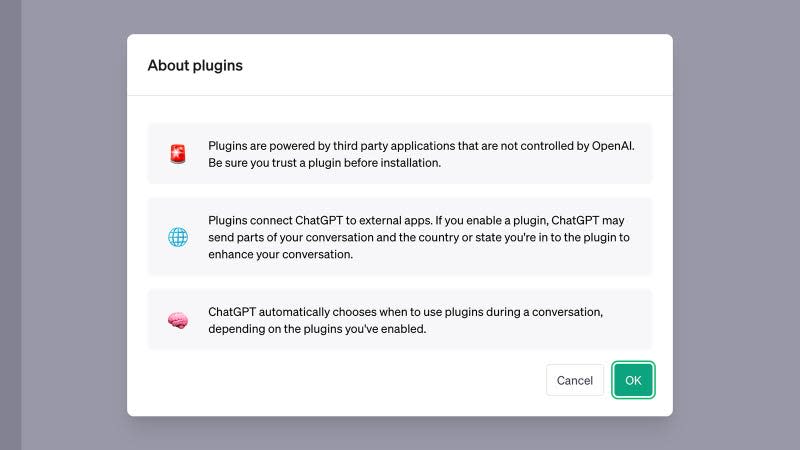
As ChatGPT will tell you, you need to trust the plugins you install.
The Expedia and Kayak plugins are perhaps best for understanding where plugins could take ChatGPT—though you can’t use them in tandem, because they cover the same sort of ground. Input some of the details about a trip you’re planning, and the plugins will help you plan and book it, all through the ChatGPT interface. If more clarification on dates or prices or preferences is required, you’ll be asked—it’s like working with an AI-powered travel agent.
Take heed of the warning that comes up when you first enable plugins: As with browser extensions, you need to be sure that you trust individual plugins and be careful with the data that you give them. Be wary of installing plugins from developers you’ve never heard of, especially if these plugins want to take significant actions on your behalf.
More from Gizmodo
Sign up for Gizmodo's Newsletter. For the latest news, Facebook, Twitter and Instagram.

