A Simple Mobility Routine for Happy Joints
This article originally appeared on Outside
Mobility encompasses all the features of a healthy joint: flexibility, stability, elasticity, strength, and coordination. Good mobility has cascading positive effects--hip and ankle mobility can help resolve knee and lower-back pain, spinal rotation helps us access powerful parts of our bodies as we run and twist--while poor mobility can lead to pain and injury.
Our joints act like springs, offering shock absorption and elastic rebound. And for springs to be powerful, they need to strike the right balance between laxity and stiffness. Mobility training helps us fine-tune this balance. If you take inventory of your body every day, before or after you work out, you'll start to learn where your limitations lie. Where are the springs too loose? Where are you restricted or hypermobile?
Mobility training is more than just passive stretching--it isn't just a matter of flexibility, and you don't gain joint mobility through stretching or foam rolling alone. In addition to stretching and myofascial release techniques, one of the best ways to improve mobility is to train with resistance and use your muscles to actively bring the joints through their full range of motion. Addressing joint limitations requires a targeted approach that biases those places where a joint (or a series of joints) needs to roll, glide, slide, pivot, or hinge. Joint-mobility exercises often use bands, anchors, light weights, and trigger-point balls, which help to more specifically target the joint(s) of interest.
Everyone is unique in their mobility, influenced by things like injury, genetics, and lifestyle, so it's important to assess your own range of motion to determine which areas need more strength and stability and which need more stretching and flexibility. You can receive a thorough mobility assessment from a local trainer, a physical therapist, or an online consultation with a coaching service.
The moves presented here provide a gentle way to begin the self-assessment process, working from the ground up with ankle mobility all the way through the spine and shoulders. If you're new to this type of mobility work, ease into it, introducing load and speed gradually. If you feel pain during an exercise, reduce the range of motion or the force or load being used. Adjust the movement to work for you.
The Moves
Ankle Dorsiflexion Mobilization with a Band
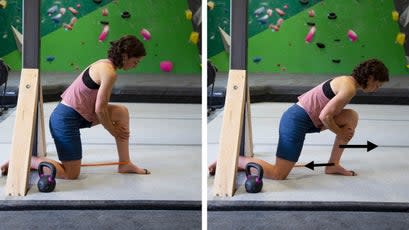

What it does: This move increases ankle dorsiflexion: the front-to-back plane of movement, which is critical for running, walking, squatting, skiing, and more. If an ankle doesn't bend well, other parts of that foot and leg will compensate--which can contribute to foot problems like hammertoe and bunions, as well as issues in the knees, hips, and spine. An ankle injury can impede dorsiflexion long after the injury heals. Good range of motion in the ankle gives us more elastic potential in the Achilles tendon, which is helpful when running and jumping.
Typical ankle dorsiflexion is anywhere from 15 to 30 degrees of forward bending while bearing weight, depending on influences like genetics, injury history, and use patterns. You can measure yours with a simple knee-to-wall test, outlined here. Having limited ankle dorsiflexion (usually less than 15 degrees) could show up as an early lift of the heel when walking uphill or squatting or difficulty going straight down steps without subtle compensations such as overpronating the foot to make up for the lack of hinging at the ankle joint. The goal is to have a functional and symmetrical range of motion in both ankles that is appropriate for the individual.
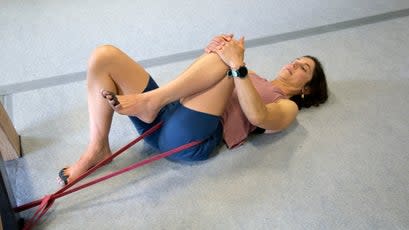
How to do it: Fix a thin, pull-up-assist-style resistance band with about 15 pounds of resistance a couple of inches off the ground. Start in a single-leg kneeling position, with the band looped around your front ankle. Use your hands to gently push your lower leg forward as you rock forward until your knee is beyond your toes. You should feel a stretch but no pain. To intensify, move farther away from the anchor point, or place a light weight on top of the thigh to help drive the heel into the ground and add pressure to the mobilization.
Volume: One to three sets of five to eight repetitions, holding for 5 to 30 seconds each. Perform this move anywhere from two to seven days a week.
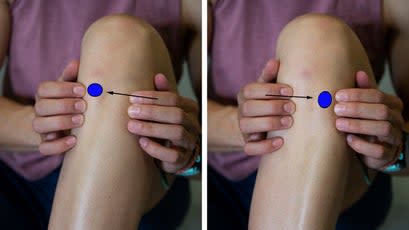
Internal and External Knee Rotation

What it does: Knee rotation is an often overlooked part of knee mobility. When the knee straightens, the larger lower leg bone (the tibia) subtly externally rotates. The opposite happens when the knee bends. If you're struggling with stiffness or pain in your knees during squatting, kneeling, running, jumping, or going up and down stairs, this could be an important plane of movement to evaluate and train. This move can help you take inventory and address rotational limitations by regularly performing the internal and external rotation action to its end range as part of your mobility training.
How to do it: Begin seated on the floor. Bend one knee to 90 degrees and hold the ankle at 90 degrees. Locate the bony prominence on the front of the tibia called the tibial tuberosity (located at the top of the shin; see the blue dot indicator, pictured above). Without moving your thigh bone or rotating through the foot or ankle, try to rotate your lower leg (shank) inward and outward as pictured. Your foot and ankle will follow the swivel of your shin. You may feel deep muscles working behind the knee, like the popliteus, which creates the inward rotation motion of the tibia. As you fully rotate inward and outward, you will know when you've gone far enough based on how your other knee functions and feels. Healthy joints have a feeling at the end range that's like pressing into a moist, pliable sponge versus a brick wall or a piece of leather. If one direction feels limited or stiff, then your goal is to condition it through movement and for your end-range stretch to become hydrated and extensible.
Volume: Perform one to three sets of five to eight repetitions on each knee, holding for 2 to 20 seconds at each end range. Do this one to five days a week.
Hip Mobilization with a Band on Four Planes
What it does: The hips are the powerhouse of the core and hold massive elastic potential in foot-powered and throwing movements--but you need mobility to access that potential, and the hips are also a major place of congestion and limited range of motion. Your day-to-day life likely isn't doing you any favors. Our modern environments are conveniently set up so we don't have to deeply squat to lower ourselves to the floor to sit, or reach very high or low to get things off of shelves, which means we can move through our everyday lives without using our full hip mobility. Sitting a lot, whether in your car or at your desk, doesn't help either. These static stretches use a band to apply decompressive force on the hip joint in a variety of directions by pulling the femur bone statically toward the anchor. By varying the direction of pull on the elastic band and changing the position of the leg, you can bias different areas of the joint capsule and other soft tissues.
How to do it: Fix a wide, strong elastic band (offering between 30 and 65 pounds of resistance) at an anchor point close to the ground. Once you find a deep, comfortable stretch in each position, hold for several breaths. Go to the point where you feel a good stretch, but not pain, gently nudging the joint into its end range of motion.
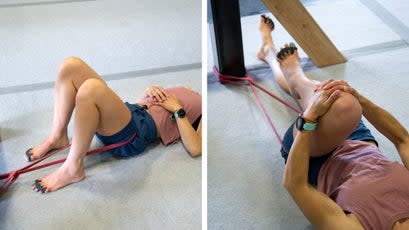
Hip Flexion: Lie on the floor with your knees bent and your feet on the ground. Place the band in the fold of your hip joint, where the thigh bone meets the pelvis. Orient your body so the band anchor is directly parallel to the direction of your spine (the band should be heading straight out from your tailbone to the anchor). Once the band is nestled into the hip fold, slowly bring your knee straight into your chest, using both hands to guide the hip into flexion. You are looking for a gentle stretch in your hip flexors, glutes, and upper hamstring, as well as a decompression deep in the hip joint and lower back. To intensify this movement, bring your knee closer to your chest or move farther away from the anchor point by scooting your whole body.
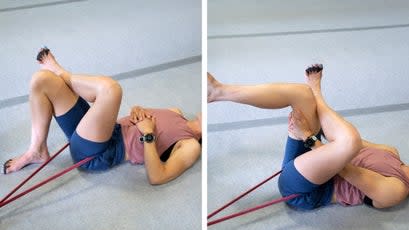

External Hip Rotation: With the band in the same position, orient your body so the band anchor is slightly perpendicular to the direction of your spine--you can adjust this angle depending on where you want to focus the stretch. Do this by scooting your whole body on the floor. Once you're settled on your angle and the band is nestled into the hip fold, slowly bring your hip out into a figure-four position, placing your ankle on the opposite thigh and opening your knee outward. Use both hands to guide the knee and foot to produce external rotation at the hip joint. You are looking for a gentle stretch in your hip flexors, glutes, and deep hip rotators, as well as a decompression force deep in the hip joint and lower back. To intensify this, move farther away from the anchor point by scooting your whole body, and adjust the depth and angle of the figure-four position.
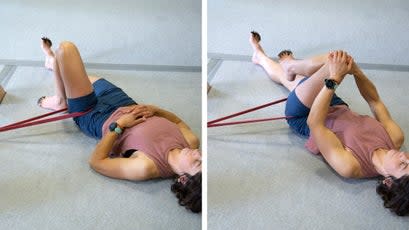

Hip Adduction: From the same position, slowly bring your knee toward the midline of your body. Use both hands to guide the knee toward your chest and across the midline. You may feel a gentle stretch in your hip flexors, glutes, and deep hip rotators, as well as a decompression force deep in the hip joint and lower back. To intensify this, move farther away from the anchor point and adjust the position of the leg.


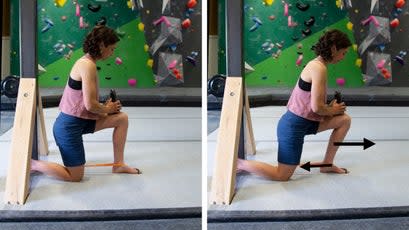
Hip Extension: Start in a single-leg kneeling position, facing the anchor point, with the band looped around your rear leg. Place the band in the crease of your buttocks where your hamstring meets your glutes. Orient your body so the band anchor is directly parallel to the direction of your spine (the band should be heading straight out in front of you, toward the anchor). Gently settle into a lunge, allowing the band to apply a pull on the femur toward the anchor. You will likely feel a significant stretch in your hip flexors and quadriceps. To intensify, deepen the lunge, press gently forward with your hand on your buttocks, or move farther away from the anchor point by scooting your whole body. You can also lift the corresponding arm, creating length and stretch along the entire side of your body.
Volume: Do one to three sets of each move, holding each for 5 to 60 seconds, varying the ranges of motion. Work through these stretches one to five days per week.
Standing Hip Range of Motion

What it does: These movements build strength and a range of motion in the hips. Strong and stable hip joints ensure good alignment all the way down the kinetic chain, helping you avoid injuries and issues like IT-band syndrome.
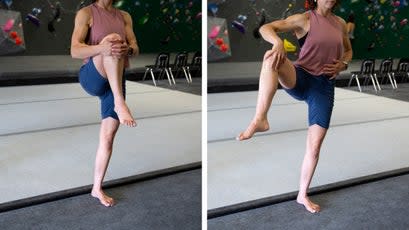
How to do it: Begin standing. Find your balance on one leg, supporting yourself with one hand at a wall if necessary. Guide the moving thigh into flexion, bringing the knee into the chest as much as is comfortable. Slowly lower the thigh to 90 degrees, then open the hip outward fully and slowly straighten the knee, attempting to hold the leg directly out to the side in while keeping your trunk upright. Next, turn the leg into internal rotation, pointing your foot toward the floor, and swing the leg slowly behind you into extension. Tip your trunk forward only as far as is necessary to maintain a straight line from your spine through your lifted heel. Return to start position. Ideally, you should be able to lift your hip until your thigh touches your chest; hold the leg out to the side at hip height, and lift your leg into extension at hip height behind you. Feel free to support yourself with your hands at the end of each movement.
Volume: Do one to five reps of this move on each hip, holding each position for a few breaths. Perform this move one to five days a week.
Spinal Rotation with External Shoulder Rotation


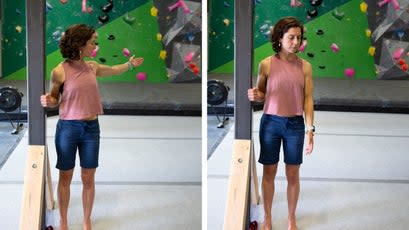
What it does: This move helps build rotational mobility in the spine and shoulders, and it offers a stretch in the shoulders as well. The hips and one shoulder are anchored, which isolates the movement to the spine and opposite shoulder, and pressing into the wall adds isometric strengthening for the rotator cuff. Spinal rotation is important in many everyday movements, like running: think about how one shoulder stretches behind into extension and then is elastically propelled forward with every other stride. This small spinal rotation helps keep us moving forward with elastic energy.
How to do it: Begin standing perpendicular to a wall, with your feet hip-width distance apart. Place the inside arm against the wall with a 90-degree elbow bend. Actively press that arm into the wall, creating a static external rotation force. Keep your pelvis and hips squared forward. Raise your outside arm in a windmill motion: in front of you, overhead, and then behind you. Simultaneously rotate your whole spine away from the wall, leading with your sternum. Return to the start position and repeat.
Volume: Do one to three sets of five to ten repetitions on each side, holding for a few breaths wherever you feel tension or stiffness. Perform this move one to five days a week.
Esther Smith, a doctor of physical therapy certified in mechanical diagnosis and therapy, has specialized in treating athletes (specifically rock climbers) for the past decade. She is a storyteller, mountain athlete, and high-performance coach for the Samsara Experience. You can find Smith's written and video resources cataloged at Grassroots Self Treatment and learn more about her physical-therapy practice at Grassroots Physical Therapy.
For exclusive access to all of our fitness, gear, adventure, and travel stories, plus discounts on trips, events, and gear, sign up for Outside+ today.
