Straw Bale Gardening Is a Huge Trend This Summer
Summer brings plenty of sunshine, making it the perfect time to get outdoors and garden. If you've been itching to try new gardening methods, you'll want to dig deeper into straw bale gardening—a form of container gardening. All you'll need are your favorite gardening tools, straw, and of course, some elbow grease.
What is straw bale gardening?
Straw bale gardening, also known as bale gardening, is a technique that allows you to create a substantial but temporary garden almost anywhere. When you grow your own straw bale garden, you’re essentially planting seeds into bales of straw that require frequent watering. If you happen to have a sunny driveway, access to an empty lot, or a sturdy rooftop, you can use it as the spot for your summer garden.
A post shared by Straw Bale Gardening Australia (@strawbaleau) on Jul 15, 2019 at 6:46pm PDT
This form of container gardening is considered one of the less physically intense versions of the activity, which is ideal for individuals who experience mobility issues or have back pain. Throughout the summer, the straw will slowly decompose, feeding plants and veggies in the process, and by the end, it can be turned into mulch for later use.
How do you start a straw bale garden?
When starting a straw bale garden, it’s crucial to use bales of real straw and not hay—the two are not interchangeable. The best source of straw bales are local farms, though they are also available at nurseries and feed stores (decorative bales from craft stores are not recommended). In addition, you’ll also need: fertilizer, potting soil, compost, a trowel, seeds or seedlings, and optional wire fence.
Once you have selected a spot to put down your straw bales and have arranged them to your liking (with the strings running along the sides), you’ll need to start prepping them. But before doing so, make sure that your straw bale garden isn’t placed on a wood surface you like (i.e. a beautiful deck) because the constant dampness could cause the wood to rot.
A post shared by Straw Bale Gardening Australia (@strawbaleau) on Jun 10, 2019 at 6:35pm PDT
The first step in prepping your straw bale garden is to decompose the inner straw by fertilizing and watering for 10 days. First, generously placing all-purpose fertilizer on the top of the bales. Next, you need to water in the fertilizer, taking your time to fully saturate each bale—this will need to be done every day for several days. Before watering your bales every day, you must add more fertilizer on top. Lastly, mix together your potting soil and compost, then put it on top of the bales, creating a 2 to 3-inch thick layer. This will help you plant seeds and seedling in the bales.
What can I grow in a straw bale garden?
A post shared by Straw Bale Garden By Ann (@annsstrawbalegarden) on May 8, 2018 at 7:22pm PDT
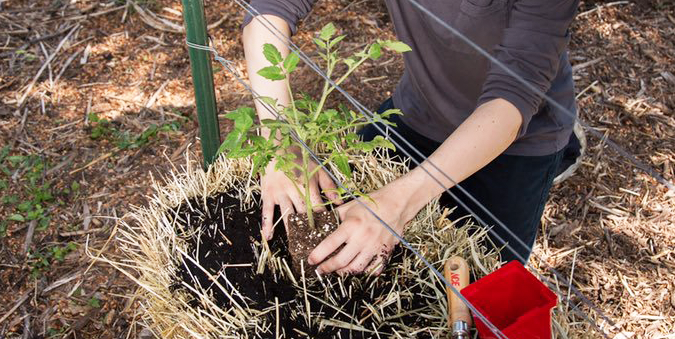
When your straw bale garden is all set up and prepped, it’s time to start planting your seeds or seedling. Take your sharp trowel and stick it into the top of a straw bale, then move it back and forth to make a spot for your seed or seedling. Make sure you put plants as deep as they would be in their nursery pot and seeds can be planted as normal (following the packet’s instructions). It’s ideal to place taller plants towards the back of your garden to prevent them shading smaller ones in the future.
A post shared by Straw Bale Gardening (@strawbalegardening) on Sep 18, 2015 at 12:43am PDT
Over the next several weeks, your straw bale garden will begin to bloom with the plants, herbs, and vegetables of your choice. It’s important to regularly water your bales to keep them moist, especially during the summer. Gardeners are recommended to water in the mornings, directing the water towards the bales and not the leaves. Straw bale gardening lessens the chances of drowning plants because excess water will simply drain out from the bottom of the bales. And of course, fertilizing is still necessary.
Follow House Beautiful on Instagram.
('You Might Also Like',)

