How To Take The Ultimate iPhone Night Photos, According To Photographers

Imagine you’re driving through a beautiful cityscape with a skyline or visiting natural landscapes where wonders like the Northern Lights and Milky Way are visible. Chances are, you’ll want to take photos of the stars and the moon, or of the reflections of city lights, especially at nighttime. With advances in technology and the popularity of photography, more people are exploring the world of night photography and capturing stunning images in the dark — and all you need is your iPhone.
Taking night photos with an iPhone can create some stunning images, but only if done correctly. Whether you’re shooting a monument or a nighttime family gathering, capturing the right amount of light is essential to getting a great shot. We spoke to professional photographers to gather some tips on technology, technique and creativity to help you take the ultimate iPhone night photos.
1. Turn on Night mode and adjust your settings

Night mode can be found next to the flash icon.
Remember to turn on Night mode (it’s that moon-looking thing in the upper left corner of your camera app), a feature available on iPhone 11 and later models, and to adjust its settings like exposure time and speed.
Although Night mode sets exposure time automatically, you can also manually adjust it to get the results you want by swiping up or down on the screen. If you swipe up, the exposure time increases, making any photos you capture brighter, but if you swipe down, the exposure time decreases, making any photos you capture darker.
“Unlike professional cameras, iPhones adjust settings like ISO (which refers to the sensitivity of the camera’s sensor) and shutter speed automatically, but sometimes the settings are off, so you might not get the result that you were looking for,” said Sehee Kim, a professional photographer with Flytographer, a concierge service that connects local photographers all around the world.
“Remember to manually change the settings on your phone, by swiping left on the camera app and tapping the moon icon. Don’t rely on the auto settings all the time.”
Photographer Andrew Ling, who has been in the industry for nearly a decade, noted you can also adjust your camera’s exposure setting when not in Night mode by holding your finger down on the screen when you are focusing on your subject, prior to snapping your pic. This will trigger a square box, and you can then increasing the exposure level by swiping your finger up or down when the sun icon appears.
2. Use a tripod and external lighting
If you don’t have a steady hand, you might want to consider purchasing a tripod to help you. They come in a range of sizes and prices, but any inexpensive tripod can help keep your iPhone stable to capture clear images even in dimmer lighting.
According to Kim, to avoid grainy photos of yourself in surroundings that are especially dark, you can use illuminating light objects like battery powered string lights positioned near your subject’s face, or surrounding areas like storefront or neon signs.
“You can get beautiful photos by illuminating the face and body!” Kim adds. She recommended these Amazon string lights because of how bright they are. An added benefit, according to her, is that the battery part is small which means it won’t show up in photos and distract from the subject.
3. Avoid using the flash
It might sound counterintuitive, but the flash on your iPhone camera is not always the best option for night photos because it can wash out details in your photos or cause bright spots that will take away from the image you are trying to capture. Some natural light will definitely enhance your photos, which is why Kim also recommends lowering the shutter speed on your phone to allow more light into the photo and avoid harsh shadows.
4. Use the Live Photo feature
The Live Photo feature can be great for foggy nights, said photographer Andrew Ling.
According to Ling, your iPhone’s live photo setting is a great way to create a “new age” form of memories because it is a cross between a photograph and a video. It captures moving images that can later be converted to a short video clip.
Plus, it works great for night photography because the live photo feature also doubles as a long exposure technique to create effects like light trails or to get a beautiful glowing effect from city lights.
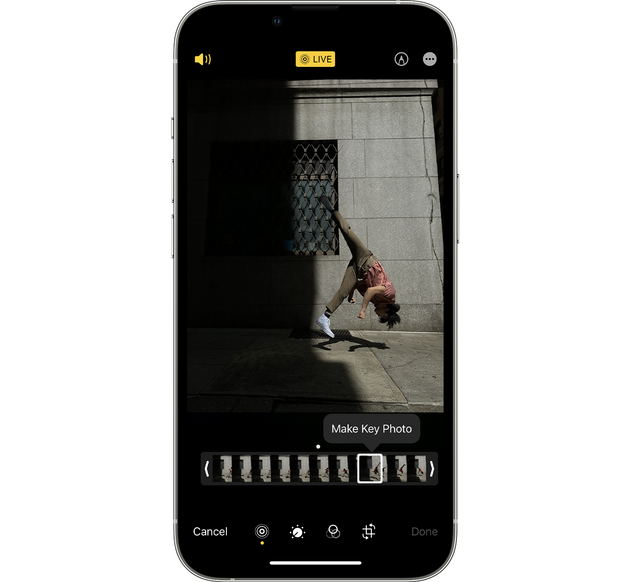
“Plan before you shoot your live photo,” Ling suggested. “One of the biggest benefits comes in the editing options after the photo is taken, where you can choose the ‘Key Photo’ or you can turn it into a loop, etc. Just select the live photo in your Photos app, and find these options in the top left dropdown menu.
“Pro tip: Try this effect on a foggy evening.”
According to Ling, newer iPhones automatically go into Night mode, which will be disabled if you turn on Live Photo mode, so be sure to choose the mode that works best for you to capture the shot you desire.
5. Edit your photos
Your instagram feed may be littered with blurry photos (there’s definitely an aesthetic model for it), but if you aren’t into that, you can experiment with editing your photos. In addition to the editing functions in your iPhone’s Photos app, secondary apps such as Adobe Lightroom, VSCO and Snapseed can adjust the brightness, contrast and saturation to make your night photos pop.
“Play around with the contrast levels, and highlights and shadows, until you get the look you are happy with! Photography is art — have fun with it,” Ling added.
